
Hi Everyone! This weekend is another Five for Friday with Tammy Tutterow. Join 5 design team members to get some inspiration for your weekend crafting. For my project, I created a Valentine card for my hubby that will contain a secret love note. To create the card, I used Tammy's Paper Bag Envelope die. I'll be slipping a gift card to one of his favorite steak houses in there too. Below is a tutorial where I show you how I put this card together. Enjoy!


You can find out how to put together the paper bag envelope here. After putting together the Tammy Tutterow Paper Bag Envelope die, I covered the front panel with Tim Holtz Melange Tissue Paper by adhering it with Ranger Multi Matte Medium.


I cover both the front and the back of the paper bag envelope and completely dry it using a heat tool.

I add the Tim Holtz Speckles and Mini Concerto stencils with Wendy Vecchi White Embossing Paste. to the top and bottom of the envelope. When the embossing paste is completely dry, I ink over the envelope with Simon Says Stamp High Dive, Lemon Zing and Duckling dye ink. I apply the inks in random areas using a mini blending tool.

I add a bow made from crinkle ribbon. To form your bow, I have created a step-by-step tutorial that you can find here.
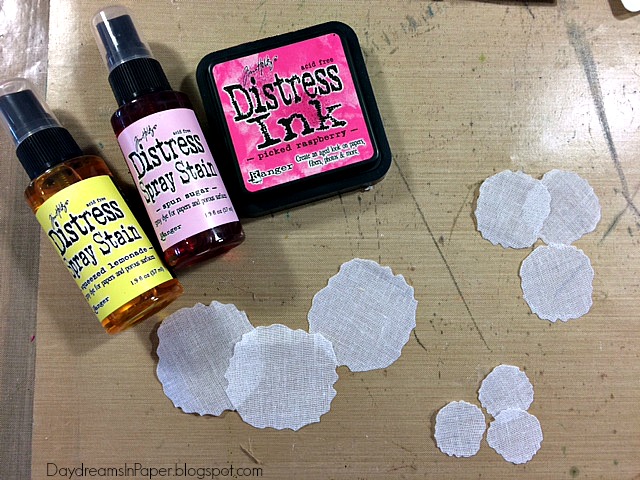
I use the Tammy Tutterow Pom Pom Posies die to create the flowers from crinoline fabric. I cut three of each of the sizes of petals to make three different sizes of flowers.

I use Squeezed Lemonade and Spun Sugar Distress Spray to color the large and medium set of petals. For the smallest set of petals, I use Picked Raspberry Distress Ink mixed with water and run the petals through the ink mixture to color them.

My flower petals are colored and dried and ready to be shaped.

I one petal at a time into thirds and put a few stitches in the bottom to hold the shape. I continue adding the other two petals by shaping them and adding them one to another until the flower is complete.

I add three small stamen to the center of the flower.

I assemble the yellow and dark pink flower in the same way.

I create a heart from the Tim Holtz Mini Hearts die cut from Neenah Solar White 110 lb. card stock, I cover it with the same tissue paper as I used on the envelope and when that is dry I color it with Worn Lipstick Distress Crayon pigment and ink the edges with Vintage Photo Distress Ink.

I create the inside note from the die that comes in the paper bag envelope die out of Neenah Solar White 110 lb. card stock and ink the edges with Vintage Photo Distress Ink. I cut some patterned paper from the Tim Holtz Menagerie 8x8 paper stash and add that to the center of the note. The lines on this particular piece of patterned paper are perfect for the secret note I want to include on the card. I add the heart with a small key and wrap that on the note card with May Arts burlap twine.

At the top of the note card, I add a We R Memory Keepers Eyelet.

To complete the note card and so that it is easy to pull out of the envelope, I add a tassle at the top.

I add the flowers to the center of the bow and some petals from the pom pom posies die set. My sentiment is from the Tim Holtz Crazy Talk stamp set stamped onto one of the tabs from the Tammy Tutterow Shortie Tabs die set. I will add the gift card inside the envelope along with my secret note and have a beautiful Valentine to give to my wonderful husband.
I hope you enjoyed seeing how I create the Paper Bag Envelope Valentine and that you got some inspiration for your next project. Thank you so much for stopping by and spending some time with me today. I really appreciate that you took time out of your busy day to take a look at my card. I'd love to hear from you so please leave a comment below if you'd like.


Such a beautiful project , I love the colour combination. Thank you for the inspiration.I really like your style of card making x
ReplyDeleteWOW! so sweet & whimsical :-) I am following you now ~ so happy I found you!
ReplyDeleteSwooon! I addoooore this textured card with depths of color. It's still romantical while being masculine. Great design!
ReplyDeleteOh, this is absolutely lovely.
ReplyDeleteYou are certainly wowing me with your designs for TT! Love this project to pieces. Hugs, Autumn
ReplyDelete