It's time for a new challenge on the Simon Says Stamp Monday Challenge. I hope you're ready to get inky and join us this week where our theme is, Based On A Book. My inspiration came from the book, "Beauty and the Beast". In the book, there is no enchanted rose. However, when this book was made into a Disney movie, which was based loosely on the book, there was an enchanted rose, so that is where I got my inspiration. Enjoy!
I start by cutting a 4-3/4" x 6-1/2" piece of canvas paper and lightly ink on Shabby Shutters and Bundled Sage Distress Inks using the darker color around the outer edges working toward the middle with the lighter color.
Next, I randomly dry brush on Shabby Shutters and Bundled Sage Distress Paint and blend it in lightly using a baby wipe. I make sure to leave some edges visible.
When the paint is completely dry, I stamp on flourishes with the Tim Holtz Flourish background stamp. I don't want a very dark image of the flourishes, so I use the second generation stamping technique. I ink the stamp in a small area with Black Soot Archival Ink and stamp that off onto a piece of copy paper. I then stamp the image onto my canvas paper without re-inking the stamp. This will result in a faded image on my canvas paper.
Next, I add splatters of Black Soot Distress Paint onto the canvas paper. I dilute the paint with a little water and mix it with the Tim Holtz Splatter Brush. Using that same brush, I flick the bristles over the panel to produce small splatters. For the larger splatters I very gently whip the bristle toward the canvas. This is fun because you never know what you're going to get since it is impossible to completely control where the splatters will end up.
When my canvas panel is completely dry, I mount that onto a 5" x 6-3/4" piece of My Favorite Things Jelly Bean Green card stock.
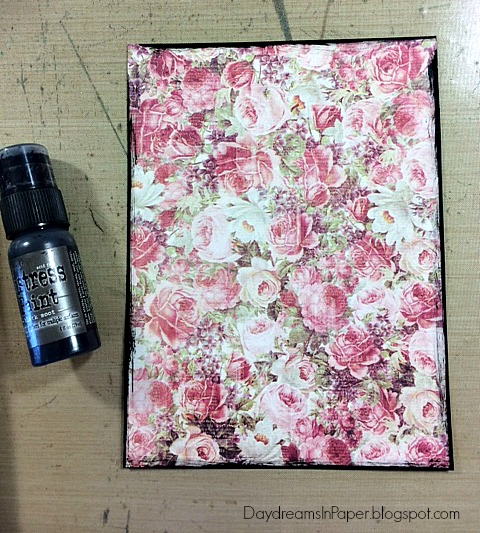
For the base panel, I cut a piece of 5-3/4" x 7-3/4" piece of card stock from the Prima Tales of You & Me 8x8 paper collection. I paint the edges with Black Soot Distress Paint with the dauber top by running it along the edges of the card stock.
I mount my canvas panel onto the patterned card stock panel with double-sided tape.
I create a trellis element for my panel by cutting the Tim Holtz Trellis Frameworks die out of one of the patterned card stock papers from the same Prima paper pad and ink the edges in random areas with Aged Mahogany Distress Ink.
I cut the trellis shape out of chipboard as well for dimension by adhering the patterned paper trellis over the chipboard trellis and adhere that to the side of my canvas paper panel. I'm now ready for the focal point piece which will be the vintage rose image.
I distressed the edges of the focal image with the Prima distressing tool and inked the edges with Black Soot Distress Ink.
To complete my piece, I adhere the vintage rose image onto a deep burgundy piece of card stock and adhere that to the upper center of the panel. I created "enchanted rose" that I printed onto cream colored card stock from my printer using Word with the Informal Roman font. I cut it out and inked the edges with Black Soot Distress Ink and adhered that to a small strip of black card stock. I wound some May Arts Burgundy burlap twine around the panel and adhered the sentiment to the center of the twine. I thought it looked a little plain but I stuck with the simplicity remembering that, in the book, Beauty, was a women of simple elegance.
Thanks for sticking with me this far through the post. I hope you enjoyed seeing the process I used to create my mixed media Enchanted Rose canvas panel. Please join us in all the fun and add your project to Simon Says Stamp's Monday Challenge Blog for your chance to win a $50 gift voucher to their amazing store.
For more inspiration, tips and tricks for all types of papercraft creations, follow Simon Says Stamp on:
You can find all the following supplies I used to create this project at Simon Says Stamp: