Tuesday, October 28, 2014

Peek A Boo Christmas

Today I made a card using a variety of Lawn Fawn Stamps.  I know most of my recent blog posts have been cards made with Lawn Fawn Stamps and yes, I do own other stamps from other companies but I'm having so much fun mixing and matching these stamp sets that I'm on a roll.  I have been making cards for kids who are in the hospital over the holidays and I wanted to make something that would speak to a child and make them smile (maybe even giggle).  I thought having the animals peek out from the tree and underneath the snow would do just that.  I hope whoever receives this card enjoys it as much as I enjoyed making it.  If you are interested in sending cards to children who are in the hospital, please check out Cards for Hospitalized Kids.  A list of all the stamps and dies I used are listed below.


Lawn Fawn Lawn Cuts - Forest Border  (I used this die to make the icicles.)

Friday, October 24, 2014

Craft Supplies Rewind #2

Simplicity, this card is just that.  Each year stamp companies come out with new sets of stamps, dies, paper collections, etc.  I want to be sure that I don't just use them for that season and store them away never to be used again.  I make a point to go back to past releases and use the beautiful stamps I purchased.  In this way, I can enjoy them year after year instead of looking at my collection with regret and feeling as though I wasted my money.  I used last year's Lawn Fawn Peace Joy Love stamp set along with their Tag, You're It, dies.  It's pretty traditional in color and style and I love bright Christmas colors like those found in the Snow Day paper collection.  By combining their new paper collection with last years stamp, I remember why I purchased this beautiful stamp.  No regrets here!   Enjoy!


Tuesday, October 21, 2014

You Warm My Heart

What's cuter than a snowman........two snowmen!  I just love snowmen and at Christmas my house is filled with them.  I haven't found one yet that didn't make me smile.  When I look at them they all seem to have a unique personality and it warms my heart.  As the stores fill with Christmas decorations, the first thing I look for is a new snowman to add to my collection so when I saw Lawn Fawn's stamp set "Making Frosty Friends", I knew this was a stamp set I HAD to own.  I have so many ideas for cute winter scenes in my head for these adorable stamps and this is the first card I've made using this set this year.  Enjoy!


Thursday, October 16, 2014

Winter Wonderland

Today I made a card using non traditional Christmas colors.  I love the combination of blues and browns and couldn't resist after I colored the trees.  I did sprinkle in a little red to make it a bit more festive and reminiscent of Christmas though and I think it's just the touch it needed.  I used quite a few different Lawn Fawn stamp sets to create the scene.  I just love these stamps and I really enjoy mixing them up.  The cute little fox and squirrel look as though they've been caught sneaking a peak at their presents.  I know it's a bit early to be thinking about Christmas.  For goodness sake, it's only October, but I couldn't resist getting started on my Christmas cards for hospitalized kids when I saw the new Lawn Fawn stamps.


Wednesday, October 8, 2014

Craft Supplies Rewind - #1

Do you  ever find yourself looking around your craft room with your jaw dropped and hands on your head saying to yourself, "What am I ever going to do with all this stuff??"  Well, try not to be too hard on yourself, we've all done it.  A new release comes out and we must have it ALL!!  We fall in love with how the designers for each company use the new products and we have some ideas on how we'd like to use the new products ourselves.  The result.........our stash gets bigger, and BIGger and BIGGER.  Well, have no fear, you fell in love with those products for a reason and they want you to dust them off and give them another go around.  This is something I'm planning on doing on a regular basis so I use all the beautiful products I bought and remember why I fell in love with them in the first place. I mix some of the old with some of the new.  I've done this a few times and it's really a great feeling because then we can look around and say to ourselves (and our family and friends), "Yep, I use all this stuff you see before you!!"


Verve Stamps - Emery (Release Date 2010)

Verve Stamps - To The Moon (Release Date 2010)


Gina K Designs - Happy Hearts (Release Date 2009) - No longer available.


Paper Artsy - Jofy Large Set 13 (Release Date 2013)

Monday, October 6, 2014

Songs In Winterland

I hope you all had a wonderful weekend making cards on Saturday, World Card Making Day.  It's a fun and exciting time to see all the new stamps and products that come out from all the different manufacturers and see what everyone creates with them.  Today, I made a card using Lawn Fawn's Snow Day paper collection along with the Snow Day stamp and die sets.  I absolutely love these stamps.  The bunnies are sooooo cute!!  When I took the stamps out of the package I noticed little musical notes and thought it would be cute to have the bunnies playing some instruments in a joyous little song to sing in the holiday season that's before us.


I used a Tim Holtz Retractable Craft Scratcher to distress the hills of snow to make it look as though there was real snow on the card.  


I drew the clarinet and saxophone by hand on white cardstock and cut them out.  I then colored them with Copic markers.


Thanks for stopping by!


Lawn Fawn - Joy To The Woods Clear Stamps  (Star on top of Christmas tree)


Friday, October 3, 2014

Ho, Ho, Ho

Hope you all had a great week!  Today I'm sharing with you a card I made using Mama Elephant stamps and dies.  It's for their October Challenge.  First, I used the Tags A Lot Creative Cuts dies to make the base of the card and for the borders I used Landscape Trio Creative Cuts.  This die set allows you to create fabulous hills, snow drifts, clouds and so much more.  I used their Cozy Christmas Stamp Set to create the adorable Santa holding a gift and Christmas Tree. These stamps took no time at all to cut out because I used the Cozy Christmas Coordinating Dies, which made it a breeze.  The string of lights on the tree is from a Lawn Fawn stamp set called Trim The Tree, which also has a coordinating die set.  I embossed some snowflakes in the background along with some little snowflake die cuts from Cheery Lynn Designs and gave a few of the snowflakes some sparkle with rhinestone dots.

Congratulations, Mama Elephant on your 2nd Anniversary.  I wish you many, many more years of success!

http://mamaelephantandme.blogspot.com/2014/10/october-challenge.html


Wednesday, September 24, 2014

Halloween Cards and A Great Organization

I love Halloween and making Halloween cards is so much fun.  My kids are past the trick-or-treating stage and just love to give out candy and see all the costumes other kids are wearing.  I have to confess, I don't make them Halloween cards any more.  I use to fill them with gift certificates and they loved all the spooky stamps and colors.  I don't have any grandchildren.....yet, so I didn't know what to do with the Halloween cards I made this year. I looked around the Internet and found a really great website called "Cards for Hospitalized Kids".  If you love to make cards and they seem to pile up and sit on a shelf, this is a great organization to spread some joy to a child going through an illness.  Here is the link: Cards For Hospitalized Kids


Friday, May 9, 2014

Time To Relax

I'm still working on polishing my Copic coloring skills and today I used a digital stamp from Tiddly Inks called "Wryn - Beach Babe".  I pulled the colors from a My Mind's Eye paper collection called "Memorable" and embellished it with a seashell from Prima Shabby Chic Treasures - Sea. This image reminds me of my daughter when she was little and brings back memories of traveling to my brother's beach house in Mexico.

Thursday, May 8, 2014

Seashore Journal

My daughter, Emily, loves the ocean, sea life and anything having to do with the beach.  I created this journal for her because she also loves to write.  I used Prima's Seashore Collection embellishments, Ingvild Bolme resins and some other embellishments from her collection.  I found a blank journal at Target and thought it was the perfect size.  I hope she enjoys this journal as much as I enjoyed creating it for her.

Products used:

Sizzix Movers & Shapers - Tim Holtz - Tag & Bookplates
Webster's Pages Trim
Seed Beads

Thursday, April 24, 2014

Garden Birdhouse


Today I want to share with you a birdhouse I made for my Mom for Mother's Day.  She has a collection of birdhouses and I hope she likes the one I made for her.  I used a plain dark brown wooden birdhouse I found at a grocery store.  It was on a clearance rack outside on their patio and I envisioned a beautiful little garden house when I saw it.  I painted it with Martha Stewart multi-surface satin paint in Scallion and used sand paper to "weather" the wood after it dried.  I wanted it to look distressed and worn.  I added some miniature pieces like a wheelbarrow, pots and a metal bicycle.  I used several Cheery Lynn Designs dies, a Spellbinder's die, I Am Roses flowers along with other fun accessories to create this garden birdhouse.


I created a trellis along the side of the birdhouse with Tim Holtz Alterations Trellis Die cut out of grunge board and used Cheery Lynn Designs Ivy Corner Flourish  and 
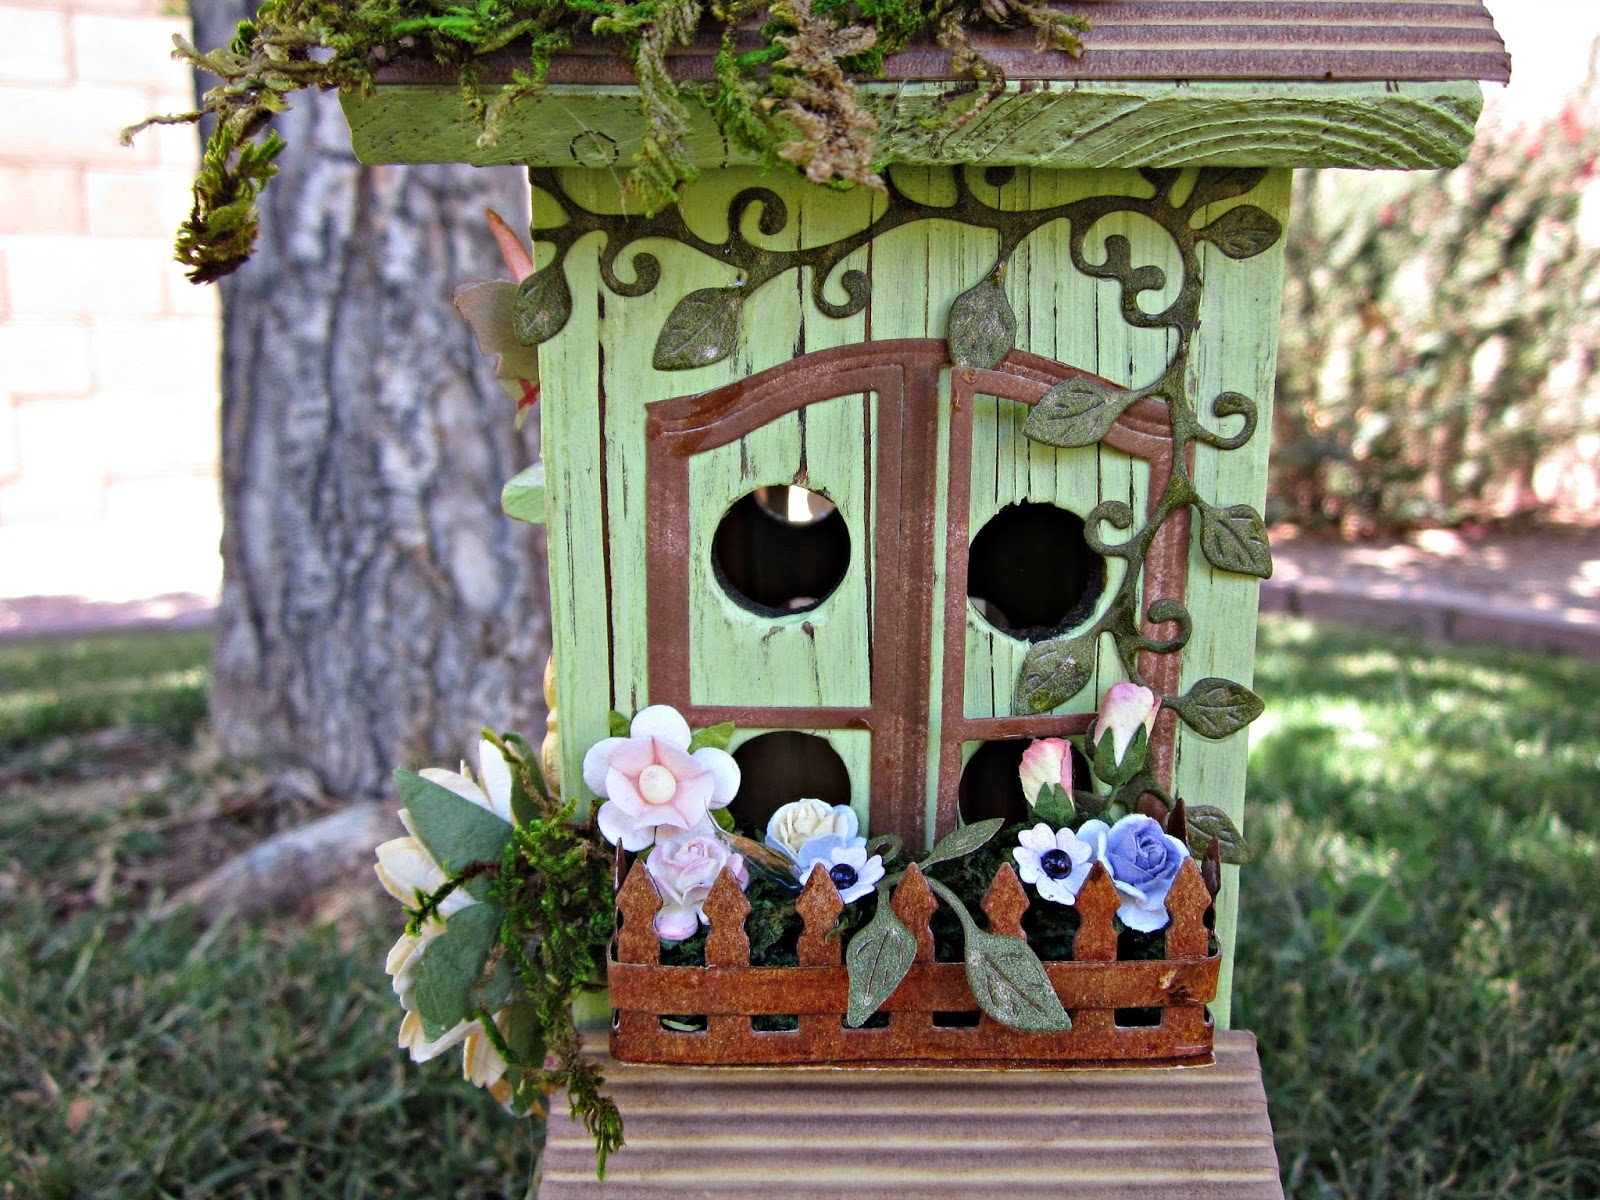
Ivy Strip woven throughout the trellis.  I painted the trellis with distress paint and distressed the edges with distress ink then sanded it to give it a worn look.  The window box was created using Cheery Lynn's Victorian Picket Fence die that I cut down a bit to size for a window.  I filled it with moss and flowers over Spellbinder's Windows Two.  I removed the decorative piece at the top of the window for a more farmhouse type look.


 Here you can see a close up of the window box.


I created a topiary tree using a miniature pot filled with moss, a wooden dowel for the stem of the tree and formed a small ball using Crayola's White Model Magic.  I couldn't find a small enough styrofoam ball and the model magic worked perfectly because I could create just the right size I needed for the tree.  The model magic was wonderful to work with because it is so pliable before it dries and doesn't crumble like styrofoam. I covered the model magic with I Am Roses mini roses in hues of purple and pink. 


Using miniatures added character to the birdhouse.  I filled the wheelbarrow with a bouquet of fresh cut flowers tied with a bow.  The miniature pots were painted with Tim Holtz Distress Paint and then sanded to give it a worn look.  I filled the pots with moss and I Am Roses rose buds.

I also added more miniatures, the metal "Bloom" sign was painted with Tim Holtz Distress Paint in Spun Sugar and then sanded.  I added moss and more I Am Roses flowers to the bucket and wove the rose buds up the sign post.  In the other bucket I added miniature garden tools which I fell in love with when I saw them at the store.  The butterfly was created using Tim Holtz Alterations Butterfly Frenzy.  This is a great die because you can create several butterflies with one die in several different shapes and sizes which can be layered.


On this side of the birdhouse I used Cheery Lynn's Shuttered Window with Flower Box but on this side I did not create a flower box.  I wove some burlap string through the shutters and added a tiny shirt and a pair of pants that look as though they are blowing in the wind on the clothesline.  The squirrel was created using Cheery Lynn's Birch Tree with Cute Critters.  More I Am Roses flowers were added with moss.  The bicycle is a another miniature I found with an adorable basket attached over the handle bars that I filled with moss and flowers.  I painted the bike using Tim Holtz Distress Paints.

Below is a close up of the bicycle and lower side of the birdhouse.


Wednesday, April 23, 2014

Enjoy Your Trip

It's been a long time dream to complete my intermediate Copic markers class.  Coloring as a child brought such joy to me and as an adult I find I still love the art.  Instead of using crayons and crayola markers I've advanced to Copic markers.  These are markers on steroids........in a good way.  The capabilities are endless and while I'm still taking little baby steps with these markers, I hope that with hours and hours of practice I will be able to fine tune my skills.

This card was made for a dear niece of mine who is going on a summer long journey to Italy.  She's beautiful, intelligent and quite frankly, brave.  She's one of the bravest young ladies I know and has faced adversities that would make most of us crumble to the ground incapable of ever getting up again.  She's a hero to me and I wish her all the best that life can possibly offer.  I will be thinking of her while she's traveling through Italy and remember the wonderful time I had when I was there in my early 30's.  It's an amazingly beautiful country with so much richness, beauty and heritage but hey, I'm a little biased being that I'm Italian and was spoon fed story after story about this amazing place.

I used Tiddly Inks image "Gonna Miss You" after having found this image on a blog called "Ms Petunias", a beautiful blog by Carolyn LaBille.  I loved the colors she used and while I still need all the help I can get, I actually used the same colors, or nearly the same colors, as she did in coloring this image.  I know in time I will be brave enough to venture out on my own, choosing my own colors and putting them together but I hope that she doesn't mind that I completely hijacked her color scheme for this image.


Thursday, April 3, 2014

Friends in the Garden of Life

Friends come and go, so they say.  Some are only meant to be there for a short while for whatever reason.   Some put a mark on your heart that stays there forever and even when you don't see them very often you find yourself thinking about them all the time.  My friend, Phyllis is one such friend.  We worked together at a marketing and accounting firm back in the late 80's, early 90's.  We laughed, cried and could talk about anything.  I wanted to make something special for her birthday.  I'm finally satisfied with the end result and I hope she likes her belated birthday gift.


Products used to make this canvas:

Blue Fern Studio - Bohemian Butterflies
Graphic 45 - Staples - Metal Butterflies
Cheery Lynn Designs - Turkish Lace Doily
Cheery Lynn Designs - Fanciful Flourish
Cheery Lynn Designs - Gardenia Strip
Cheery Lynn Designs - Shasta Daisy
Prima - Tea Thyme - Charms & Tiles


Related Posts Plugin for WordPress, Blogger...