Friday, January 29, 2016

SSS Monday Challenge - Love Is In The Air + Use Red


Hi Everyone! Today I'm featuring my SSS Monday Challenge canvas called "Love". This was a really fun challenge for me with a theme that is very close to my heart. Not only do I absolutely LOVE Valentine's Day but it's my favorite holiday as well. I love all the bright decorations, the yummy treats and how fun it is to let everyone you know how much you love them. One year, when my kids were at school I decorated their rooms and threw candy all over their beds. When they got home they didn't really say too much but I knew their little love tanks were filled. Just yesterday, my son asked if I was going to decorate their rooms again this year. That's what it's all about! It warmed my heart that he remembered.

Please join in these challenges at Simon Says Stamp. They are a blast and you can use any of the supplies you already have on hand. Click on the icon below to find out all the details.

Simon Monday Challenge Blog

Here is my project:


I had an idea of what I wanted to create and used an 8x8 canvas to get started. I cut pieces of cardstock from Authentique's Smitten collection.


I laid them out on the canvas to see what my layout would look like.


I used Mod Podge Matte to adhere all the pieces to my canvas and waited for that to completely dry. The pieces are still wet in the photo below but when the Mod Podge dries it is completely clear.


After the canvas was completely dry, I wanted the cardstock pieces to fade into the background so I applied a layer of gesso over the top in a random pattern.


As I waited for the canvas to dry, I started working on my focal piece for the canvas. I traced a heart out of another piece of Authentique's Smitten collection.


I wanted the heart to have dimension so I traced and cut out two more hearts from chipboard and adhered all the pieces together.


Next, I went over the edges with the Tim Holtz distresser tool to distress the edges of the heart.


Now that my canvas is completely dry, I inked the edges with Archival Ink in Red Geranium and used Black Soot Distress Paint on the outer edge of the canvas.


I stenciled the canvas on the right side with the Tim Holtz Rays stencil. I wanted rays coming out from the heart that I would place in the center of the canvas.


I wanted a light glimmer to come from the rays so I gently added Brilliance Galaxy Gold ink with my fingertip along the rays. It's difficult to see in the photo but there's a slight glimmer to the rays that makes them stand out just a bit.


I cut a piece of Bo Bunny Kraft Canvas Pleated Lace to place on the center of my heart but I wanted it to match my project so I used Archival Ink Red Geranium to give it just the right color.


After the pleated lace was dry, I inked the edges with Jet Black Archival Ink and also inked the edges of the heart with Black Soot Distress Ink and Jet Black Archival Ink.


I continued adding stencils to my canvas and I also added some stamping on the canvas as well.


I wanted to add a butterfly above the heart so I used a wood butterfly from Jillibean Soup and inked and embossed it with Pink Peony and Red Geranium Archival ink and embossing powders. I first inked and embossed the butterfly with Pink Peony and them when that was dry went over it with the Red Geranium Archival Ink and embossing powder and let that dry. This gave the butterfly a slightly marbled look. I then went over the edges with Jet Black Archival Ink. I learned the embossing technique from Wendy Vecchi's blog. She has wonderful tips on making embellishments for a canvas. Check out her blog here.


Another technique I learned from Wendy Vecchi is to stamp images on wooden pieces and here I used one of the butterfly stamps from the Tim Holtz Watercolor CMS217 stamp set. Isn't it beautiful!! I'm telling ya, check out Wendy's blog, she's amazing!!


I wanted the word "Love" in the center of my heart and used Tim Holtz Letterspress Typographie to spell out the word. I used the "&" sign for the "e" and used the same embossing technique as I used on the butterfly except that I didn't use the Pink Peony ink and embossing powder. I just wanted the heart to be solid red so I only used the Red Geranium ink and embossing powder to color the letters.


I now had all the pieces for my canvas and was ready to put everything together. I adhered the pleated lace to the center of the heart and added one of the Tim Holtz Trinket Pins and one of Prima's Red Velvet trinkets to the bottom of the pleated lace.


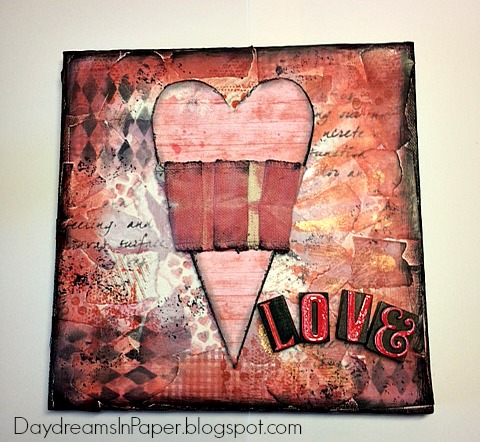
Here again is my completed canvas.


I hope you enjoyed seeing the process of how I put together my canvas and I hope you join in the fun at SSS. Have a great weekend everyone!


Ranger JUMBO ARCHIVAL INK PAD Jet Black XL Tim Holtz A3P06701  Ranger Wendy Vecchi Archival RED GERANIUM Ink Pad AID38993  Ranger Wendy Vecchi Archival PINK PEONY Ink Pad AID45649


Ranger Wendy Vecchi Archival RED GERANIUM Reinker ARD39051  Ranger Wendy Vecchi Embossing Powder RED GERANIUM WEP43911  Ranger Wendy Vecchi Embossing Powder PINK PEONY WEP45724

Tim Holtz Distress Paint BLACK SOOT Ranger TDD36302  Authentique Paper Smitten Collection Kit 12X12  Tim Holtz Cling Rubber Stamps WATERCOLOR cms217


Tim Holtz Cling Rubber Stamps MIXED MEDIA cms125  Tim Holtz Cling Rubber Stamps URBAN TAPESTRY Stampers Anonymous CMS061  Tim Holtz Layering Stencil RAYS THS003  Tim Holtz Layering Stencil HARLEQUIN THS016


    Image result for prima velvet trinkets


Image result for bo bunny pleated lace  Wood Shapes Tim Holtz Idea-ology LETTERPRESS TH93130


 Tim Holtz Tonic Craft SCISSORS Micro Serrated Non Stick  Tim Holtz Tonic PAPER DISTRESSER Altered Aged Edges  Ranger ADHESIVE FOAM BLACK IWT40507  White Gesso, 4 oz Bottle  Matte Finish  

Friday, January 22, 2016

SSS Monday Challenge - Best Friends

Hi Everyone! It isn't every day that you meet someone who becomes a friend for life. Only the fortunate few can say they have a friend who is there through thick and thin. When life gets in the way and you don't communicate with them for a long time, as soon as you reconnect, it's like you talked to them just yesterday. I have one such friend and since her birthday is coming up in March, I wanted to make her something to show how much she means to me. I'm also joining in the Simon Says Stamp Monday Challenge where the theme is "Best Friends" so this is perfect for the challenge. Click on the icon below and join in the "Best Friends" challenge fun.

Simon Monday Challenge Blog


I chose to use a 4x6 Tim Holtz burlap panel and turned it around to create a shadowbox. I used the packaging material that comes with the burlap panel and cut it down to fit inside the shadowbox and distressed the edges with the Tim Holtz Distresser tool. I used that piece to be the matting behind my main focal point.


I cut a piece of watercolor paper to fit the inner part of the matting and taped it with painter's tape to a hardboard panel.


I sprayed the watercolor paper with water before adding Mermaid Lagoon and Cracked Pistachio Distress Spray Stain.


I allowed the spray stains to dry adding more until I got the desired look and depth of color for my watercolor panel and then, very carefully, removed the painter's tape.


I cut a piece of Tim Holtz Melange Tissue Wrap to fit over the watercolor panel and adhered it to the panel with Ranger Multi Medium Matte. I applied the medium to the watercolor panel and then gently placed the tissue paper over the panel. I carefully rubbed my fingers over the tissue to get rid of any air bubbles and then applied more medium over the top of the tissue paper. After letting that dry, I cut the tissue hanging over the edges to the same size as the panel. 


When the entire tissue panel was dry I distressed the edges.


Now it was time to ink the edges of the tissue panel with Vintage Photo Distress Ink.


I placed the panel inside the burlap panel to make sure it fit properly. After seeing that my panel fit perfectly, I removed it so I could finish my project.


I wanted to create a frame to go around the outer edges of the burlap panel to hide the staples so I cut a piece of Robin's Egg Bazzill cardstock the same size as the panel. Using a Spellbinder's Long Classic Large Rectangle die I created a window for the frame in the cardstock.


When my cardstock frame was complete I cut out three Cheery Lynn Designs Anastasia Borders and cut one of the borders in half.


My next step was to assemble the pieces of the frame together but before I did that, I used vintage photo distress ink to give the lace border a vintage look. After applying the ink, I then pieced together the lace to the cardstock frame leaving a small edge in the center so the beautiful Robin's Egg colored cardstock would peek through.


To create the flowers for my project, I cut out three sizes of flowers from the Robin's Egg and Whirlypop Bazzill cardstock with Tim Holtz Tiny Tattered Florals Thinlit dies.


When the flowers were formed, glued and dry, I applied vintage photo distress ink to the edges of the light blue flowers to give them a vintage look.


I didn't have a die in the shape of a vase, so I had to create my own. As I was looking at my distress tool I saw a vase within its shape and it looked like it would be just the right size! I traced around the tool on watercolor paper and removed the tool, then drew a scalloped top to the vase and cut it out.


I used the same distress spray stains in Mermaid Lagoon and Cracked Pistachio to color the vase using the same process I used to make the original panel. I then stamped the screen image from Tim Holtz Stampers Anonymous Mixed Media stamp set on the top and bottom of the vase with Wendy Vecchi Potting Soil Archival Ink and inked the edges with vintage photo distress ink. I arranged the flowers on the tissue panel and added stems that I made from green floral stem wires.


It was now time to make a bow for my project and I used Tammy Tutterow's method of coloring the plain, dry edges of seam binding ribbon with distress markers. I used the same colors that matched my project. You can find her free tutorial here.


I created my own sentiment "Friends are flowers in the garden of life" using Microsoft Word on plain ivory cardstock in my printer. I then cut out the sentiment in pieces and inked the edges with Mermaid Lagoon and Vintage Photo Distress Ink.


After all my pieces were complete, I arranged them on my panel and adhered them with glue.  Here again, is my completed shadow box. 


I hope you enjoyed my "Best Friends" project and that you decide to create something for your best friend too.  Have a great weekend!


  Tim Holtz Distress Spray Stain MERMAID LAGOON Ranger TSS44147  Tim Holtz Distress Spray Stain CRACKED PISTACHIO Ranger TSS44109  


  Tim Holtz Distress Ink Pad VINTAGE PHOTO Ranger TIM19527    


  Image result for spellbinders long classic rectangles large  Image result for cheery lynn anastasia border  


    Ranger Wendy Vecchi Archival POTTING SOIL Ink Pad AID38979


    Ranger 4 Oz. MULTI MEDIUM MATTE Paint Glue INK41535  


Tim Holtz Tonic Craft SCISSORS Micro Serrated Non Stick
Related Posts Plugin for WordPress, Blogger...