Hi Friends! I'm so glad you stopped by for this week's Simon Says Stamp Monday Challenge. Our theme this week is, Young At Heart featuring Simon Says Stamp products. I created a mixed media panel with a layered background of Paper Artsy Infusions, Distress Crayons, Simon Says Stamps stencils and dies and gesso. Come along and see how I created my panel and get some inspiration for your next project. Enjoy!
Also, please join me in giving a warm welcome to our next guest designer for the month of February, Nicola.
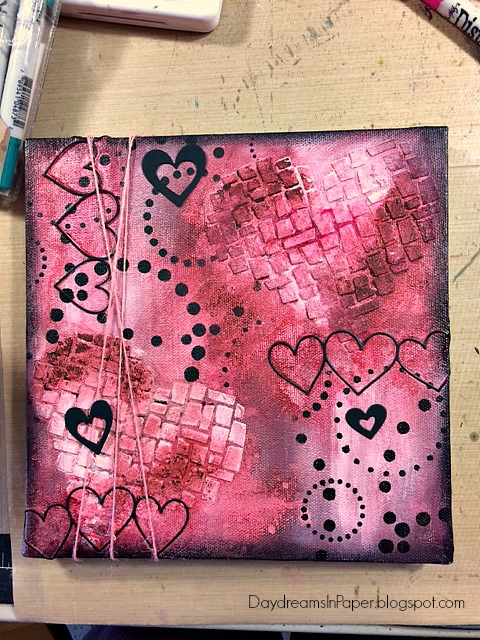
To create the background for my panel, I start by covering an entire 6" x 6" canvas (front and sides) with Dina Wakley White Gesso and apply that with the medium size Tim Holtz Collage Brush. I let that completely dry before moving on to the next step.
On the dry panel, I sprinkle on Paper Artsy Are You Cerise and Sunset Beach Infusion pigment powder in random areas.
I spray the panel with water and allow the colors to blend and move on the canvas. After spraying on the water I pick up the canvas and move it around to get this effect. I completely dry the canvas using a heat tool.
I color on Worn Lipstick, Picked Raspberry, Festive Berries and Fired Brick Distress Crayons in random areas and then rub the pigment in with my finger tips. I add a little water to my fingers before rubbing in the pigment to get them to move on the canvas easier.
When the canvas is completely dry, I dry brush on some Dina Wakley White Gesso to add highlights to the background.
When the canvas is completely dry, I add the Simon Says Stamp Circle Dots stencil on the canvas applying it with Dina Wakley Black Gesso. I allow that to completely dry before moving on to the next step.
Next, I add the Simon Says Stamp Mosaic Heart Stencil applying it on with Tim Holtz Grit Paste. I set that aside to completely dry.
When the grit paste is completely dry, I color on Fired Brick Distress Crayon in random areas on the two large hearts and spray on water to move the colors between the mosaic tiles. I use my finger tips in areas to blend the color in also.
When the panel is completely dry, I add the outline from the Simon Says Stamp Hearts Align die in random areas. I cut these out of Bazzill Licorice Twist card stock and apply them with Ranger Multi Matte Medium.
I ink the edges of the panel with Black Soot Archival Ink with a mini ink blending tool.
I add three of the hearts from the Simon Says Stamp Hearts Align die and some May Arts Pink Twine.
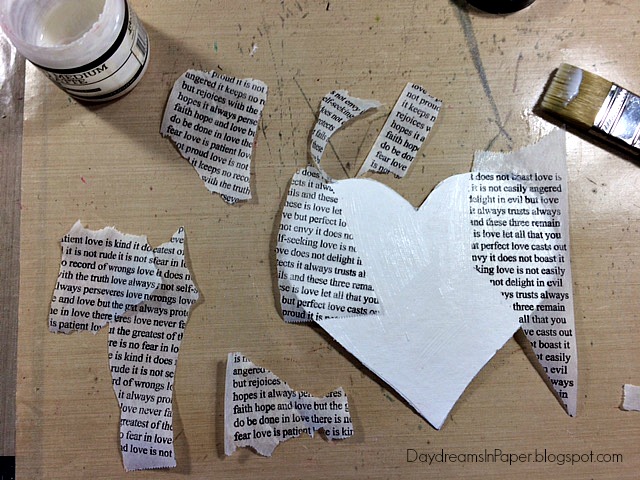
I cut a heart out of white chipboard. The heart measures 5-3/4" x 5-1/2".
I cover it with printed tissue paper but want to create my own, so I stamp on the Simon Says Stamp Love Is background stamp onto Tim Holtz Plain Tissue Wrap with Black Soot Archival Ink.
I tear the printed tissue wrap in small pieces and begin adhering it to the heart with Ranger Multi Matte Medium.
I leave some areas of the heart uncovered and after applying the printed tissue wrap, I completely dry the glue using a heat tool to speed up the process.
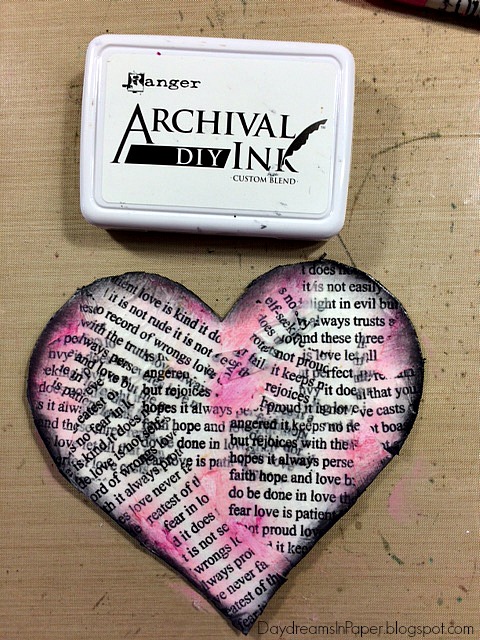
When the heart is completely dry, I cut off the excess tissue wrap from around the edges.
I begin adding color to the heart in random areas and start with applying Worn Lipstick Distress Crayon using my finger tips to blend in the color after it's applied.
I continue the process and add Picked Raspberry Distress Crayon in random areas continuing to blend the colors.
To give the heart depth, I ink the edges with Black Soot Archival Ink.
I decide to add a bit more color so I add Fired Brick Distress Crayon and rub that in with my finger tips.
To give the heart some textural interest, I add the Simon Says Stamp Stacked Hearts die adhering it with multi matte medium.
Before adding the heart to the panel, I dry brush on Dina Wakley White Gesso to the center of the heart where I will place my images. After adding the two sweet cupid images I found for free on the internet and fussy cutting them out, I adhered them to the center of the heart with 3d foam tape and a bit of glue. I adhere the entire heart with glue and 3d foam tape and add some May Arts Black Twine along with a Tim Holtz Metal Arrow and a Tim Holtz Custom Heart Charm. I printed out the words, "Cupid's Arrow" in red ink on my printer and cut it out to fit in the heart charm. I added two handmade flowers that were left over from a previous project and my Young At Heart Valentine mixed media panel is done.
I hoped you enjoyed seeing the process I used to create the mixed media panel featuring the Young At Heart theme. Please join us in all the fun and add your project to Simon Says Stamp's Monday Challenge Blog for your chance to win a $50 gift voucher to their amazing store.
For more inspiration, tips and tricks for all types of papercraft creations, follow Simon Says Stamp on:
You can find all the following supplies I used to create this project at Simon Says Stamp:


Wow - I love your amazing canvas Cathie!! The background is wonderful with stunning tones and textures. Then the yummy heart and little scene and embellies are gorgeous and give great dimension. Thanks for the lovely welcome and fab step x step too. Nicola x
ReplyDeleteooh this is gorgeous Cathie :-) I love the background and need to get me some of those infusions! the whole design of this is absolutely fabulous! LOVE it :-)
ReplyDeleteluv
Lols x x x
This is so romantic and totally deep and vibrant. I love the stencil on stencil mix and the black accents on that deep red background. Lovely finish with the black and white image! Hugs xxx
ReplyDeleteWonderful project!!!!!!!!!!
ReplyDeleteLovely canvas, Cathie! I love the mosaic hearts you included, and the text is a great addition. Your wrapped twine and arrow added the perfect touch! hugs, Maura
ReplyDeleteWow, wow, wow! I really love how this turned out! Your layers are incredible and I adore what you did with the twine. I also thought you were so skilled in using red and pink together! That could've gone wrong so easily, but you nailed it!
ReplyDeleteThis is really neat, Cathie! I love all the collaging you did!
ReplyDelete*mwah*
Steph
Simon Says Stamp!
loving all the layers on this super SWEET piece!
ReplyDeleteWow! That is such a cool piece. Blessings!
ReplyDeleteThis is just gorgeous Cathie! It's so, so pretty and I love the images you've used, they are perfect! Just beautiful... <3
ReplyDeleteLove your gorgeous canvas creation, Cathie. The texture and vintage colors are fantastic! :)
ReplyDeleteCome sempre adoro guardare i tuoi step by step! It's amazing to see the whole creative process, you're my Queen of Tutorial! The project is fabulous as every week! BArbara
ReplyDeletea stunning mix of texture and beautiful colourful details Cathie....hugs kath xxx
ReplyDeleteBeautiful canvas Cathie! Love the mix of patterns and textures and the tissue paper heart looks fantastic.
ReplyDeleteGorgeous canvas, Cathie! Love to walk through all the steps with your pictures! So much techniques in this amazing canvas. Hugs, Sandra
ReplyDelete