

Hey, everyone. I'm so happy you stopped by! I hope you're ready for a new challenge on the Simon Says Stamp Monday Challenge because we have another fun one this week, Let's Take A Vacation. Doesn't that sound fun! I created a wall hanging for my craft room to remind of a place that has captured a piece of my heart. It's a small, almost unknown, little seaside beach town and going there is like turning back the hands of time. The sunsets are amazing, the people are amazing, and the surfing is amazing. I put together a tutorial for some of the elements I created for the wall hanging, as well as how I created the background scene. Enjoy!
Also, make sure to check out our amazing guest designer for the month of June. Anne's felt journal last week was amazing and I can only image what awesome creation she put together for this week's challenge.
Each week the DT has beautiful and inspiring projects, be sure to check them out by clicking on the link below ↓


I begin by creating the background scene for my wall hanging by inking the top half of a 4-1/2" x 5-1/2" piece of Neenah Solar White card stock with Squeezed Lemonade Distress Ink.

Next, I blend Spiced Marmalade Distress Ink over the first layer of ink only along the edges.

To finish creating the sunset, I ink Fossilized Amber Distress Ink next and then finish off the edges with Ripe Persimmon Distress Ink. I then blend everything together using Squeezed Lemonade Distress Ink. I set that aside to dry.

For the ocean, I take another 4-1/2" x 5-1/2" piece of Neenah Solar White card stock and ink the edges on the top half of the piece with Tumbled Glass Distress Ink.

Next, I ink Mermaid Lagoon Distress Ink to the edges of the card stock.

To finish the ocean, I ink on some Salty Ocean Distress Ink and finish off the edges with Faded Jeans Distress Ink. I blend everything together by going over the piece with Tumbled Glass Distress Ink. I set that aside to dry.

For the beach, ink a piece of Neenah Solar White card stock with Gathered Twigs Distress Ink.

I go over the entire piece with Scattered Straw Distress Ink and set that aside to dry.

To begin assembling the beach scene, I tear the ocean and sand pieces with my finger tips. I tear two pieces for the ocean and tear the brown piece only at the top for the sand. I lay all the pieces down on top of the sunset piece to create the scene as shown above. I gently use my fingertips to curl the torn edges downward to create waves on the torn blue pieces.

I live in Arizona and am surrounded by palm trees. I wanted mine to have dimension and character so I came up with a way to make them look a little more realistic. To do this, cut out six of the palm trees from the Tim Holtz Village Surf Shack die set.

Take one palm tree in your hand and tear off part of the trunk near the bottom of the base. For the second palm tree, tear off the trunk a little higher up the trunk and continue to do this with three more palm tree trunks. Reserve one palm tree intact.
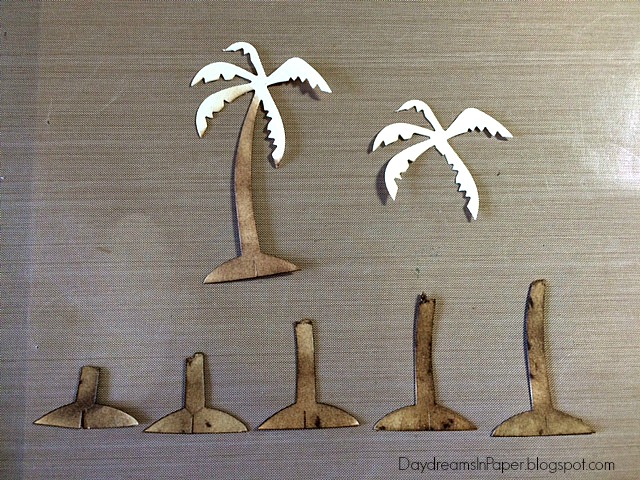
Cut off the palm fronds from the trunk of one of the torn palm tree trunks as this will serve to add more leaves to your palm tree giving it more dimension. Ink the palm tree trunks with Vintage Photo Distress Ink paying special attention to the torn area. Ink the torn area a little extra so you can almost see a line at the top.

Ink the outer palm fronds with Peeled Paint Distress Ink using the Ranger Mini Ink Blending Tool.

Ink the inside of the palm fronds with Forest Moss Distress Ink.

Now it's time to assemble your palm tree. Adhere the trunks together beginning with the shortest trunk working your way up to the tallest trunk.

Here you can see I'm continuing to build up my palm tree trunk.

Here, is the finished palm tree trunk.

Adhere the sectioned palm tree trunk over the complete unaltered palm tree trunk.

To adhere the second set of palm fronds, I placed a drop of Ranger Multi Matte Medium in the center of the bottom set of palm fronds and adhered that to the main palm tree.

Here is my completed palm tree. Isn't it adorable!!
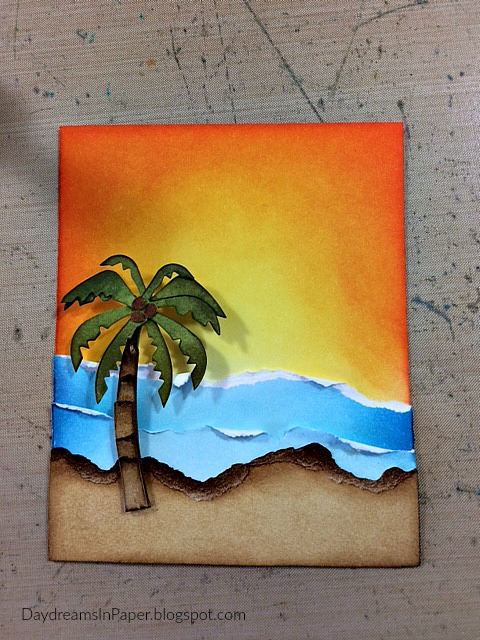
I added three little coconuts to the palm tree and cut off the base of the palm tree before adhering it to the beach scene.

To rust the Tim Holtz Hanger, I use Prima Rust Effect Pastes. First, I dab on some brown rust all over the hanger and clips. There is no need to allow the first layer to dry before moving onto the next layer and there is no need to clean the brush between layers.

For the second layer, I dab on red rust paste in random areas on the hanger and clips.

Next, I add the gold rust paste in random areas.

To finish the rust effect, I go back and dab on more brown rust paste in random areas and set it aside to completely dry.

I add a metal ship's wheel from my stash onto the center of the wall hanger and a rusted Tim Holtz star to the center of the wheel to decorate the wall hanger.

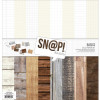
The wood background is very simple. I cut a 5-3/4" x 7-1/2" piece of chipboard and cover it with the dark wood card stock from the Simple Stories Sn@p paper pack. I distress the edges with the Prima Distressing Tool. (Photo of distressed edges not shown but you can see the distressed edges on the finished project.)

To create the "Cayucos" banner at the top, I used the Tim Holtz Alphanumeric Thinlits dies on an inked piece of Neenah Solar White 110 lb. card stock piece. I used the same colors of ink as I used to create the ocean for the background. I placed the letters at angles for interest.

To complete the wall hanging, I add a surfboard from the Tim Holtz Surf Shack die set and a small gathered and tied burlap piece with some seashells at the base of the palm tree. I cut a strip of Neenah Desert Storm card stock and write the latitude and longitude of Cayucos on the strip with a black marker and ink the edges with Gathered Twigs Distress Ink. I cut the abbreviation letters for California from the same alphanumeric die set and adhere them to the bottom left corner. A small piece of gathered burlap is placed behind the top right corner of the beach scene. I clip the rusted hanger onto the wooded chipboard piece and add a small ship's wheel and rusted Tim Holtz Star to the center and my wall hanging is done.
I hope you enjoyed seeing the process I used to create my wall hanging for the Let's Take A Vacation challenge and that you join us for this fun challenge by adding your project to Simon Says Stamp's Monday Challenge Blog for your chance to win a $50 gift voucher to their amazing store.

For more inspiration, tips and tricks for all types of papercraft creations, follow Simon Says Stamp on:


You can find all the following supplies I used to create this project at Simon Says Stamp:


LOVE this wall hanging Cathie! the colours and whole design of this is fabulous! GORGEOUS!!
ReplyDeleteluv
Lols x x x
First of all, thank you so much for your kind words, I really appreciate them!
ReplyDeleteI have never been to Cayucos but you have taken me straight there (well, in my mind anyway), what a wonderful place! I love the way you created the ocean and sand and the sunset background is gorgeous! Such a clever idea for the palm tree trunk too... and then the rusting on the hanger - just wonderful! A beautiful creation.... Anne xx
I love this project and I fondly remember spending many summers there as a child.
ReplyDeleteWOW this is spectacular in dimension and color depth! I love the details you added~esp with the layering of the tree trunks. Thank you for the beautiful inspiration Cathie!
ReplyDeleteThis is so lovely! I almost can feel the smell of Cayuco's summer air :-) I love the way you made the sky, water and sand. The wood and burlap make this hanging even warmer! Great job! Hugs, Marzena
ReplyDeleteHow GORGEOUS! That sunset is blended perfect, and that's such a lovely serene scene :)
ReplyDelete*mwah*
Steph
Simon Says Stamp!
Oh wow wow wow! This is absolutely amazing. All the different layers and textures are so interesting. Thanks for sharing the process with us. I'm still quite new to cardmaking and love learning different techniques.
ReplyDeletewhat a totally gorgeous project-LOVE it!! The way you layered the inks and created your palm tree-brilliant!
ReplyDeleteWONDERFUL!!! I especially love the fact you added the coordinates.... I have coordinates tattoed on my skin, to remember me of special fractions of life <3
ReplyDeleteThe blending on your project is fantabolous! (is that even a word? LOL!!!)
Such a cool project, Cathie! I want to go there! Love the beautiful tropical colors and design, and the little touch I really, really like is that you added the latitude and longitude! hugs, Maura
ReplyDeleteWhat a gorgeous piece of art! I am in love with the way you made that sandy shoreline! I also adore your color blending and how you really brought the feeling of peace and adventure to life. This makes me feel relaxed and energetic all at once and it came together beautifully!
ReplyDeleteYour creation is a feast for the eyes, I adore the bright colours, just beautiful,
ReplyDeleteThank you for always encouragement for me.
Such a gorgeous hanging, Cathie! So bright and fun! Love the gorgeous background and the palm tree is amazing! Hugs, Sandra
ReplyDeleteBright, beautiful and such a fun interpretation of the challenge theme ~ this is fantastic Cathie and it reminds me of retro poster art from a bygone era! Beautiful work as always... <3
ReplyDeleteWhat a stunning beach scene! I wish I could sit on that beach. The inking glows and stands out so well against the woodgrain.
ReplyDeleteFirst let me say that you are a master of blending colors! So beautiful! I have been to Cayucos myself, it is such a quaint little town that not gone the way of most beach towns (too many crowds and no parking!). Plus that cookie bakery there is amazing! Thanks for sharing!
ReplyDeletewow what an amazing project Cathie...makes me want to grab a towel and head off to the beach...hugs kath xxx
ReplyDelete