

Hi Friends! I hope you had an awesome weekend and that you're enjoying the beautiful Autumn weather in all its splendor. This week on the Simon Says Stamp Monday Challenge our theme is Thanksgiving. I created a card reminds me a beautiful, colorful transition into winter. I hope you enjoy it.


My card features a bottom panel and a top panel. For my bottom panel, I cut a 5" x 7" piece of Neenah Solar White 110 card stock and emboss it using the Tammy Tutterow Rose Tablecloth embossing folder.

Next, I cover the entire panel with Aged Mahogany Distress Ink using a mini ink blending tool.

I ink the edges with Red Geranium Archival Ink to brighten the color. I only ink the edges because the center will be covered with my top panel. I set the this panel aside to dry.

For my top panel, I cut a 4-1/2" x 6-1/2" piece of Neenah Solar White 110 card stock and emboss it with the same embossing folder as my bottom panel.

I ink the Memory Box Drifting Oak Leaves stamp with Potting Soil and Red Geranium Archival Inks overlapping the inks in some areas and stamp that in random areas onto my panel.

Using the Prima Distressing Tool, I distress the edges of my panel.

I cover a piece of white card stock with Fossilized Amber Distress Ink using an ink blending tool.
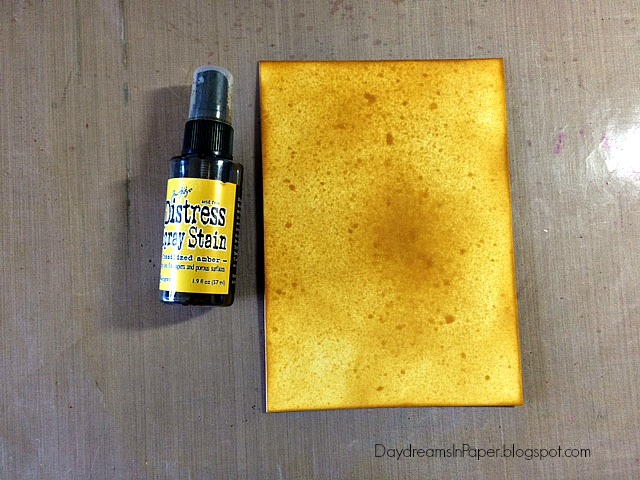
To add some platters in the same color, I spray on Fossilized Amber Distress Spray Stain.

I add some water drops using the Ranger Distress Sprayer. I allow the water to sit for about 20-30 seconds before removing the excess with a paper towel. I let that completely dry before cutting my flower petals.

When my paper is completely dry, I cut all four flower petals from the Tammy Tutterow Shabby Posies die set.

Using a McGill Flower Shaping Tool Kit, I begin to form each petal with a stylus.

I add my flower center to the smallest set of petals. I used a medium sized brown Kaisercraft Sparklet for the center.

I curl the petals around the flower center and form the petals inward toward the center of the flower using the tweezers that come in the flower shaping tool kit.

I adhere the flower petals together making sure to offset the petals as I build my flower. After the flower is complete, except for the center, I curl all the petals outward with tweezers.

After all the petals have been formed, I adhere the center to my formed flower and continue shaping the petals with the tweezers until I am happy with the way my flower looks.

To create a twine bow that I want to place behind my flower, I wind some burlap twine around my pointer finger and pinky on one hand and pinch it off in the center of the bow using my pointer finger and thumb from my other hand to remove the twine. Before letting go of the twine, I use EK Success Precision tweezers to hold the center of the bow so I can tie it with another small piece of twine.

Here, you can see my completed twine bow.


To create the leaves for my card, I use the Tim Holtz Fall Foliage die set and cut some of the pieces and ink them with Fossilized Amber, Scattered Straw, Fired Brick and Peeled Paint Distress Inks. I then ink the edges with Ground Espresso Distress Ink.

For my sentiment, I stamp the Happy Thanksgiving stamp from the Simon Says Stamp Autumn Greetings stamp set in Potting Soil Archival Ink.

Using Tim Holtz scissors, I cut around the sentiment following the lines of the sentiment.

I adhere the sentiment on a piece of craft card stock. Using a pencil, I draw a line following the outline of the sentiment.

I cut around the line on the craft card stock and then erase any pencil marks left behind.

Before adhering the sentiment to my card, I ink the edges with Potting Soil Archival Ink.

To finish my card, I ink the edges of the top panel with Peeled Paint Distress Ink and adhere that to my bottom panel and add three of the leaves that I created using 3D foam tape to add dimension. I add some burgundy ribbon, the twine bow and flower that I created to the bottom half of my card. I then add my sentiment and adhere the card to a top folding card base.
I hoped you enjoyed seeing the process I used to create my Thanksgiving card. Please join us in all the fun and add your project to Simon Says Stamp's Monday Challenge Blog for your chance to win a $50 gift voucher to their amazing store.

For more inspiration, tips and tricks for all types of papercraft creations, follow Simon Says Stamp on:


You can find all the following supplies I used to create this project at Simon Says Stamp:


Gorgeous card Cathie, the background is fabulous, love the collage style stamp and the fabulous flower, so pretty :-)
ReplyDeleteluv
Lols x x x
What an artsy and perfectly Autumn felt card! LOVE the contrast of the white with the Fall tones! Gorgeous!
ReplyDeleteThank you, Anita, for your sweet comment.
DeleteCathie ♥
This comment has been removed by a blog administrator.
ReplyDeletereally beautiful card, and oh how I love the flower!
ReplyDeleteThank you so much, Linda!
DeleteCathie ♥
stunning card Cathie...love all the layers you created and that Shabby Posie flower is amazing...hugs kath xxx
ReplyDeleteSuper cool card, Cathie! Love the finishing touch to distress! Perfect for this card :)
ReplyDelete*mwah*
Steph
Simon Says Stamp!
Cool card CAthie! love the colors and I adore the idea to stamp over your embossed panel! Wonderful effect! The flowers are spectacular! you know i'm not able to create flowers.... see your fabulous work encourage me to try to create some handmade flowers! I promise: I'll try! Barbara
ReplyDeleteI thoroughly enjoyed reading your process here! Beautiful card... absolutely depicts the transition from fall to winter! The sentiment looks awesome-- almost like it's been burnt.
ReplyDeleteThank you, Mimi! I'm so happy you enjoyed seeing the process and I appreciate your sweet comments.
DeleteCathie ♥
Mimi is right on with her comment! It is always such a bonus to see your detailed pictures of your processes. I am so impressed by your range of techniques and your skill level to successfully pull them all off! The layering here is incredible and it's gorgeous from back to front!
ReplyDeleteMimi is right on with her comment! It is always such a bonus to see your detailed pictures of your processes. I am so impressed by your range of techniques and your skill level to successfully pull them all off! The layering here is incredible and it's gorgeous from back to front!
ReplyDeleteThis card is stunning Cathie!! I love the stamped and embossed background and those wonderful flowers.
ReplyDeleteOh my! I love this! The contrast of your panels is just stunning. I love how you made the bottom panel and it's a pity is so hidden but gives a perfect contrast to the snowy white main panel. The random stamping on the embossed panel was such a great idea! The amber flower is a perfect finish. LOVELY! Hugs, Marzena!
ReplyDeleteSuch a beautiful card Cathie...I love the colour palette and the embossed detail and autumn foliage really bring the piece to life ~ gorgeous! <3
ReplyDeleteCathie, this is one beautiful card! I love your use of white in the background, and how you have bits of color peeking through. Your flowers are amazing too! hugs, Maura
ReplyDeleteLove your gorgeous cards! Cathie. The flower you created is fabulous. :)
ReplyDeleteWonderful card, Cathie! The depth of color in the back piece is amazing, love it! Hugs, Sandra
ReplyDelete