Hi Everyone! I hope you all had a fabulous weekend and that you're ready for another Simon Says Stamp Monday Challenge. Our theme this week is, Shine Bright Like A Diamond and we're featuring Tim Holtz Products.
When I first started brainstorming about what to create, I sat and thought about a diamond and the first thing that came to my mind was how beautiful diamonds are and that there is really nothing you could add to them to make them more beautiful. So with that in mind, I decided to create a card that didn't have a lot going on, one that was in some way simple, yet still captured a bright and shining spirit.
Below you will find some of the elements I created for my card. I hope you find the step-by-step instructions helpful.
To create the butterfly, I ink Wilted Violet, Mermaid Lagoon and Squeezed Lemonade Distress Ink onto a piece of Neenah Solar White 110 card stock using a mini ink blending tool.
I use the Tim Holtz Detailed Butterflies and cut the base of the butterfly from the inked card stock I created above.
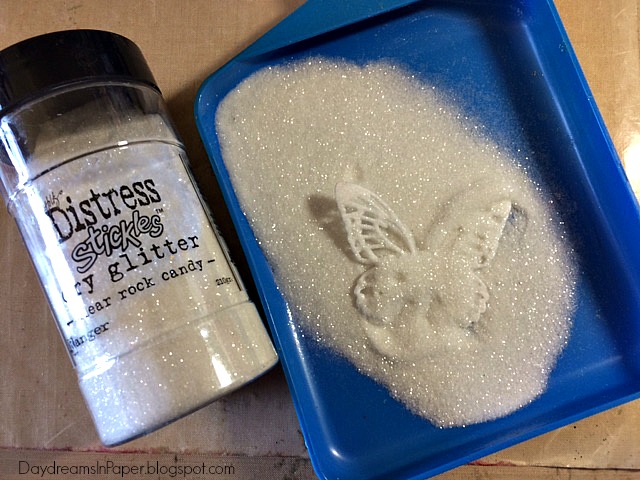
I cut the detailed top layer that goes over the butterfly out of white card stock and use my finger tips to rub on Ranger Glossy Accents making sure to cover the entire piece.
Next, before the glue dries, I cover the entire piece with Distress Stickles Dry Rock Candy Glitter.
I shake off the excess to reveal a beautiful, glistening top layer for my colorful butterfly.
I adhere the top layer of the butterfly over the bottom layer using Ranger Multi Matte Medium. I set the butterfly off to the side to dry.
I begin working on my card base by stenciling on the Tim Holtz Rays layering stencil with Wendy Vecchi White Embossing Paste. I apply it over the top left corner of my 5" x 7" piece of Neenah Solar White 110 card stock.
I gently peel away the layering stencil.
While the embossing paste is still wet, I sprinkle on Distress Stickles Rock Candy Dry Glitter and set it aside to completely dry. (Do not use a heat tool to dry as it will cause the embossing paste to bubble.)
When my card base is completely dry, I ink Tumbled Glass Distress Ink over the bottom half using a mini ink blending tool. I set that aside to completely dry.
To create my bow, I spray some Wilted Violet Distress Spray Stain and water onto a craft sheet.
I dip some Tim Holtz Crinkle Ribbon in the ink mixture to color my ribbon. I want it to be a very light purple color so I dip the ribbon in the mixture once. You can see how I tie my bow here.
For my sentiment, I use one of the sayings from the Tim Holtz Small Talk sticker set and lightly go over the sticker with Spun Sugar Distress Ink.
I gently ink on one of the floral stamps from the Tim Holtz Floral Tattoo stamp set using Tumbled Glass Distress Ink.
To complete my card I attached the bow to the center of the card. I adhered a Tim Holtz Mirrored Heart to the center of the butterfly and add my sentiment.
I hoped you enjoyed seeing the process I used to create my Shine Bright Like A Diamond project. Please join us in all the fun and add your project to Simon Says Stamp's Monday Challenge Blog for your chance to win a $50 gift voucher to their amazing store.
For more inspiration, tips and tricks for all types of papercraft creations, follow Simon Says Stamp on:
You can find all the following supplies I used to create this project at Simon Says Stamp:


This is a beautiful card, I love how the soft colors complement the sparkle that the rock candy glitter creates. Simply lovely!
ReplyDeleteIt may be a simple card in your eyes but it just shines like a diamond - such beautiful colours and I love your sparkly butterfly! Chrisx
ReplyDeleteBeautiful card Cathie, the whole design is so pretty! I love the sparkly butterfly and stunning background! Gorgeous :-)
ReplyDeleteluv
Lols x x x
So pretty, Cathie! Love how you glittered up the rays, it really looks great with the fragile butterfly! Maura xx
ReplyDeleteHow beautiful! Thank you for the step by step.
ReplyDeleteOh how sweet is that! I love the cute pastel colors on the butterfly and the bottom of the card and the violet of the ribbon is fantastic. Great glittering on the top of the card! Cute, sweet and beautiful. Hugs, Marzena
ReplyDeleteThis is so cute, Cathie! Stunning colors! This makes me wish it was spring again! That's my favorite season of the year! Hugs, Sandra
ReplyDeleteBeautiful! Love the ribbon treatment... very cool way to dye your ribbon.. I will have to try that... and the butterfly is beautiful! Love the distress glitter... beautiful beautiful creation!
ReplyDeleteOh those rays make me happy! LOVE the sparkle! The butterfly is gorgeous too, and I love seeing this warm theme during the colder months...lol. Beautiful!
ReplyDeleteSuch stunning additions of sparkle, Cathie! Love it!!
ReplyDelete*mwah*
Steph
Simon Says Stamp!
Absolutely gorgeous! this butterfly is fabtastic, love the paastel shades you used and the glitter..... fab! Barbara
ReplyDeleteSuch a pretty card, Cathie and I love the subtle sparkle that you've added, it looks amazing and compliments the butterfly perfectly! <3
ReplyDeletethis is such a stunning card Cathie...love the rays sparkle in the background and your gorgeous sparkly butterfly...hugs kath xxx
ReplyDeleteThis comment has been removed by the author.
ReplyDeleteSuch a beautiful card Cathie!! I love all the sparkle and the glittery butterfly. The sentiment is perfect!
ReplyDeleteLove your gorgeous card, Cathie. The glittered butterfly and sparkle are fantastic! :)
ReplyDelete