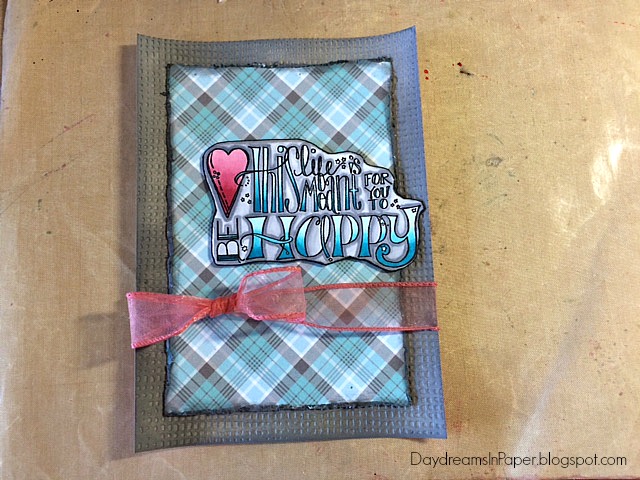
Hi Friends! Today I created a card using Tammy Tutterow Design products. I love to color doodle art and Tammy has some of the most fun and inspirational stamps out there. You can find her designs here. I'll show you how I colored this stamp along with how I created the background and pretty pink flower. Join me and follow my step by step photos and instructions below.
I use the Misti Precision stamp tool to stamp the Tammy Tutterow Be Happy stamp onto a piece of Neenah Solar White 110 lb. card stock.
I begin by coloring the sentiment with Copic markers BG05, BG01 and BG000. I want the sentiment to have an ombre look so I color the letters from the bottom up using the darkest color and moving to the lightest color making sure to blend the colors together as I go along.
I color the heart using Copic markers R81, R83 and R85. When I'm finished coloring the sentiment and heart, I lay the stamp over my image and trace the edges of the stamp around the colored sentiment.
I cut around the sentiment using the pencil marks as my guide. After cutting around the image, I erase any left over pencil marks with an eraser.
Next, I want my sentiment to stand out so I add shading around the letters and heart using Copic markers C0, C-1, C-2 and C-3. I set that aside while I work on my backgrounds.
My card consists of two background panels. For the bottom panel, I cut a 5" x 7" piece of Neenah Solar White 110 lb. card stock. I ink the entire piece with Hickory Smoke Distress Ink using a mini ink blending tool. I want there to be dark and light areas throughout the background as apposed to an even covering.
I emboss the 5" x 7" bottom panel using the Tammy Tutterow Horsehair embossing folder. I set that aside to work on my top panel.
For my top panel, I cut a 4-1/2" x 6-1/2" piece of card stock from the Lawn Fawn Perfectly Plaid paper pack and distress the edges using a Prima Distressing Tool.
I ink the edges using Hickory Smoke Distress Ink using a mini ink blending tool and set that aside while I work on creating my flower.
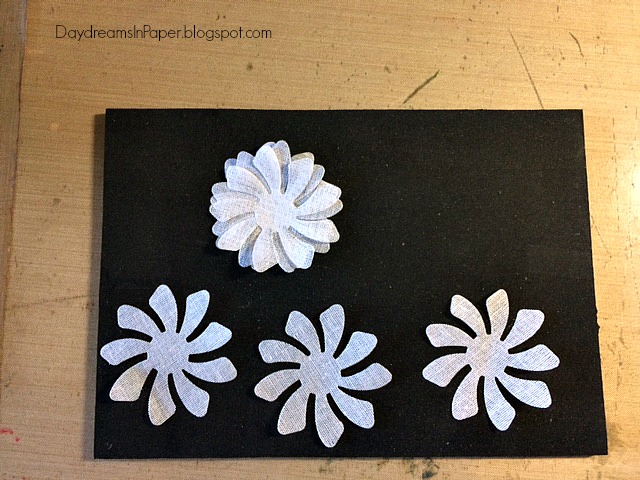
To create the pretty pink flower, I use the smallest flower die from the Tammy Tutterow Pinwheel Posies die set. I cut six of these flowers out of crinoline fabric.
I lay one flower petal on top of another making sure to offset the petals as I go along.
I continue adding petals one on top of the other.
You can see the flower will have several petals and turn out fluffy and full.
Here, all the 6 flower petals are offset one on top of the other. I pick up the flower gently so as not to move the petals as best as I can.
Using a needle and thread, I start from the bottom and push the needle through all six layers of petals and then down through the six layers of petals. I continue this pattern three times as shown above.
I pick up the flower and place my thumb and pointer finger where the thread comes out of the bottom of the flower and pull the thread with my other hand to force the petals to come together. This forms the flower and creates a pom pom look of petals.
When the flower is pulled tightly, I then tie the thread on the bottom of the flower so it will keep its shape. I then fluff out the petals until I'm pleased with the shape of the flower.
To color the flower, I create a mixture of Picked Raspberry Distress Ink and water on my craft mat.
I gently run the petals of the flower through the ink and water mixture. Before moving on to the next color I make sure the flower is completely dry.
To add some dimensional color to the petals, I create a mixture of Candied Apple Distress Ink and water onto the craft mat.
I gently run some of the petals through the ink mixture. This will create light and dark areas of color on the flower.
Here is my pretty pink flower ready to add to my card.
I adhere the sentiment to the top panel using 3D foam tape so my card has dimension. I adhere the top panel to the bottom panel and add a piece of wired ribbon with a bow around the bottom half of my card just underneath the sentiment.
I ink the edges of the bottom panel with Hickory Smoke Distress Ink using a mini ink blending tool.
I add the pretty pink flower to the center of the bow and fluff the petals.
To finish the card, I adhere it to a 5" x 7" top folding card base.
These stamps are so much fun to color and make into cards. Wouldn't this be a fun card to send to someone just to make them smile? I love the combination of gray and light blue and the splash of pink compliments these colors so well.
I hope you enjoyed seeing how I created this beautiful card. Thanks so much for stopping by!!


I just love all the dimension you created on this card.Very beautiful.
ReplyDeleteThank you, Valerie!
DeleteCathie ♥
Hi Cathie, a really gorgeous card and thanks for showing all the stages, brilliant work!
ReplyDeleteThanks for sharing,
Shaz in Oz.x #9
{Calligraphy Cards - Shaz in Oz}
Thank you for your sweet comments!
DeleteCathie ♥
Beautiful coloring & your flower is just amazing!
ReplyDeleteThank you, Greta! I'm so happy you stopped by to leave your sweet comment.
DeleteCathie ♥
Love this card!
ReplyDelete