

Hi Friends! I hope you all had a wonderful Thanksgiving with family and friends. There's so much to be thankful for and it's a holiday where we can all sit back, relax and hopefully not just be filled with turkey, but with gratitude.
This week on the Simon Says Stamp Monday Challenge our challenge is, O Christmas Tree. I created a card using some patterned paper to create my Christmas tree. If you'd like to see how I created this card, stick around and check out the step-by-step instructions below. I hope you get some ideas and inspiration!


I cut several snowflakes from the Tim Holtz Paper Snowflakes Mini thinlets die set out of Neenah Solar White 110 lb. card stock.

For the top card panel, I cut a 4-1/2" x 6-1/2" piece of Neenah Solar White 110 lb. card stock and placed a variety of the snowflakes on the panel until I was happy with the arrangement.

When I was pleased with the placement of the snowflakes, I adhered them to the card stock panel using Ranger Multi Matte Medium.

When the panel was completely dry, I cut off the excess snowflakes from around the edges of the panel. I set that aside and began working on my Christmas trees.

I created two Christmas trees from Neenah 110 lb. solar white card stock. The tall, thin tree measures 5" tall, the wider tree measures 4-3/8" tall.

I marked 5 sections on each tree because I'm using 5 different patterned papers to create the tree. The tall tree is sectioned in 1" intervals and the wide tree is sectioned in 7/8" intervals. I will use these as a pattern which will give me a guide as to where I need to cut the pieces of patterned paper trees.


I cut 5 trees using the tree patterns from Lawn Fawn's Perfectly Plaid Winter paper pack.

Using the tree pattern for the tall tree, I use the marked sections as a guide as to where I want to cut the pieces.

I do the same with the wider tree pattern, using it to create the five pieces for my wide tree.

I distress the sides of each of the tree pieces using a Prima Distressing Tool and ink those edges with Hickory Smoke Distress Ink.

Here you can see the tall tree completely assembled. I used 3d foam tape to build the tree. This gives it dimension and will allow the trees to pop off the card for more interest.

For the stars on top of the trees, I use one of the smallest solid snowflakes from the paper snowflakes mini die set and cover it with Ranger Glossy Accents. I then sprinkle on Prima Platinum Glass Glitter. I set them aside to completely dry.

Going back to the top card panel, I adhere the Christmas trees to my card panel with hot glue.

Next, I color over the snowflakes with a Tumbled Glass Distress Crayon and rub it in with my finger tips.
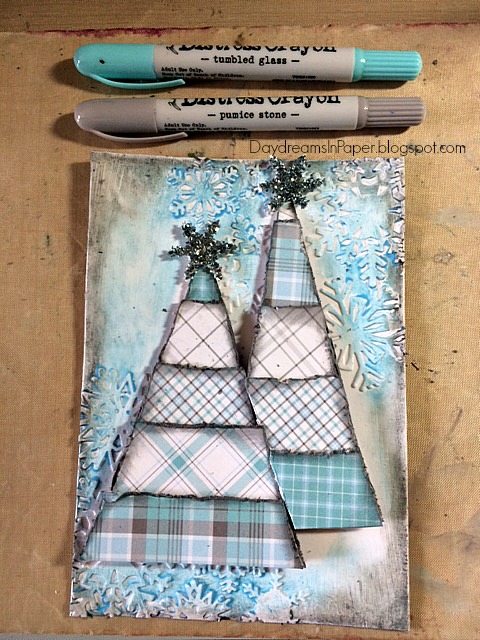
I color along the edges with a Pumice Stone Distress crayon and rub it in with my finger tips blending all the colors together.

To finish my card, I adhere the card panel onto a 5" x 7" card top folding card base and add a few pearl dots to the center of some of the large snowflakes. I add a sentiment created from Tim Holtz Chitchat Seasonal stickers and this card is done.
I hoped you enjoyed seeing the process I used to create my card. Please join us in all the fun and add your project to Simon Says Stamp's Monday Challenge Blog for your chance to win a $50 gift voucher to their amazing store.

For more inspiration, tips and tricks for all types of papercraft creations, follow Simon Says Stamp on:


You can find all the following supplies I used to create this project at Simon Says Stamp:


I really like these trees!
ReplyDeleteGorgeous card Cathie, I love the background and the trees are amazing!! Love the papers and how you distressed them 😍❤️
ReplyDeleteLuv
Lols X X X
Pinned this beauty! I LOVE the torn paper trees and the colors!
ReplyDeletebeautiful card Cathie...love the colours and papers you used for those adorable funky trees and I gotta me some of that glass glitter...hugs kath xxx
ReplyDeletebeautiful card Cathie...love the colours and papers you used for those adorable funky trees and I gotta me some of that glass glitter...hugs kath xxx
ReplyDeleteBeautiful cards Cathie! I just realized we kinda used the same technique for the trees!!! great minds thinks alike!!!
ReplyDeleteHugs, Zoey
Fab textured snowflake background, and your trees are so charming - love them!
ReplyDeleteAlison x
Wow.. this is such a fun and fabulous design, Cathie. Love your beautiful Christmas card! :)
ReplyDeleteThis is so GORGEOUS! I love this from top to bottom and side to side! I am a sucker for plaid, but I really like the way you made the plaid have a bit of an "edgy vibe" with the distressing and gray tone. These trees have attitude and beauty both and I think you are a master at combining things in interesting ways!
ReplyDeleteSuch a beautiful card and I adore how you created the background and the trees, so clever and such a great use of patterned paper! Gorgeous work as always... <3
ReplyDeleteCathie, I LOVE this! Gorgeous blues and plaids, and the snowflakes in the background and on top are wonderful. Beautiful card!!!
ReplyDeleteThank you for step by step:) Your's christmas trees are adorable:)
ReplyDeleteLove your trees! As always a wonderful tutorial, I love to see your creative process!!! Brilliant!Barbara
ReplyDeleteThese trees are stunning, Cathie! Love the combo grey with blue and all the pattern papers are fabulous! Hugs, Sandra
ReplyDelete