


I chose to use a 4x6 Tim Holtz burlap panel and turned it around to create a shadowbox. I used the packaging material that comes with the burlap panel and cut it down to fit inside the shadowbox and distressed the edges with the Tim Holtz Distresser tool. I used that piece to be the matting behind my main focal point.

I cut a piece of watercolor paper to fit the inner part of the matting and taped it with painter's tape to a hardboard panel.

I sprayed the watercolor paper with water before adding Mermaid Lagoon and Cracked Pistachio Distress Spray Stain.

I allowed the spray stains to dry adding more until I got the desired look and depth of color for my watercolor panel and then, very carefully, removed the painter's tape.

I cut a piece of Tim Holtz Melange Tissue Wrap to fit over the watercolor panel and adhered it to the panel with Ranger Multi Medium Matte. I applied the medium to the watercolor panel and then gently placed the tissue paper over the panel. I carefully rubbed my fingers over the tissue to get rid of any air bubbles and then applied more medium over the top of the tissue paper. After letting that dry, I cut the tissue hanging over the edges to the same size as the panel.

When the entire tissue panel was dry I distressed the edges.

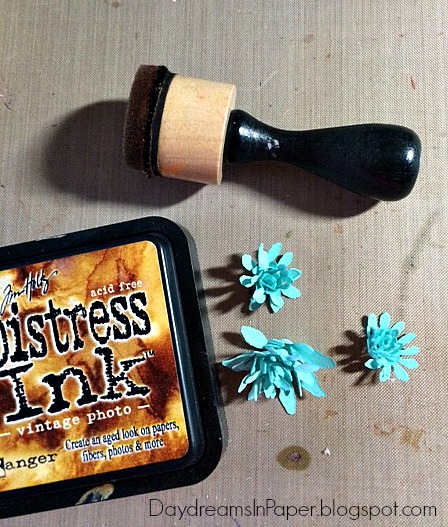
Now it was time to ink the edges of the tissue panel with Vintage Photo Distress Ink.

I placed the panel inside the burlap panel to make sure it fit properly. After seeing that my panel fit perfectly, I removed it so I could finish my project.

I wanted to create a frame to go around the outer edges of the burlap panel to hide the staples so I cut a piece of Robin's Egg Bazzill cardstock the same size as the panel. Using a Spellbinder's Long Classic Large Rectangle die I created a window for the frame in the cardstock.

When my cardstock frame was complete I cut out three Cheery Lynn Designs Anastasia Borders and cut one of the borders in half.

My next step was to assemble the pieces of the frame together but before I did that, I used vintage photo distress ink to give the lace border a vintage look. After applying the ink, I then pieced together the lace to the cardstock frame leaving a small edge in the center so the beautiful Robin's Egg colored cardstock would peek through.

To create the flowers for my project, I cut out three sizes of flowers from the Robin's Egg and Whirlypop Bazzill cardstock with Tim Holtz Tiny Tattered Florals Thinlit dies.

When the flowers were formed, glued and dry, I applied vintage photo distress ink to the edges of the light blue flowers to give them a vintage look.

I didn't have a die in the shape of a vase, so I had to create my own. As I was looking at my distress tool I saw a vase within its shape and it looked like it would be just the right size! I traced around the tool on watercolor paper and removed the tool, then drew a scalloped top to the vase and cut it out.


I used the same distress spray stains in Mermaid Lagoon and Cracked Pistachio to color the vase using the same process I used to make the original panel. I then stamped the screen image from Tim Holtz Stampers Anonymous Mixed Media stamp set on the top and bottom of the vase with Wendy Vecchi Potting Soil Archival Ink and inked the edges with vintage photo distress ink. I arranged the flowers on the tissue panel and added stems that I made from green floral stem wires.

It was now time to make a bow for my project and I used Tammy Tutterow's method of coloring the plain, dry edges of seam binding ribbon with distress markers. I used the same colors that matched my project. You can find her free tutorial here.

I created my own sentiment "Friends are flowers in the garden of life" using Microsoft Word on plain ivory cardstock in my printer. I then cut out the sentiment in pieces and inked the edges with Mermaid Lagoon and Vintage Photo Distress Ink.

After all my pieces were complete, I arranged them on my panel and adhered them with glue. Here again, is my completed shadow box.

I hope you enjoyed my "Best Friends" project and that you decide to create something for your best friend too. Have a great weekend!


Hello Cathie.... this is AMAZING!!!! I am in love with this project and thank you so much for showing us how you created!!!
ReplyDeleteSuch a cool idea to use the distress tool to shape a vase!!! LOL!!! SO SMART!
Thank you for playing along with us over Simon Says Stamp Monday Challange!
I wish you a great day!
xx Zoey
Thank you so much, Zoey! This was such a fun project for me and I have enjoyed your work as guest designer with SSS. Your work is amazing! Have a wonderful weekend.
DeleteGorgeous, love the way you created your vase. Gorgeous colour palette too. Tracy x
ReplyDeleteThank you for the sweet comments, Tracy!
DeleteCathie, this is as cool as it can be! I love your choice of layers and awesome grungy yet colorful palette. Beautiful creation. Biggest congrats on your SSS spotlight!
ReplyDeleteThank you so much! I was so excited to see my name in the SSS spotlight. I've enjoyed the challenges and I love the inspiration from all the designers each week.
Delete