Also, this month we have guest designer Larisa Vereshagina aka Riliska with us. Please send her some love and visit her blog Riliska's Home.
I created a 1940's movie house inspired by the movie "Casablanca". I hope you enjoy some seeing how I created some of the elements for my mixed media panel. Thanks for stopping by!

Do you remember the old movie house theater wallpaper? I don't either, but I've seen pictures and I always thought the red wallpaper with velvet embossed patterns was so pretty. That's the look I was going for and used a few Spellbinders products to recreate this pretty wallpaper background. I'll show you how I did it below along with some of the other fun elements on my panel.

To create my wallpaper background I cut four panels of Neenah Solar White 110 lb cardstock and embossed them with the Spellbinders Butterfly Kisses Embossing Folder.

I used a Ranger Mini Ink Blending Tool to color all four panels with Fired Brick Distress Ink.

I gently went over the embossed design with a Black Soot Distress Crayon. (Be careful to use very light pressure because you don't want the pigment to get beyond the embossed pattern and on to the flat ares of the paper. You just want to leave some texture on top of the pattern to mimic velvet.)

To complete the look, I went over the entire panel, very gently, with Black Soot Distress Ink being very careful to stay on the top of the embossed pattern. I now have four beautiful "velvet wallpaper" panels to create my background.
Can you guess what die I used to create my movie reel? I used the Tim Holtz Sizzix Picture Wheel die. There are a few cuts and snips you need to make to create the movie reel and I've created a picture step-by-step tutorial below.

First, cut two picture wheels. I cut mine out of Neenah Solar White 110 lb cardstock. It's a nice heavy weight cardstock that you can still manipulate and bend which is important to create the center of the movie reel which you will see in another step below.

Begin removing some of the pieces that connect to the center wheel. (It's important to mark the sections with a pencil that need to be cut to make sure the right pieces are removed, otherwise the wheel will have one small rectangle left behind as you can see on some of the pieces that connect to the center of the wheel resulting in a non-symmetrical wheel.)

Cut two pieces and then leave one piece attached. Here, you can see as I move around the wheel and remove pieces.

As I continue removing pieces, you can see the movie reel beginning to form.

After all the correct pieces are removed I now have one base piece for my movie reel.

You will need to create two of these to make a complete 3 dimensional movie reel.

To create the center of the movie reel, there are a few steps that need to be done. First, you will need to cut another Picture Wheel, because you will need the center portion to create the center of the movie reel. (This step can be deleted if you have a 3/4" circle punch that can reach to the center of your wheel. Unfortunately, I don't have one, so I had to complete the following steps to create the center of the movie reel.)

After you have removed the center of the Picture Wheel, use a 3/4"circle punch to create a perfect circle. Trace four of these circles on the center piece of the picture wheel and make sure they are spaced evenly around the center.

Once your circles are traced onto the center piece, you can now line up your 3/4" circle punch and punch out the four circles for the center of the movie reel. You will use this piece for creating the movie reel as well as using it as a template for the next step.

Place the center template created in the step above over one of the picture wheels that was completed in step 5. Line up the template to the center of the solid center on the movie reel and trace the circles. Use an exacto knife or craft knife to cut out the circles you traced. (Notice these are not perfect circles, which is why we will now use the template to cover those circles leaving behind perfect circles. You will see this in the photo below.)

Here, is a completed movie reel. You will need to create another one to create a three dimensional movie reel. (DO NOT attach these pieces together yet because they need to be painted first. I found if you attach them and paint it as one piece it doesn't look cohesive as when the pieces are attached after they are painted.)

Next, cut a strip 7-1/4" long by 3/8" wide for the center piece that connects the two movie reels together. This is where the Tim Holtz Film Strip Ribbon will be wound.

Paint all 5 pieces with Brushed Pewter Distress Paint. I used the dauber top because by pouncing the dauber on the pieces, it left behind some nice texture that is found on old movie reels.

Here are the painted pieces for the wheels of the movie reel. (You will need to paint both sides as this is 3 dimensional.)

When the pieces of the wheel for the movie reel are dry, attach them together as shown above. You will also need to paint the connecting strip for the movie reel on both sides as shown above.

To complete the 3 dimensional movie reel, bend the strip of painted cardstock to create a circle and make sure this circle is big enough to go around the outside of the four wheels in the middle of the movie reel.

Place the second movie reel on top of the circle in the middle and viola, you have a 3 dimensional movie reel!

To create the popcorn for my panel, I tore small pieces of Neenah Solar White 110 lb. cardstock from left over scraps and wet them with water crumpling them in my hand as I formed them. (Video below.)

Here are my formed and dried popcorn pieces.

Here, is a closeup of the popcorn pieces after they have been inked with Scattered Straw Distress Ink and attached to my final project.
Here again is my final project:
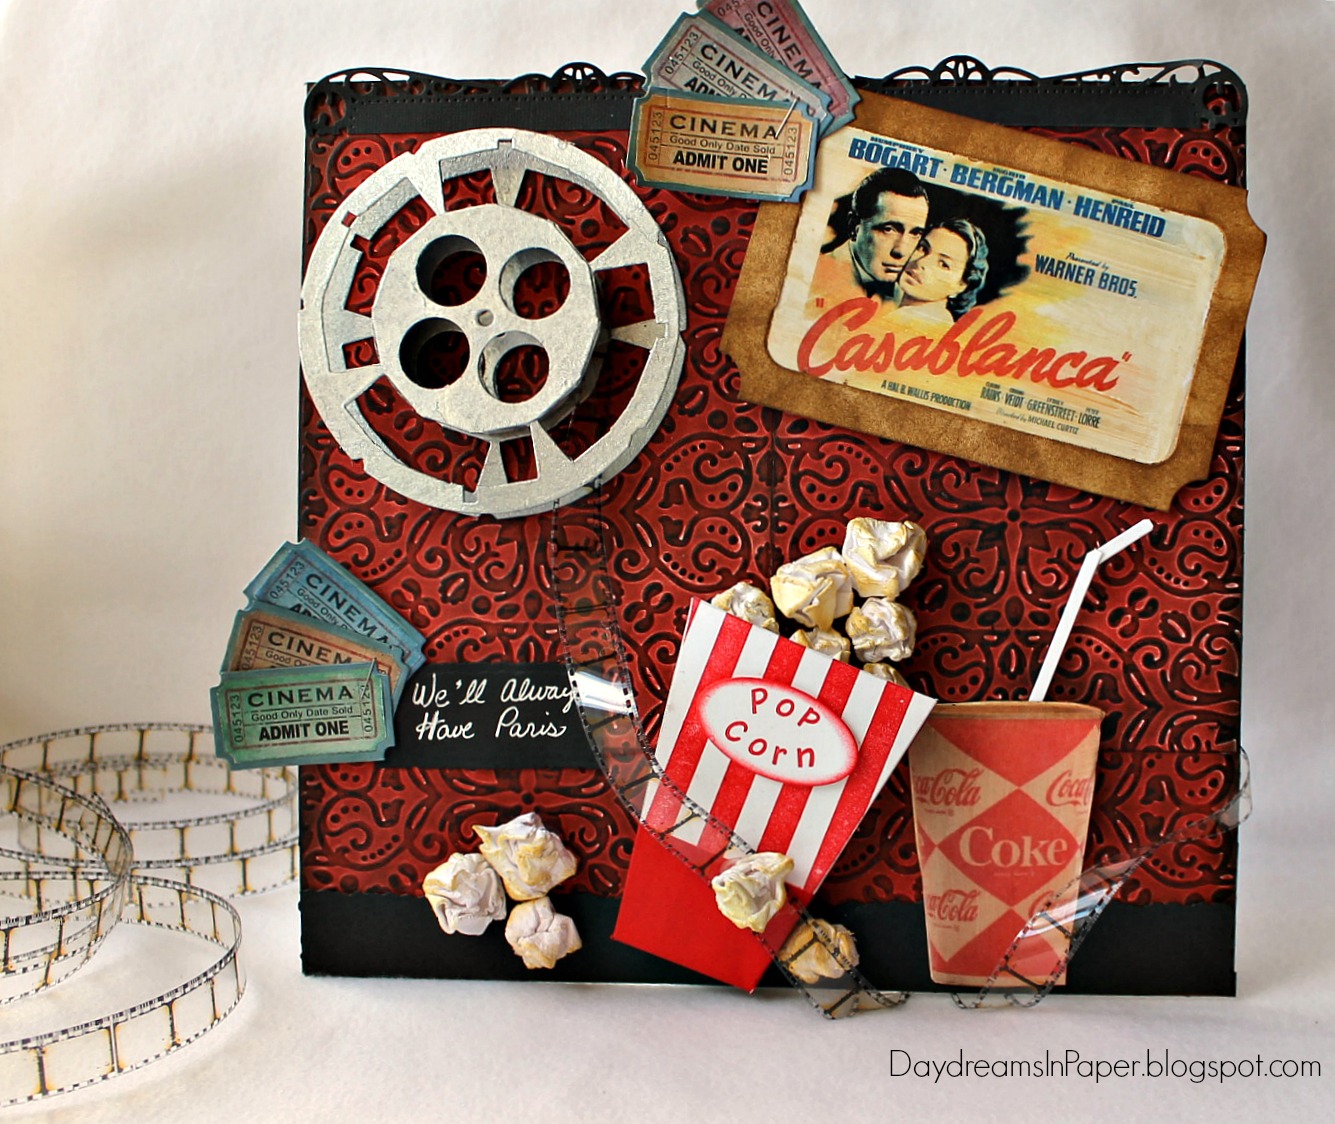
I cut decorative strips from the Spellbinders Timeless Rectangles and Deckled Rectangles die sets for the top and bottom of my background to add some framing. I used the Tim Holtz Mini Tickets and Big Ticket die sets to create some fun pieces where I added free images from the internet and attached them with Ranger Distress Vintage Collage Medium. I made a 3 dimensional popcorn box by hand and stamped and inked it to look like an old time popcorn box where I placed my popcorn. The Film Strip Ribbon was wound around the movie wheel and around some of the elements on my panel. I added one of the famous quotes from the movie handwritten on a Deckled Rectangle and called my piece finished.
I hoped you enjoyed seeing the process I used to create my 1940's Casablanca mixed media project representing our At The Movies theme. Please join us in all the fun and add your project to Simon Says Stamp's Monday Challenge Blog for your chance to win a $50 gift voucher to their amazing store.

For more inspiration, tips and tricks for all types of papercraft creations, follow Simon Says Stamp on:


You can find all the following supplies I used to create this project at Simon Says Stamp: