


Hello Friends! I hope you had a wonderful weekend and that you're ready for a new challenge on the Simon Says Stamp Monday Challenge. Our theme this week is, Distress It. My take on the challenge is to use the word Distress in a couple of different ways. When I hear the word distress, my mind instantly thinks of ink. Come' on, you know it's the first thing you think of too. Second thing that comes to my mind when I hear the word distress is worn edges. So with those two thoughts in mind I created this beautiful card. I think Distress Inks make the prettiest backgrounds and the most gorgeous soft colored flowers. I hope you enjoy the tutorial I put together below.
Also, don't forget to check out Beulah Bee, our July guest designer. She's awesome and the detail she creates in each project leaves me speechless. I'm so happy she's with us again because I always learn something new from her amazing talent.


I begin the card by creating the background using Tumbled Glass and Fossilized Amber Distress Inks. I apply the inks in random areas on the card panel. I then stamp on the Tammy Tutterow Dear Ruby stamp in Fossilized Ink over the yellow areas.

Next, I lightly stamp on the Tammy Tutterow Big Cheesecloth stamp in Tumbled Glass Distress Ink over the blue areas of the panel.

To finish the background, I ink the edges with Vintage Photo Distress Ink. I set that aside to completely dry.

To begin creating the flowers for the card, I cut small flower petal shapes from the Tammy Tutterow Designs Posie Parts die set. There are several different shapes in the set and they are actually for the stamps that come with the set, but I will be using them alone just for the shapes. For the first flower, I cut two of the same shape petal (the one with the indentations) and ink the centers with Tumbled Glass Distress Ink.

I cut a 1/4" slit from each of the indentations of the petals on the die.

I then turn the petals over and use the McGill Flower Kit to shape the petals. I use the 6mm stylus tip in a circular motion in the center of the petals.

I turn the stylus around to the 2mm tip and push down lightly drawing from the top to the center. This will leave a crease in the petal making it easy to form.

Next, I turn the flower petals over to the inked side and push down firmly in the center of the petal with the 2mm stylus tip.

I place one set of petals on top of the other, offsetting the petals and glue them together. I form the petals with my fingertips until I'm happy with the way they look and add some white stamens to the centers. You can see them completed above.

I cut another set of petals from the same die set (the one with the jagged edges) and form the petals with the flower shaping kit. Using the 2mm stylus I firmly press the center of the petals which will naturally form a "Y" shaped crease.

For this flower, I cut away one of the three sections on one of the petals.

Using my fingertips, I adhere the two sides together from the cut away petal to form a cup-shaped set of petals.

I adhere the cup-shaped flower petals on top of the complete set of petals.

I add some yellow stamen tips to the center.

Above, you can see the completed cup-shaped flowers on the card.

Using the same Posie Parts die set, I cut three of the 7-petaled flowers and ink the centers with Fossilized Amber Distress Ink.

I shape each petal with a stylus just as I did with the other flowers.

For this flower, I cut away two petals from one of the flowers as shown above.

Using my fingertips, I adhere the two sides together from the cut away petal to form a flower with four petals.

I place one set of complete petals on top of another set of complete petals offsetting the petals and adhere them together.

Next, I adhere the flower with 4 petals to the center.

To complete the flower, I adhere a small half pearl to the center.

Above, is a close-up of the yellow flowers.
Too see how I create my roses see my tutorial here.

To create the decorative edge above the flowers on the card, I use the Tammy Tutterow Deco Edge Envelope die. (I like to try and use dies in many different ways to get the most out of them. I love the look of the deco edge on this envelope die and cut four of them for the card. You can still use the bottom portion of the envelope die so don't throw it away!
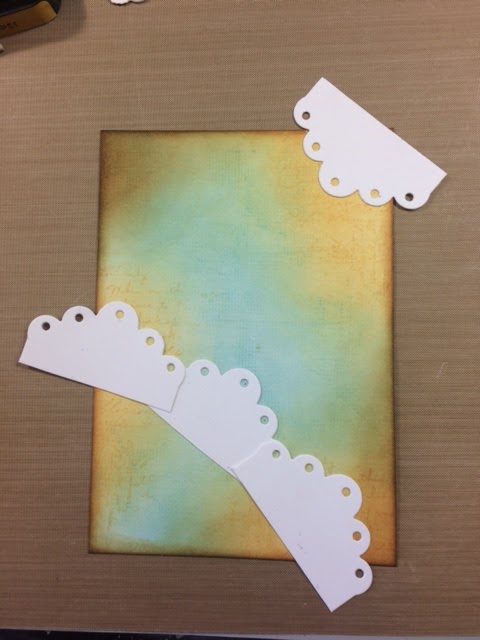
I adhere the deco edges to the card then turn the card over and cut the overages off the edges.

I adhere the flowers just below the deco edges and add half pearls.

To complete the card, I add a twine bow to one of the dies from the Tammy Tutterow Frayed Tabs die set. Instead of creasing the tab in half, I left it full length and added the bow over the center crease. I adhered the main card panel to the bottom portion of a small corrugated panel distressed with the Prima Distressing Tool. I adhered that panel onto an 4-3/4" x 6-3/4" embossed panel and then, finally, I adhered that to a 5" x 7" piece of Simon Says Stamp Dark Chocolate card stock.
I hope you enjoyed seeing the process I used to create my card for the Distress It challenge and that you join us for this fun challenge by adding your project to Simon Says Stamp's Monday Challenge Blog for your chance to win a $50 gift voucher to their amazing store.

For more inspiration, tips and tricks for all types of papercraft creations, follow Simon Says Stamp on:


You can find all the following supplies I used to create this project at Simon Says Stamp:

 |  |  |  |  |  |
 |  |  |  |  |  |
 |  |  |  |  |  |
 |


Gorgeous card Cathie, the flowers are absolutely stunning and I love the background, the whole design is so pretty :-)
ReplyDeleteluv
Lols x x x
Very pretty, gorgeous flowers!
ReplyDeleteWow! The mix of the old, distressed and vintaged background with the fresh and elegant and clear flowers is amazing. I love this combo a lot. Hugs, Macarena
ReplyDeletegorgeous card, and those flowers are awesome Cathie!
ReplyDeleteAnother stunning creation, Cathie! I love seeing the process of how you created those gorgeous flowers!
ReplyDelete*mwah*
Steph
Simon Says Stamp!
All right, hands down you make THE best flowers, Cathie!! Beautiful card, and those distressed edges look fab! Yes, distress ink came first to mind for me too :) hugs, Maura
ReplyDeleteThis is gorgeous! And what a treat to see all the behind-the-scenes work that went into those fabulous flowers! I also love how you hit the perfect balance between elegance and distressing techniques.
ReplyDeleteSuch a wonderful piece, Cathie! Love the tutorial on the flowers! They look amazing! And love the color combo you've picked, very pretty! Hugs, Sandra
ReplyDeleteLove the beautiful color scheme and those gorgeous flowers on this piece, Cathie. Such a fabulous design! :)
ReplyDeleteGorgeous card and I love the softness of the colour palette which works so well with the beautiful flowers...it's just so pretty Cathie! <3
ReplyDeleteBeautiful card Cathie! I love those wonderful flowers that you created. The white together with one color ink in the center of the flowers look amazing.
ReplyDeletestunning card Cathie...love the texture and beautiful soft colours and oh boy those flowers are amazing...hugs kath xxx
ReplyDeleteYour flowers are out of this world!!!! I love it! I literally checked your blog as I was making these flowers aswell!!! Love love love it!
ReplyDeleteWonderful how-to's!
ReplyDeleteSo happy to see your flowers tutorial!!! Amazing as always and so helpful for me! love this card and the way you created a spectacular contrast beteween colors and white! Barbara
ReplyDeleteMerkur 45C Merkur Classic Slant Bar DE Safety Razor - CASINO
ReplyDeleteI love this Merkur classic safety razor with 바카라사이트 an extra kadangpintar long handle. The longer deccasino handle leads to an excellent grip, not too short.