

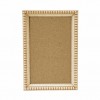
Hi Everyone! Welcome back to another fun challenge on the Simon Says Stamp Monday Challenge. Our theme this week is, It's A Frame Up. For my project, I used a Tim Holtz Mini Framed Panel to create my "Believe In Love" mixed media picture. I added handmade flowers along with some old Prima resin pieces from my stash and chose a striking color palette of blue and black. I hope you like it and I hope you enjoy the tutorial I put together so you could see some of the steps I completed to create this beautiful project.
Also, did you see the amazing interactive sliding scrapbook our May guest designer created last week? It's a stunner! If you haven't checked it out, please do, and then stop by Dr. Sonia's blog Cards, Crafts, Kids Projects to see more of her amazing talent.


To begin, I painted the decorative mini frame with Dina Wakley Black Gesso and let that completely dry. You can speed up the process with a heating tool.

Here is the mini frame completely covered with black gesso. Make sure to get every nook and cranny covered.

I used my finger tip to apply a small amount of Pure Platinum Nuvo Embellishment Mousse.

To prepare the background, I covered the panel with two coats of Dina Wakley White Gesso.

After the gesso is completely dry, I color random areas with Tumbled Glass and Hickory Smoke Distress Crayon. I blend the color in with my fingertips and a small amount of water to get the pigment to move. I then splatter Brushed Pewter Distress Paint all over the panel using a splatter brush. I want small splatters, so I hold the brush over the panel and flick the bristles with my fingers.

Now that the paint and Distress Crayons are completely dry, I stamp on small areas of flourishes using the Tim Holtz Flourish stamp. I stamp that on in Hickory Smoke Distress Ink.

Now I want larger splatters on the panel, so I flick the splatter brush over the panel and where they land, they land. You really don't have any control over where they go so be prepared to accept the pattern as it is. Just let go of control and flick away. :)

When the paint splatters are dry, I add cut up sections of the Tim Holtz Doily #2 thinlits die. I cut this die from Neenah Solar White 110 lb. card stock and adhered it to the panel with Ranger Multi Matte Medium.

I add a piece of ribbon from my stash in the upper top half of the panel and adhere that with multi matte medium. If you're using ribbon, make sure to leave some space for the frame along the edges or the frame will not adhere to the background panel.

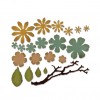
When I create flowers for projects, I create a couple extra just in case I need them in a pinch for future projects. I created this rose from the Tammy Tutterow Shabby Posies die out of some patterned Prima paper which didn't match my project so I completely cover it with Dina Wakely Black Gesso and let it completely dry. You can see how I create my roses here.

When the gesso is completely dry, I rub on some Pure Platinum Nuvo Embellishment Mousse on the tips of the petals with my fingertips.

To create this flower, I use the Tim Holtz Small Tattered Florals thinlits die set. I ink the center of the petal pieces with Tumbled Glass Distress Ink and punch a small hole in the center of each. I push a set of 4 stamens in the centers of the holes from the smallest petal set to the largest petal set and offset the petals as I glue each set of petals one to another. I then shape the petals. I also create several other flowers of different sizes with the same die set.

For the main focal point of my piece, I use a Prima resin heart from my stash. This heart was white so I covered it with black gesso and let it completely dry.

When the gesso is completely dry, I rub on some Pure Platinum Nuvo Embellishment Mousse to accentuate the decorative pattern on the heart. I apply the mousse with my fingertips.

I use another resin frame piece from my stash and cover it with Tumbled Glass Distress Paint using my fingertips. I then rub the decorative accents with the same pure platinum mousse.
For the white frame underneath the heart, I paint it over with Picket Fence Distress Paint so it's pure white.

To complete my project, I adhere the frame to the background panel and add my flowers and resin pieces. I adhere the pieces with Prima 3D Translucent Matte Gel. I created the sentiment on my computer, cut it out along the edges of the words and inked with Tumbled Glass and Black Soot Distress Ink.
I hope you enjoyed seeing the process I used to create my It's A Frame Up project and that you join us for this fun challenge by adding your project to Simon Says Stamp's Monday Challenge Blog for your chance to win a $50 gift voucher to their amazing store.

For more inspiration, tips and tricks for all types of papercraft creations, follow Simon Says Stamp on:


You can find all the following supplies I used to create this project at Simon Says Stamp:


Gorgeous panel Cathie, I love the whole design of this, the frame and flowers are fabulous and I love the background and heart too, everything is beautiful :-)
ReplyDeleteluv
Lols x x x
Beautiful!
ReplyDeleteWOW what an absolute stunner this is Cathie...love how you have used the mousse and the paints. I was debating whether to buy the mousse...you have sold me on it!! And Thank you so much for the loving kind words on my projects...you are so generous!!!
ReplyDeleteCheers
Dr Sonia
Wonderful icy blues, Cathie! The dark frame is gorgeous around the heart and lovely textured elements! Gorgeous! Maura
ReplyDeleteOh yes! I enjoyed the process and the project! The design is so magnetic and extremely elegant. The mix of soft blues and black/silver is stunning. LOVE IT. Hugs, Marzena
ReplyDeleteGorgeous piece! Love the sentiment, the layout, the colors, the texture....everything!!
ReplyDelete*mwah*
Steph
Simon Says Stamp!
Cathie, it:a truly shabby chic.The texture on your layout in frame is amazing!!What a stunning project. I love the heart as focal point. Well done......
ReplyDeleteBeautiful framed art! I love your flowers and the colors work so well together!
ReplyDeleteSuch a stunning framed heart Cathie! And those flower are absolutely fantastic! Love everything going on here.
ReplyDeleteWow, wow, wow! I could only imagine disaster if I tried to incorporate a black flower into my work, but you absolutely nailed every part of this! You always hit such an admirable balance with your color and embellishments. This is no exception and I enjoy seeing what you make week after week!
ReplyDeleteanother stunning project Cathie...love that heart and all the pretty additions you added...hugs kath xxx
ReplyDeleteThis is such a pretty project, Cathie ~ really elegant and I love the framed heart, it really pops against the blue background and your flowers look amazing... <3
ReplyDeleteSuch an amazing project Cathie! I love how it is rich of texture and the colors you choose make the whole project so elegant and classy! Love it!
ReplyDeleteThis is such a gorgeous creation, Cathie. The frame and the flower embellishments are fabulous. :)
ReplyDeleteStunning project! I adore this shades of blue and I love your way to alter and create embellishments! Barbara
ReplyDelete