

Happy Monday, everyone! I hope you had an amazing weekend and you're ready for a new challenge on the Simon Says Stamp Monday Challenge. Our theme this week is, Splash It On. We're asking you to use water or watercolor on your project. I chose to use the Tim Holtz Distress Inks and Markers and created a fun background with some beautiful flowers. I hope you enjoy the tutorial I put together to show how I created the background for my project. Enjoy!
Also, don't forget to stop by our lovely guest designer for the month of April, Amy, from Amy's Card Obsession. You won't be disappointed with her amazing talent. Her last two projects with us have put a huge smile on my face and made me chuckle out loud and I know they will do the same for you. So please, check out her website to see her unique style.


I want a lot of texture on the background so I decide to use the Tim Holtz Lattice Frameworks die. I use the lattice piece and also the small triangles pieces that are left behind after cutting.

I cut the lattice piece apart so I have open triangles to go along with the closed triangles that were left over pieces of the die. I lay the pattern onto a 5" x 7" piece of Strathmore Mixed Media board to get an idea of what I want the background to look like and where the flowers will be place.

Before adhering the lattice pieces, I decide to stencil on the Simon Says Stamp Falling Snow stencil to the background in random areas and let that completely dry.

Now that the stenciling is completely dry, I adhere the lattice pieces onto the background using Prima 3D Matte Gel.

I go over the entire piece with Dina Wakley White Gesso. I set this aside to completely dry while I create the flowers for the project. (Discovery: After I apply the gesso, I realize it would have been better to gesso the background and the triangle pieces separately before adhering them to the panel. You can see in the photo above, the gesso clumps around the triangle design. This frustrated me, but I learned a valuable lesson for future projects.)

I stamp one of the flowers and one of the stems from the Tim Holtz Flower Garden stamp set with Versamark embossing ink and Hero Arts clear embossing powder.

I watercolor the flower with Aged Mahogany, Spun Sugar, Fossilized Amber and Wild Honey Distress Markers. I apply the color onto my craft mat and pick up the color with a water brush and apply the color to the flower.

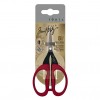
After coloring the flower and stem, I fussy cut them out with a Tim Holtz Snips scissors. I create another flower for the project while my background is drying.

Now that the background is completely dry, I spray Broken China Distress Spray to the bottom of the background and Tumbled Glass Distress Spray to the top of the panel.

Before the background is dry, I dab a little of the color off with a paper towel.

I continue to add color and dab off color until I'm pleased with the way the colors turn out and I allow that to completely dry. You can dry it with a heat tool to speed up the process.

When everything is dry, I stamp on one of the stamps from the Tim Holtz Etcetera stamp set with Black Soot Archival Ink.

I go over the edges with Black Soot Distress Paint. I use the bottle with the dauber top.

Next, I decide to add more texture with Prima Crystal Glass Beads and add them in random areas of the background. I paint over them with Black Soot Distress Paint.

For the last step to complete the background, I splatter on some Black Soot Distress Ink mixed with water using the Tim Holtz Splatter brush.
To finish my project, I adhere the flowers to the background in the center and add the "Thinking Of You" sentiment from the Tim Holtz Sentiment Thinlits set. I dab on some Broken China Distress Ink that has been diluted with water using my fingertips and ink the edges with Black Soot Distress Ink. I add some small, thin pieces of ribbon from my stash for interest and my project is done.
I hope you enjoyed seeing the process I used to create my Splash project and that you join us for this fun challenge by adding your project to Simon Says Stamp's Monday Challenge Blog for your chance to win a $50 gift voucher to their amazing store.

For more inspiration, tips and tricks for all types of papercraft creations, follow Simon Says Stamp on:


You can find all the following supplies I used to create this project at Simon Says Stamp:


That background is so cool Kathie! I love how you used those diamond pieces, it looks stunning. Gorgeous flowers and sentiment too.
ReplyDeleteCathie, I do not know if i already said this to you, but I truly think that you have improved SO MUCH in these months. I love seeing where this path is taking you. I love to see improvement and to see how much you grow and how much love you put in your projects! It is fantastic. Love it my friend <3
ReplyDeleteyou are kind at heart and I am very blessed to call you my friend.
Aw, thanks Zoey, you're making me blush. This means so much to me coming from you. You are one of my biggest inspirations and I'm blessed to call you my friend too. ♥
DeleteThis is totally amazing, Cathie. I alway love to see how your project is being done and how much work is in it. I love the blues on your background and the different textures you gave to this card. I am absolutely amazed by the coloring of the flowers, the color is fantastic and so soft. Great project! Hugs, Marzena.
ReplyDeletewhat a super looking project!! Fab colors and a touch of grunge-love!
ReplyDeleteGorgeous project! I love how you used texture in the background! :)
ReplyDelete*mwah*
Steph
Simon Says Stamp!
Love this Cathie 😍❤️ The background is awesome and I love the flowers, so pretty ❤️
ReplyDeleteLuv
Lols x x x
The background does a wonderful job of showing off the pretty flowers, their shading is so professional and my hat's off to you for brilliant fussy-cutting!
ReplyDeletefantastic card, Cathie! Love how you use the positive and negative from the die cut, and your background has such depth and texture! Flowers are gorgeous edged in white! hugs, Maura
ReplyDeleteFabulous detail and depth in that background, and the flowers look charming.
ReplyDeleteAlison x
Wonderful detail and techniques on this card and I adore how you've created the background, it looks fabulous and so, so striking ~ it's the perfect backdrop for the beautiful stamped flowers which really stand out against it! <3
ReplyDeletelove love love those gorgeous flowers against the beautiful textured background Cathie...hugs kath xxx
ReplyDeleteLove the beautiful texture and the gorgeous flower on this piece, Cathie. The whole design is stunning! :)
ReplyDeleteLove the colors, love your style, love your watercoloring.... love every single detail! Stunning work! barbara
ReplyDelete