

Hi Everyone! It's time for another Simon Says Stamp Monday Challenge. The theme this week is, We've Got Your Number, and we're asking you to put a number somewhere on your project. Simple, right? I love adding numbers to projects. They don't have to have any significance, I just think they look cool. I chose to create a beautiful garden scene in an old and rusty garden. Below is a tutorial, with photos, on how I created my rusty garden background. Enjoy!
Also, don't forget to stop by our lovely guest designer for the month of April, Amy, from Amy's Card Obsession. This is April's last week with us and she's been amazing. I love her artwork and plan on following her for a long time to come. Check out her website to see her unique style. You won't be disappointed.


I start by cutting a 5" x 7" piece of Strathmore Mixed Media Board and stencil on the Simon Says Stamp Leaves Stencil with Wendy Vecchi White Embossing Paste. I set that aside to completely dry.

I embossed a 5" x 7" piece of Neenah Solar White 110 lb. cardstock with the Tammy Tutterow Horsehair Embossing Folder and tear it along two of the corners.

I attach the two torn pieces to the dried stenciled leaves panel.

I use the Tim Holtz Trellis Frameworks die to create small pieces that I want to add to the panel. These pieces are cut out from white chipboard. I use the trellis along with the leftover cutout pieces.

I adhere the trellis pieces to the panel in random areas.

After the pieces are securely adhered to the panel, I cut off the excess from the edges.

I cover the entire panel with Dina Wakley White Gesso.

(If you're wondering why there is a slight pink hue to the background, it's because I sprayed it with Distress Spray and hated the way it looked so I went over the entire panel again with white gesso. I wasn't worried about the pink left behind because I was going to cover it with Distress Crayon but if I didn't want the pink hue left behind I would have just covered it with another layer of white gesso.)
Now back to the tutorial.....I cover the leaves with Peeled Paint Distress Crayon by drawing it on around the lines of the leaves and move the pigment around with my fingertips.

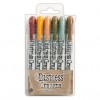
I cover the trellis pieces and rest of the background with Gathered Twigs and Wild Honey Distress Crayons. I color on the pigment in random areas and move it around with my fingertips until I'm pleased with the way it looks.

To get the rusty hardware look, I use Prima Rust Effects Paste on the trellis pieces. See below on how to apply the Rust Effects Paste.

To create the window frame for the panel, I cut out the Tim Holtz Stitched Ovals as shown above.

Here you can see what I have left over after cutting two ovals inside each other. I will save the one on the right for a future project and use the one on the left for this project.

To apply the Rust Effect Paste to the frame, I start with the darkest brown color. I dab it on with a paint brush until the piece is completely covered. (There is no need to dry the paste between layers.)

Next, I dab on the rust colored paste using the same paintbrush in random areas around the frame. (There is no need to clean the brush between applications. You can use the same brush throughout the process.)

Next, I dab on the yellow colored paste to the frame.

For the final step, I return to the dark brown paste and dab that on over all three layers in random areas. You can repeat the three layer process as many times as you want until you're happy with the way it looks.

I adhere the oval frame with 3D foam tape to the center of the panel and my background is complete.

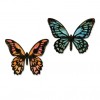
To complete the project, I create two butterflies, one from the Tim Holtz Detailed Butterflies thinlits dies and one from the Mini Detailed Butterflies thinlits dies. They are colored with Peeled Paint and Broken China Distress Oxide Inks. The flowers are from my stash and the ruler pieces are from the Tim Holtz Dapper Stash that have been distressed around the edges and inked with Black Soot Archival Ink. The sentiment is from the Tim Holtz Paperie Quote Chips with Vintage Photo Archival Inked edges. I adhere the completed panel onto a 5-1/2" x 7-1/2" piece of Simon Says Stamp 100 lb. black card stock and my piece is done.
I hope you enjoyed seeing the process I used to create my We've Got Your Number project and that you join us for this fun challenge by adding your project to Simon Says Stamp's Monday Challenge Blog for your chance to win a $50 gift voucher to their amazing store.

For more inspiration, tips and tricks for all types of papercraft creations, follow Simon Says Stamp on:


You can find all the following supplies I used to create this project at Simon Says Stamp:


What a wonderful project Cathy - so happy you included a tutorial because I would have never figured out that background! Glad that I am not the only one that has to wipe stuff off and start over!
ReplyDeleteYes, I'm notorious for having several bottles of gesso on hand to cover up my mistakes. I'm glad you enjoyed the project, it was really fun after I got the original background fixed.
DeleteCathie ♥
Such a beautiful project Cathie...loved all the process! Hugs...
ReplyDeleteThank you! I'm so happy you enjoyed seeing the process.
DeleteCathie ♥
This rusty effect is AMAZING, Cathie! I love the way it turned out. The greenery in the center gives a good freshness to the project. LOVE i! Hugs, Marzena.
ReplyDeleteCathie, this is one of my favorites! I have loved your work with these dies this week and last. Really awesome inspiration! I just love the rusty texture against the gorgeous vibrant butterflies, great contrast! You are quickly becoming my favorite artist at SSS! It seems like each week your art gets better and better and I can't wait for the next! Happy Monday friend, Autumn
ReplyDeleteAw, thank you, Autumn! Weekly projects for a year and a half have definitely allowed me to grow. I'm so happy you're enjoying my projects. That means a lot coming from someone as amazingly talented as you.
DeleteCathie ♥
This is such a totally clever design! I love the way you made the layers and especially liked how you did the center portion. It was like I was peeking into this beautiful scene. I also adore those flowers and how they add such a nice pop of color to your piece.
ReplyDeleteOh, this is so beautiful, I just love the way you built up the background - and the rusting - it is absolutely incredible ... and so realistic! Thanks so much for sharing the 'how to' as well! Anne x
ReplyDeleteYou're welcome, Redanne, and thank you for leaving such a sweet comment. I really appreciate it!
DeleteCathie ♥
Love all the fantastic techniques you used for the background, gorgeous colours too, and I really love the sentiment,
ReplyDeleteSarita x
Thank you, Sarita! I'm so happy you enjoyed this project. I appreciate you taking the time to leave such a nice comment.
DeleteCathie ♥
Beautiful card, Cathie! You create such depth and texture with your pieces, love them! I especially like the rusty frame and the delicate flowers. hugs, Maura
ReplyDeleteWow this truly awesome!
ReplyDeleteThank you, Jamie! I'm so happy you liked it and thanks for taking the time to let me know. I really appreciate it.
DeleteCathie ♥
Gorgeous panel Cathie! The background is fabulous and I love the flowers and butterflies, the whole design is stunning!! 😍❤️❤️❤️
ReplyDeleteLuv
Lols x x x
stunning project Cathie...love how you achieved the gorgeous rusty look...hugs kath xxx
ReplyDeleteA truly fabulous card with so much yummy texture and beautiful layering...this is wonderful Cathie and I love the whole design! <3
ReplyDeleteFantastic card Cathie! I love that wonderful background with all the layers and textures. And the pink flowers stand out so nicely against it.
ReplyDeleteWow... this is such a gorgeous card, Cathie. I love all the beautiful details on this piece. The texture and colors you created are amazing. :)
ReplyDeleteFAbulous card! the rusty look is spectacular! love the design and, as always, thanks for sharing your step by step! Barbara
ReplyDelete