

Happy Monday everyone! I hope you had an awesome weekend. For most of you, I'm sure the sun is shining more, the weather is getting warmer and the flowers are starting to bloom. All the signs of spring are in the air and beautiful colors are beginning to emerge so it is fitting that our theme this week is, Make A Rainbow. We're featuring Tim Holtz products and with all the Distress Ink colors and his amazing stamps and dies this should be a very popular challenge. I mean, c'mon, who doesn't love Tim Holt!. I bet if you're like me, at least 85% or more of your craft stash is made up of Tim Holtz products. For my project, I created a spring cottage shadow box that has all the signs that spring is in the air. Below, I've put together a tutorial for some of the elements on my panel. I hope you find some of the tips and tricks useful.
Also, please welcome our guest designer this month, Amy Bethke from Amy's Card Obsession. Her talent is amazing so please stop by her blog and check out her work, you won't be disappointed!


To create the window, I cut a 6" x 6" piece of Neenah Solar White 110 lb. card stock and ink the entire piece with Walnut Stain Distress Ink. I'm not worried about the mini ink blending tool leaving marks on the paper as this will add to the character of the "wood" on the window.

Next, I create some splotches or circles of Vintage Photo Distress Ink on the card stock with a mini ink blending tool.

I do the same with Ground Espresso Distress Ink.

I cut the window from the Tim Holtz Window & Window Box die set.
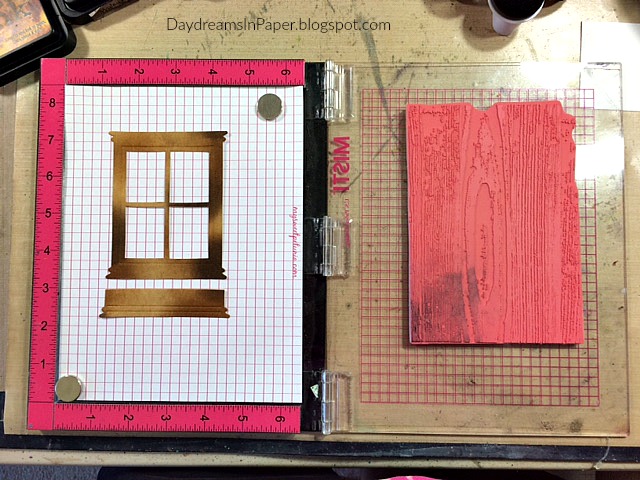
I place the window in the Misti stamping tool to apply a woodgrain pattern to the window. I use the Tammy Tutterow Big Woodgrain background stamp and stamp that onto the window using Potting Soil Archival Ink.

Here, is a close up of the window after stamping on the woodgrain pattern.

I want there to be a curtain in the window so I cut a piece of patterned card stock from the Tim Holtz Menagerie 8x8 paper stash the same size as the window.

Placing the patterned piece of card stock behind the window, I draw the shape of the curtains with a pencil.

I cut along the pencil lines and erase any marks left behind.

Here is a close up of the window with the curtains. (Sorry this photo is a little blurry.)

To create the outside walls of the cottage, I cut a 4-1/2" x 6-1/2" piece of card stock and cover the entire piece with the Tim Holtz Bricked Layering Stencil with Ranger Opaque Crackle Texture Paste.
(Note: I cut the sides away on the Tim Holtz Bricked stencil so there isn't a harsh line along the edges. This allows me to use the stencil on larger areas.)

Now that my piece is completely dry, I begin to add Vintage Photo Distress Crayon pigment in random areas. I draw it on and rub it in with my finger tips.

I love how the Distress Crayon pigment goes into the tiny cracks.

The inside of the window, or the part that will show when looking into the house, is simply a piece of Bristol water color paper the same size as the window covered with Broken China Distress Ink.

I drip on large droplets of water so there is some variation in the colors and wipe the excess water away with a paper towel.

To give the curtain some depth, I ink Walnut Stain and Ground Espresso Distress Ink along the edges of the curtain and some Simon Says Stamp High Dive in random areas of the curtain for a deeper blue color.

I made the window into a little shadow box by propping the window pane onto 3d foam tape. I create a "window" with Judkins Window Plastic by cutting the plastic the same size as the window and adhere all the layers together to create the shadow box. The layers are as follows from the top down: window pane, window plastic, curtain, 3d foam tape and blue background piece. Inside the window there is a Tim Holtz Tiny Vial with moss stuffed inside and a rose ephemera piece from the Tim Holtz Snippets Ephemera Paperie pieces. I adhered a small ephemera clock to the wall on the inside and a cute little silhouette of a cat looking inside the window on the outside of the window so his cute little tail can hang down.

To create the flowers, I use the small flower die as shown above.

I use the 5mm and 1mm ball stylus from the McGill Paper Blossoms Tool Kit to shape the flowers. Place the top side of the flower onto the shaping pad and pull the petals to the center using the 5mm ball tip. This will curl the petals inward.

Turn the flower over and use the 1mm ball tip and push down in the center of the flower. This will fan out the petals and complete the flower shaping.

Here is a close-up of the flower.
I create 7 colors representing the colors of a rainbow. I cut seven 2" x 3" pieces of Neenah Solar White 110 lb. card stock and ink both the top and bottom sides of each piece using the following Distress Ink Colors: Candied Apple, Carved Pumpkin, Squeezed Lemonade, Mowed Lawn, Tumbled Glass, Blueprint Sketch and Wilted Violet. I cut 5 flowers out of each inked piece.

I use one of the flowers (see photo below) from the Tim Holtz Wildflower Thinlits die set and use that as a stem:

After cutting the stems from Bazzill Lime Crush card stock and ink the edges with Forest Moss Distress Ink.

I pick up the tiny flowers with a tweezer, dip them in Ranger Multi Matte Medium and place them on the stem.

Now that all the colors of flowers are glued to their stems, I will add the centers to the flowers. I add the flowers to the stems before adding the centers because it's much easier as the flowers will stay straight when applying the tiny dabs of glue.

I use Prima Black Micro Beads for the centers of the flowers.


To create the centers for the flowers, squeeze a tiny drop of Ranger Multi Matte Medium into each center.

Place the flower stem into a tray. (I use the No Spill Tray Mate but I have provided a link below to several similar trays in the supplies which function in the same way.) Poor the micro beads over the glue centers and gently shake off any excess. Set it aside to completely dry without touching.

Here is a close-up of the flower centers when they are dry.

To complete the panel, I adhered each element as shown above to a 6" x 8" piece of Bazzill Butter Mints card stock that has been distressed with a Prima Distressing Tool and inked with Ground Espresso Distress Ink. I create some cut grass from the Tim Holtz Tapered Fringe Decorative Strip. I cut two strips from Bazzill Lime Crush card stock and ink the edges with Forest Moss Distress Ink. I offset the strips, one from the other, and adhered them to the bottom of the distressed panel. I adhere that panel to a 7" x 9" piece of Bazzill Malt Ball card stock and underneath that is a 7-1/4" x 9-1/4" piece of Bazzill Walnut Cream card stock. I add a strip of gathered burlap ribbon underneath the grass. On the top corner I add a Tim Holtz Index Clip Fastener with the word "imagine" from the Big Chat sticker set to complete my project.
I hope you enjoyed seeing the process I used to create my Spring Cottage Window Shadow Box project and that you join us for this fun challenge by adding your project to Simon Says Stamp's Monday Challenge Blog for your chance to win a $50 gift voucher to their amazing store.

For more inspiration, tips and tricks for all types of papercraft creations, follow Simon Says Stamp on:


You can find all the following supplies I used to create this project at Simon Says Stamp:


GORGEOUS panel Cathie! the whole design of this is stunning and I love the little kitty sitting in the window enjoying the flowers, so cute!! :-)
ReplyDeleteluv
Lols x x x
OMG! This is absolutely BEAUTIFUL. I would never imagined all the steps you have made to get this fabulous effect. Thank you for making this step by step pictures cause I totally love each of the stages of your work. The window is fantastic and the way you made the wall is just awesome! So much work with those mini flowers! LOVE it! Hugs, Marzena
ReplyDeleteGreat window scene! Love the attention to details!
ReplyDeleteFabulous project, Cathie! Love every bit of it. So much details love it. Amazing to see the pictures to really get an idea of all the work and thoughts went into this beauty. Hugs, Sandra
ReplyDeleteWow! This is such a fabulous little scene! I want to walk into whatever cottage this is! It reminded me of some quaint little cottages I saw when I lived in England and how they were surrounded by stalks and vines full of flowers. And what incredible details you've included! I especially love the woodgrain window frame.
ReplyDeleteoh my-what intricate details in this gorgeous piece!! Great idea to cut edges of the bricked stencil, and I so love all the textures and layers of this delightful window scene.
ReplyDeleteWhat a delightful scene you've created, Cathie! So much attention to detail, from the cat in the window, to the gorgeous rainbow of flowers! Love it!! hugs, Maura
ReplyDeleteThis is just precious!. Your color choices are spot-on and it's wonderful to see examples of the new mini's and get a better judge of scale. Thanks for the inspiration!
ReplyDeleteThis is amazing! I hope you win!
ReplyDeleteWowza!!! Is what I have to say. So detailed right down to those fabulous flowers you have made!!! Love the cozy feeling you conveyed by adding the "vase of flowers"!!! Thank you for sharing!
ReplyDeleteAmazing! You are my papercrafting idol!
ReplyDeleteSo darn cute! Love how you created the faux wood window and those flowers are super cheerful.
ReplyDeleteGooooorrrgeous creation Cathie... love it
ReplyDeleteThis is just gorgeous, Cathie and so very pretty! I adore the scene you've created and love all the tiny little details that pull this whole project together! Stunning work as always.... <3
ReplyDeleteLove this gorgeous creation, Cathie. Those embellishments and flowers are stunning. :)
ReplyDeletelove this dreamy scene you created with lots of rainbow colours and fab textures...hugs kath xxx
ReplyDeleteYou're the Queen of Flowers , definitely! I think that these flowers are amazing, really amazing, so small and so difficult to create! Whole design of your panel is fabulous,but the flowers fascinate me! Great project! Barbara
ReplyDeleteWoww... This is gorgeous! <3
ReplyDelete