

Happy Monday! Are you ready for a new challenge on the Simon Says Stamp Monday Challenge? This week our theme is, Transport, and I had a lot of fun creating a mixed media panel using canvas paper. I have never used this type of paper before and decided to try it. I love the texture it has and it's dreamy when blending Distress Inks. Join me below and see how I put together my "Take Me To Paris" mixed media panel and don't forget to check out our February guest designer, Nicola. See her amazing talent on her blog, Paper Profusion and leave her a sweet comment.

To begin the background, I cut a 4 3/4" x 6 3/4" piece of Strathmore Canvas Paper and blend Broken China, Tumbled Glass and Mermaid Lagoon Distress Inks together on the top. I blend Cracked Pistachio Distress Ink on the bottom half of the canvas.

Next, I ink on one of the stamps from the Tim Holtz Ledger Script stamp set with Black Soot Archival Ink.

I add some torn pieces of Tim Holtz Sketchbook tissue tape to the bottom portion of the panel.

I add torn pieces of Tim Holtz Symphony tissue tape to the top of the panel.

To add some depth to the color of the sky on the canvas, I add Simon Says Stamp High Dive dye ink to the top edges.

Next, I add some texture using the Tim Holtz Harlequin stencil with Wendy Vecchi White Embossing Paste and add that in random areas on the panel.
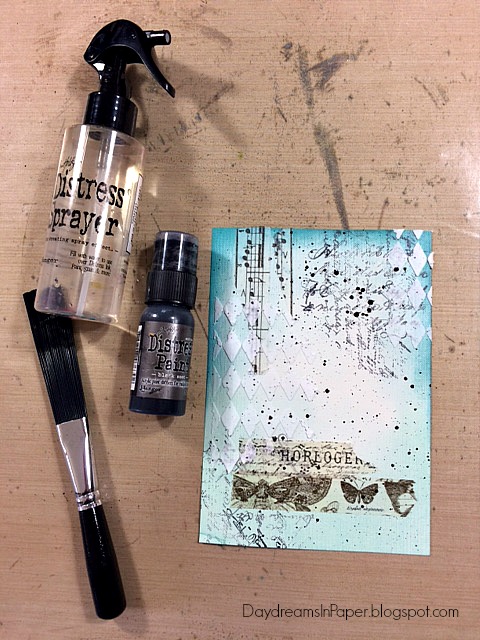
I add some splatters using Black Soot Distress Paint mixed with a little water and apply it with the Tim Holtz Splatter brush. To get small splatters, I flick the bristles over the top of the panel.

I add larger splatters to the panel with Tarnished Brass Distress Paint, I use a gentle whipping motion downward onto the panel.

Next, I add Black Soot Distress Paint to the edges of the panel.

To bring out the texture of the stenciling, I color on Vintage Photo Distress Crayon and rub it in with my fingertips. I also add half of the Fleur De Lis from the Tim Holtz Fleur De Lis & Eiffel Tower Bigz die set to the side of the panel.

Next, I use the Misti to stamp the word "Paris" on the canvas. Because this is canvas paper, I use the Misti so I can stamp it on several times until the word is clear and crisp. The ink has a hard time getting in between the texture of the canvas so stamping it several times allows me to get a completed image. I place the letters on the canvas where I want them to go and then I pick them up with the door of the Misti tool.

Here, you can see I have a nice clear and complete, crisp image transfer of the word I created with the Tim Holtz Tall Text stamp set. This completes the background so I set it aside to completely dry while I create some of the elements for the piece.

I cut out the Eiffel Tower from the Tim Holtz Fleur De Lis & Eiffel Tower Bigz die set out of one of the sheets of card stock from the Tim Holtz Materialize 8x8 paper stash.

Next, I ink the edges with Black Soot Distress Ink using a mini ink blending tool.

For the clouds, I cut them out of the Tim Holtz Mini Airplane and Cloud die set. To give them texture, I add the Tim Holtz Ringer Stencil with Distress Grit-Paste and let that completely dry before coloring.

When the grit-paste is completely dry, I color on Tumbled Glass and Cracked Pistachio Distress Crayon onto the clouds and rub that in with my fingertips. I add Ground Espresso Distress Ink to the edges.

The airplane is cut from the same die set as the clouds and from a sheet of card stock from the same Tim Holtz paper stash. I ink the edges of the airplane with Black Soot Distress Ink.
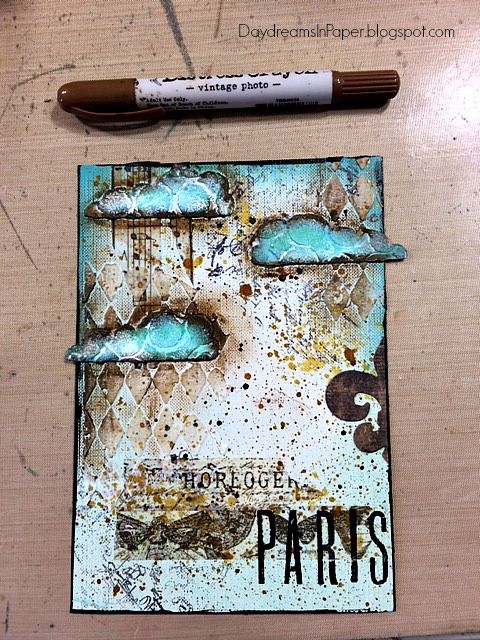
I adhere the clouds to the panel using Distress Multi Matte Medium and add Vintage Photo Distress Crayon around the edges and blend it into the canvas to give depth to the clouds.

I cut the edges of the clouds that hand over the edge and add the airplane and Eiffel Tower. I then outline them with a Black Soot Distress Crayon and rub the pigment in with my fingertips to give them some depth. For the sentiment, I used the Simon Says Stamp You Matter Stamp set inked onto black card stock with embossing ink and sprinkled with Hero Arts white embossing powder. I cut out the words from the set that I wanted to use. I did have to combine letters to make the word "take".
Here again is my completed panel. I adhere the canvas panel onto a 5" x 7" piece of coordinating card stock and adhere that onto a 5 3/4" x 7 3/4" piece of card stock from the Tim Holtz Dapper Paper Stash. To finish off the panel, I adhere that to a 6" x 8" piece of Bazzill Licorice Twist card stock. To give the panel a little romantic flair, I add a shabby bow I created from crinkle ribbon that I dyed with Cracked Pistachio and Broken China Distress Stain and add a metal button to the center of the bow. To see how I tie my shabby bows, you can find the tutorial here.


Thanks for sticking with me this far through the post and I hoped you enjoyed seeing the process I used to create my mixed media "Take Me To Paris" canvas panel. Please join us in all the fun and add your project to Simon Says Stamp's Monday Challenge Blog for your chance to win a $50 gift voucher to their amazing store.

For more inspiration, tips and tricks for all types of papercraft creations, follow Simon Says Stamp on:


You can find all the following supplies I used to create this project at Simon Says Stamp:


I came straightaway from IG when I saw this beauty and have inspected each detail, while reading (and hanging on) every word! What a fantastic background and design. I am in love!!! Super inspiration. Hugs, Autumn
ReplyDeleteThank you, Autumn, that means a lot to me! It makes me so happy to know you enjoyed it.
DeleteCathie ♥
Gorgeous panel Cathie, Springtime in Paris, perfect!! I love the background and colours, the whole design of this is stunning!! :-)
ReplyDeleteluv
Lols x x x
Cathie, this is amazing! I love the step by step pictures and all the stages you went tghrough to get this fabulous effect. The background is beyond perfect and I love to know how was made! LOVE this card so much!!! Hugs, Marzena
ReplyDeleteFabulous, Cathie!! I am in love with your Paris theme, and you have created such a beautiful one. Love, love your background and the layers and the gorgeous blues!!
ReplyDeleteyes I will say it- ooh la la!!! I am mostly French and have always loved everything French-and Paris-wow! Gorgeous project, and thanks for the step outs-love!
ReplyDeleteGorgeous scene and big pretty bow to match!
ReplyDelete*mwah*
Steph
Simon Says Stamp!
Beautiful project Cathie!! Those clouds are fantastic!! Love all the gorgeous textures and splatters and details.
ReplyDeleteSuperb canvas Cathie!! I don't know where to begin to admire all of the yummy ingredients and all your tips and step x step. It all looks amazing - makes me want to head to the airport asap! The textured clouds and brillaint splatters are brilliant and then the multiple matting and that bow finish it all together beautifully!! Like how you used your misti too to get the clear stamp. Just love it! Have a lovely weekend. Nicola x
ReplyDeletewow wow wow Cathie...I love everything about this beautiful project...the colours...the textures and details...have a great weekend hugs kath xxx
ReplyDeleteThis is fabulous Cathie and as a lover of all things Parisian, this really does appeal to me! I adore the colours you've used and the textures are amazing...gorgeous! <3
ReplyDeleteThis turned out so cool! I especially love how the elements have different textures and patterns (like those fabulous clouds), yet they all work together perfectly. What an eye for art you have and what a treat it is to see what you've made week after week!
ReplyDeleteOne of my favorite works of yours! love every single detail: the wonderful bow, texture paste in little clouds.... I could continue... fab project! Barbara
ReplyDeleteYour creation is awesome, Cathie. I love the beautiful step photos you took. All the embellishments and details are gorgeous. :)
ReplyDeleteWow, what an amazing piece, Cathie! Love every bit of it! So cool that the background is made out of fabric. The clouds are so pretty! Hugs, Sandra
ReplyDelete