

Hi Everyone! I hope you're ready for a really fun challenge on the Simon Says Stamp Monday Challenge Blog where our theme this week is, Let There Be Snow. I had so much fun with this challenge deciding to try something new and not knowing how it would turn out. I created a background using die cuts that I had left over from previous projects and I'm thrilled with the results. Join me below for a step-by-step photo tutorial. I hope you find some useful inspiration and join us in this fun holiday challenge.


To create the top panel, I place several snowflake die cuts on top of a 4-1/2" x 6-1/2" sheet of Neenah Solar White 110 lb. card stock. I chose this paper instead of watercolor paper because I knew it would break down in a way that would add to my background. Stick with me here and you'll see what I'm talking about, trust me. :)

Make sure you're in an open area with your desk clear and free of anything you don't want to get sprayed or you can do this inside an open box to contain the spray. I hold the distress spray about 12 inches above the panel and spray it trying to apply a light mist. It's okay if there are a few splotches, it only adds to the character.

I then remove the snowflake die cuts.

I want to lighten the panel, so I scoop some Dina Wakley white gesso onto a craft sheet and apply it onto a brayer with a back and forth motion.

Roll the gesso on with the brayer making sure to use light strokes.

Next, wipe the panel very gently with a baby wipe. Let that dry before applying the next coat of gesso.

Apply another coat of gesso with a brayer using very light stokes. Continue the process until you are happy with the amount of coverage that lightens the panel. See where some of the paper has peeled away leaving a darker color in some areas? This is the effect from using the Neenah card stock instead of watercolor paper.

After the panel is completely dry, I distress the edges with a Prima Distressing Tool.

I ink the edges of the distressed panel with Hickory Smoke Distress Ink.

I cut 5 of the small Tammy Tutterow Frayed Posies form them using the McGill Flower Shaping Tool Kit. After the petals are shaped, I spray them with Brushed Pewter Distress Spray Stain. I apply the spray so that it looks splotchey because I want darker and lighter areas of the color on the petals. This can be achieved by pushing the spray nozzle half way and then stopping. If you would rather they be a smooth pewter color, push the spray nozzle all the way to the bottom so the stain comes out in an even mist.

To assemble the flower, I adhere one petal on top of the other in an offset pattern with hot glue. I adhere one petal to another one at a time.

I cut some Tim Holtz Mini Holiday Greens out of green card stock and ink the edges with Forest Moss Distress Ink. I adhere the flower, some holiday berries from my stash and the mini greenery along the left corner and along the edges of my panel.
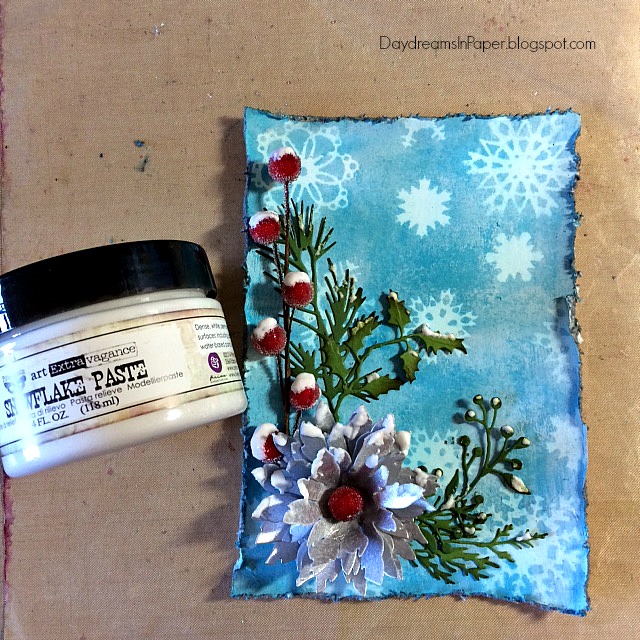
The theme is "Let There Be Snow", so I want to add some "snow" to my project. To do this I use Prima Snowflake Paste. I dabb a little on the berries and top portion of the flower and also on the tips of some of the greenery. This gives the look of falling snow.....at least that's what I'm going for here.

For the bottom panel, I create a simple background that will compliment the top panel. I cut a 5" x 7" piece of Neenah Solar White 110 lb. card stock and spray it with Brushed Pewter Distress Spray Stain.

When the bottom panel is completely dry, I attach the top panel to the bottom panel using 3d foam tape. It's now ready to attach to the card base.

To finish the card, I spray a piece of white card stock with Brushed Pewter Distress Spray Stain and let that completely dry. I then cut the Simon Says Stamp Merry Christmas die from this card stock and adhere it to the card using Ranger Multi Matte Medium.
I hoped you enjoyed seeing the process I used to create my card. Please join us in all the fun and add your project to Simon Says Stamp's Monday Challenge Blog for your chance to win a $50 gift voucher to their amazing store.

For more inspiration, tips and tricks for all types of papercraft creations, follow Simon Says Stamp on:


You can find all the following supplies I used to create this project at Simon Says Stamp:


Gorgeous card Cathie, the background is fabulous and I love the dusting of snow on the berries and flower, the whole design is stunning! LOVE IT :-)
ReplyDeleteluv
Lols x x x
Wow, this card is so beautiful! Your background is fantastic and perfectly highlights your beautiful silver flower!
ReplyDeletePretty card. I love how you did that background.
ReplyDeleteCathie, your card is gorgeous!! I love how you used up bits you had on hand. I think the snow covered berries are my favorite part of the card. And...did you make those gorgeous flower balls?? hugs, Maura
ReplyDeleteBeautiful card, Cathie! I love all the dimension! It looks like the cranberries could pop off the page :)
ReplyDelete*mwah*
Steph
Simon Says Stamp!
I really love the red and green against the snowy blue sky - so fresh and pretty.
ReplyDeleteAlison x
Love the step by step guide! :) That snow is awesome!
ReplyDeleteTotally love the idea of making patterned background! That's so clever, thank you for the inspiration. Lovely colors and 3D flower.Hugs, Marzena
ReplyDeletestunning card Cathie and that flower is amazing...hugs kath xxx
ReplyDeleteWhat a stunning card and that flower is heavenly...it's just beautiful, Cathie! <3
ReplyDeleteThis is such a fantastic Christmas card, Cathie. The flower you created is so gorgeous! Love the fabulous patterns and texture on the background, too. :)
ReplyDeleteThis card is so very pretty Cathie! I love how you added snow to the red berries and the silver flower is gorgeous.
ReplyDeleteThis is layer upon layer of wintery goodness! I don't know how you come up with so many different techniques week after week. You must have one heck of an epic muse! Send her my way sometime because I always LOVE what you make!
ReplyDeleteYou're unstoppable! your tutorial is fabulous and every week I'm waiting to see the next! Fabulous card, flowers as always are stunning! You know I bought Mc Gill flower shaping tool kit, after I saw your use of it??? Thanks so much Cathie to share your tips and tutorials! Barbara
ReplyDelete