

Hi Everyone! I hope you had a wonderful weekend and that you're ready to join us in all the fun for a very special week as we're celebrating Simon Says Stamp Monday Challenge's 6th Birthday. The theme for this week's challenge is Celebrate and we're featuring Simon Says Stamp products.

It's always fun to know a little about whose behind an online store, so I invite you to listen to an interview with Heidi Crowl on how this company started, some fun behind the scenes happenings and what's in store for the future by watching a wonderful crafty chat video made by Onlinecardclasses.com. You can find the video here.
We have a new guest designer this month, the amazing Christine Bedford from Pear Shaped Crafting. Please give her a warm welcome and leave some love on her blog.
I created a mixed media panel using mostly Simon Says Stamp products and added Simon himself to my project. There wouldn't be much of a celebration without him!


I cut a piece of 6 x 8 white chipboard and covered it in Dina Wakley White Gesso and let that completely dry. When the panel was completely dry, I used my mini ink blending tools to add three Simon Says Stamp inks, Jelly Bean, High Dive and Duckling. I love how these inks reacted with the gesso to create a dreamy blended background.

I stamped six balloons from the Tim Holtz Birthday Blueprint stamp set with Versamark Embossing Ink and sprinkled over the ink with Ranger Black Embossing Powder. After setting the embossing powder with my heat tool, I added the color to my balloons using my mini ink blending tools by going over the shaded areas of the design with a heavy hand and lifting the pressure as I moved toward the other side of the balloon for lighter shading. I used Simon Says Stamp Jellybean, High Dive, Duckling, Melon and Teeny Bikini to color my balloons.

After fussy cutting each balloon, I went over the edges with a Copic BV29 marker to cover the white edges from cutting the balloons out.

I filled in the white light image on all the balloons with a Uniball Signo White Gel Pen.

I created some background pieces for my panel using the Simon Says Stamp Stacked Stars wafer die.

I inked them with Simon Says Stamp High Dive ink by pouncing the ink on gently with a mini ink blending tool.

I used the small stars cutouts from the same die set and inked them black with Jet Black Archival Ink.

After setting my stacked stars and mini stars aside to dry, I began working on some other background pieces for my panel. I stamped happy birthday using the Simon Says Stamp Handwritten Borders stamp set along the edges of on of the Simon Says Stamp Authentic Vintage Papers.

I adhered the vintage papers onto my panel using Ranger Multi Matte Medium and did the same with the Stacked Stars and leftover tiny star pieces.


I wanted to create the number 6 with several layers of paint for a marbling effect. I used the number 6 from the Tim Holtz Numeric Alpha Parts and started the process by completely covering it with Picket Fence Distress Paint.

Before it was completely dry, I laid a textured towel over the number and gently pressed down so some of the paint would lift away leaving the texture of the towel behind.

I used Evergreen Bough Distress Paint as my next layer and completely covered the number with paint. I went over it with a heat tool for a few seconds so some of the paint would dry but not completely dry. Remember to move the heat tool around so the number, which is made out of plastic, won't melt or warp. I went over the number using the same process above with the textured towel.

This is what the number looks like after lifting some of the Evergreen Bough paint off with a textured towel.

For my next coat, I combine two colors of Distress Paint, Mermaid Lagoon and Twisted Citron. I apply them by completely covering the six in random areas. I go over the number with a heat tool and use the same process as above with a textured towel to lift some of the two colors off.

After lifting some of the Mermaid Lagoon and Twisted Citron off, I'm pleased with how my number looks but want to lighten it up a bit and get more of a marbling effect. I cover the entire number with Picket Fence Distress Ink and follow the same process by letting it dry a little and then lift some of the paint off with a textured towel.

Here is my completed number 6.

I go over the edges with Black Soot Distress Ink to give it some dimension. I apply the ink lightly with a mini blending tool.

To embellish my number I want to add a party hat to it, so I stamp three party hats from the Tim Holtz Crazy Things stamp set and cut them out using the Crazy Things die set.

I want to color the party hat in coordinating colors to my background panel and smudge Simon Says Stamp High Dive ink onto my craft sheet. I then add a tiny bit of rubbing alcohol to the ink and mix it with my tiny paintbrush.
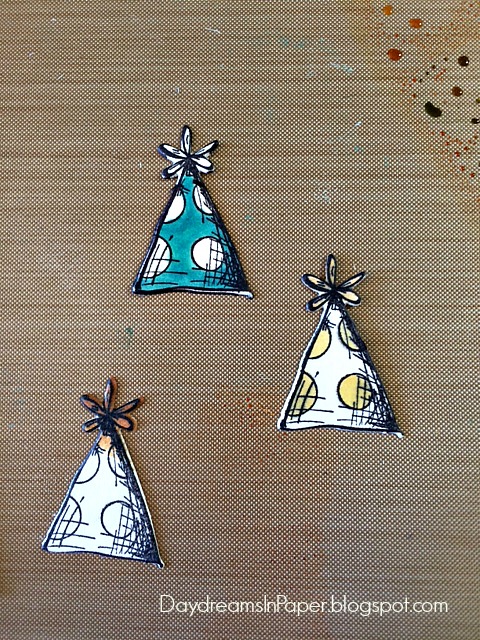
I want my party hat to have dimension so I color the hat, the dots and the tassel different colors. I will be cutting out the dots and the tassel to adhere to the main party hat. I use the same painting technique by smudging the inks onto my craft sheet and adding rubbing alcohol so I can paint the colors onto each piece with a small paintbrush. The inks I used are Simon Says Stamp High Dive for the base of the hat, Duckling for the dots and Melon for the tassel.

I cut out all the pieces and adhere them in their proper places onto the main party hat using small pieces of 3D foam tape.

Here is the party hat after all the pieces are adhered. The photo doesn't capture the dimension but believe me, it looks really cool and was worth all the work to create it.

I wanted Simon to have a party blower in his mouth and could see that I could use one of the crazy thing shapes to create one. I cut out the deflated balloon string from the set as above.

I cut the piece in half at the bend.

I colored the two pieces with coordinating copic marker colors for my project.

I took the longer blue piece and curled it with a quilling tool to create the blow thingy on the party blower. (Sorry, blow thingy was the only thing I could think of since I don't know what it's called.)
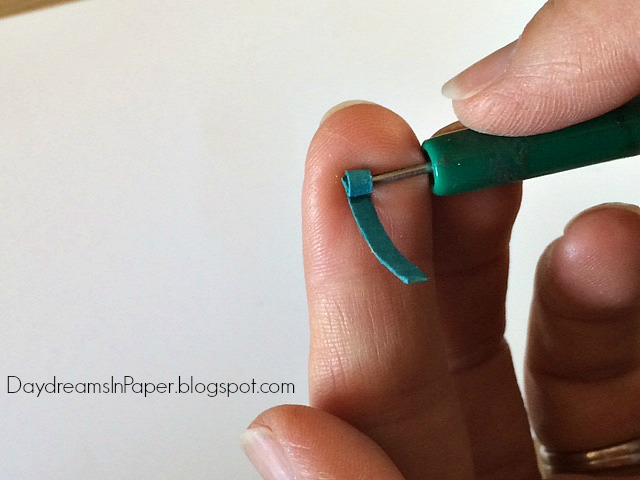
After slipping the piece into the quilling tool, I rolled it along my finger as shown above until there was just a little left at the end.

Here is my blow thingy when it's finished.

I adhere the quilled piece to the yellow base of the party blower and added a small white tip at the end for the mouthpiece as you can see below.


I forgot to take step photos of this process, so I apologize but will try to explain the best I can.
For my sentiment, I used the Simon Says Stamp Game Tile Letters stamp set. I used the Misti to create the letters connected together. All the letters are the same size so I stamped the letter "C" onto some Inkadinkado Masking Paper and cut it out. To create the word as one piece, I stamped the first letter onto come Neenah Solar White card stock, I then placed the masking paper piece on top of the letter I just stamped and then I stamped the next letter overlapping the prior letter. When I remove the mask, I can use it for the next letter, there is no need to create a new mask. I repeated this process until the word "celebrate" was completed. I then adhered that to my project with 3D foam tape.
Here again is my final "Happy Birthday, Simon" mixed media panel.

I hoped you enjoyed seeing the process I used to create my "Happy Birthday, Simon" panel along with some of the elements I added to make it special. Please join us in all the fun and add your project to Simon Says Stamp's Monday Challenge Blog for your chance to win a $50 gift voucher to their amazing store.


Super cute panel Cathie! I love that you included Simon in the party and his little blower is awesome! that really made me smile, so creative and a wonderful finishing touch, the whole design is gorgeous :-)
ReplyDeleteluv
Lols x x x
Thanks, Lols! I'm so happy to hear the little blower made you smile. That's always the best compliment for me.
DeleteHugs,
Cathie ♥
Wow!! How creative! And Happy Birthday to SSS!!
ReplyDeleteThank you, Angi!
DeleteCathie, what a totally fun project! I love how the balloons are floating up there at the top, and Simon looks so smart behind that gorgeous 6! Brilliant idea making the party blower! hugs, Maura
ReplyDeleteThank you so much, Maura!
DeleteHugs,
Cathie ♥
Yours is my FAVORITE!!
ReplyDeleteAw, thank you Tricia Ann! I'm so happy you like what I made to celebrate our 6th birthday and thank you for taking the time to stop by and leave your sweet comment.
DeleteHugs,
Cathie ♥
PS You give excellent instructions. Thank you.
DeleteThank you, Tricia Ann! I often wonder if taking the time to do step outs helps anyone so I'm really happy to hear you appreciate them. I enjoy showing others how I made something just in case they're wondering.
DeleteHugs,
Cathie ♥
Super creative card and a fabulous way to celebrate this special event! Thanks for all the inspiration this year.
ReplyDeleteThank you so much for taking the time to stop by and leave your sweet comments. I really appreciate it!
DeleteCathie ♥
This is such a fun and pretty card, Cathie! Love the detailed step-by-step tutorial! The party blower is amazing! Hugs, Sandra
ReplyDeleteThank you, Sandra!
DeleteCathie ♥
That party blower is the best! What a great idea! This card is wonderful. Love how Simon hides behind the number and the balloons look fantastic.
ReplyDeleteThank so much, Anna-Karin!
DeleteCathie ♥
Cathie! This is perfect in every way! The little blower for Simon was the icing on the cake! So fun :)
ReplyDelete*mwah*
Steph
Simon Says Stamp!
Thank you, Step! It was a really fun challenge and I'm so happy you like the little blower.
DeleteCathie ♥
love your fun colourful card and party blower is hilarious...hugs kath xxx
ReplyDeleteThanks, Kath!!
DeleteCathie ♥
love your fun colourful card and party blower is hilarious...hugs kath xxx
ReplyDeleteThis is such a beautiful and fu card! Love the delightful colors :)
ReplyDeleteThank you, Meihsia!
DeleteCathie ♥
Great job! I love the background, you're right the inks react with gesso perfectly! Lovely baloons and sweet details on Simon's head! Hugs, Marzena
ReplyDeleteThank you, Macarena!
DeleteCathie ♥
Fabulous card, full of fun and gorgeous detail and I love how Simon is peeking out from behind the number 6...so cute! <3
ReplyDeleteThanks, Emma!
DeleteCathie ♥
Wow! You thought of EVERY detail on this piece and it is a stunner! I really love how you included Simon and his "blow thingy." SO BRILLIANT!!!
ReplyDeleteThank you, Andrea!
DeleteCathie ♥
I adore your card, so brilliant! Every detail is perfect and i love bright colors you used!Barbara
ReplyDeleteThanks so much, Barbara!
DeleteCathie ♥
I adore your card, so brilliant! Every detail is perfect and i love bright colors you used!Barbara
ReplyDelete