

Here's my little summer surf shack I created using Tim Holtz Village Dwelling and Surf Shack die sets.


I first cut all the pieces I needed to create the body of the surf shack. I cut out the Tim Holtz Village Dwelling from Neenah Solar White 110 lb. smooth cardstock. I cut out another set of the village dwelling from neutral corrugated cardstock. I cut away the tabs on the corrugated pieces. For the roof, I did the same by cutting the roof from Neenah Solar White 110 lb. cardstock and another set from burlap.

I wanted the beach house to have an old metal look, so I painted the corrugated pieces with Broken China Distress Paint. One coat is all that is needed.

I allowed the first coat of paint (Broken China) to dry completely. I then lightly brushed on Tarnished Bronze Distress Paint in random areas. I then set that aside to completely dry. When all the pieces were completely dry, I adhered them to the pieces that had the tabs on them cut from Neenah Solar White 110 lb. cardstock.

I adhered the burlap roof pieces to the cardstock roof pieces using Ranger Multi Matte Medium.

When the glue was completely dry, I inked the edges using Ground Espresso Distress Ink with a Ranger Mini Ink Blending Tool. ( I wasn't thinking when I made my roof pieces because I didn't intend on using the small roof piece. Later, I realized I didn't need to make the smaller piece because I was using the surf shack roof from the Tim Holtz Surf Shack Bigz Die as seen below in the next two photos.)
The surf shack roof below was made using the same process as the roof pieces above.


I begin assembling my surf shack. You can find an excellent video showing how to assemble the village dwelling by Tim Holtz himself, here.

You can see my surf shack taking shape as I add the main roof.

Here, I'm adding the windows that come with the Village Surf Shack die set. I cut them from one of the Core' dinations Kraft Core Nostalgic Cardstock sheets.

The village dwelling comes with a single door in case you want to create a unique door for your dwelling. I cut this piece twice and inked them both with Ground Espresso Distress Ink. I poked a hole for the door handle with a Tonic Craft Pick. (Be careful! DO NOT pierce your door on your craft mat, use a soft piercing mat or mouse pad.)

I put a Tim Holtz Mini Fastner Brad through the hole to create a door handle.

I adhered another door to the back of the door with the door handle so when the door is open you can't see the brad on the other side of the door.

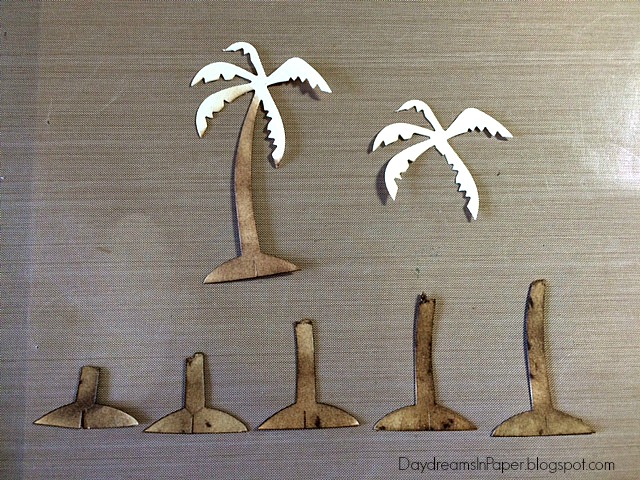
I live in Arizona and am surrounded by palm trees. I wanted mine to have dimension and character so I came up with a way to make them look a little more realistic. To do this, cut out six of the palm trees from the Tim Holtz Village Surf Shack die set. I cut mine out of manila paper or you can use a file folder if you have one on hand.

Take one palm tree in your hand and tear off part of the trunk near the bottom of the base. For the second palm tree, tear off the trunk a little higher up the trunk and continue to do this with three more palm tree trunks. Reserve one palm tree intact because this will serve as your base.
Cut off the palm fronds away from the trunk of one of the torn palm tree trunks as this will serve to add more leaves to your palm tree giving it more dimension. Ink the palm tree trunks with Vintage Photo Distress Ink paying special attention to the torn area. Ink the torn area a little extra so you can almost see a line at the top.

Ink the outer palm fronds with Peeled Paint Distress Ink using the Ranger Mini Ink Blending Tool.

Ink the inside of the palm fronds with Forest Moss Distress Ink.

Now it's time to assemble your palm tree. Adhere the trunks together beginning with the shortest trunk working your way up to the tallest trunk.

Here you can see I'm continuing to build up my palm tree trunk.

Here, is the finished palm tree trunk.

Adhere the sectioned palm tree trunk over the complete unaltered palm tree trunk.

To adhere the second set of palm fronds, I placed a drop of Ranger Multi Matte Medium in the center of the bottom set of palm fronds and adhered that to the main palm tree.

Here is my completed palm tree. Isn't it adorable!!

To make the sand, I purchased some white sand at the dollar store which I keep in a container. This sand can be colored wonderfully using Adirondack Alcohol Inks. I placed some sand in a baggie and added about 10 drops of Latte Adirondack Alcohol Ink. I closed the baggie leaving air in the bag and tossed the bag around so the sand would mix with the alcohol ink.

My surf shack needed a larger base than the single size base that comes with the die set so I created four of them and taped them together to create a larger base. I cut the bases out of manila paper and added light and dark specks to the base using the specks stamp from the Tim Holtz Cracks & Specks Stamp Set. This created the look of sand on my bases.

Here, you can see one of the bases stamped to look like sand. I used Potting Soil and Tree Branch Archival Ink. (Tree Branch Archival Ink has been discontinued but you can use another lighter shade of brown for this effect.)

Here again is my completed surf shack. I can't tell you how much I love it! It is so special to me and will have a prominent place in my craft room to remind me of the wonderful summer fun I had in Cayucos sunnin' and surfin'.

That's me with my beginner's surf board.

My five beautiful kids spending an afternoon boogie boarding.
I hoped you enjoyed seeing the process I used to create my Surf Shack representing Summer Fun. Please join us in all the fun and add your project to Simon Says Stamp's Monday Challenge Blog for your chance to win a $50 gift voucher to their amazing store.

For more inspiration, tips and tricks for all types of papercraft creations, follow Simon Says Stamp on:


You can find all the following supplies I used to create this project at Simon Says Stamp:


LOVE you surf shack!! the whole design of this is absolutely brilliant, I love the photo staging too, the hippy van is a perfect backdrop LOL :-) The step by step photos are fab and I love the photos of you and your family having some summertime fun! :-)
ReplyDeleteluv
Lols x x x
Woahhh! what a fantastic scene!!!! Love it so much!!!
ReplyDeleteHugs xx
Zoey
This is awesome! Love your idea for the palm trees.
ReplyDeleteWhat an awesome little surf shack to help you remember your fun times at the beach, Cathie! I love how you did the grass roof, so many fun details, and with the old VW bus in the background, I feel like I am there! hugs, maura
ReplyDeleteHow FUN! I love that you are fearless enough to go surfing! This is the perfect keepsake, love the way you set the scene! :)
ReplyDelete*mwah*
Steph
Simon Says Stamp!
wow~ This is just too cool! I love all of the details and how this came together!
ReplyDeleteWhat fabulous surf shack! Loved seeing the process to make it! Hugs, Chris
ReplyDeletewow. Nice !
ReplyDeletegreets
Alexa
wow your surf shack is amazing Cathie and great tutorial too...how wonderful to spend the summer in such a dreamy place...love the little camper van in the background of your photo...have a great weekend...hugs kath xxx
ReplyDeleteYes, please! I'd like to book a week at this surf shack! It is so adorable and clever and I am dying over how genius you were to make your trees dimensional! I also really like your sand and the texture on the shack itself could not be more perfect. I loved how you staged your house, too, with that fab retro van in the background and I thought it was so fun to see pictures of you and your fam enjoying the beach!
ReplyDeleteWow! This is just amazing
ReplyDeleteWow... this is such a fantastic project, Cathie. Love all the beautiful details and embellishments you created. :)
ReplyDeleteCathie your way to create the tree is AMAZING! i love this idea !!! The scene you've created is wonderful and colorful, perfect for the summer! thanks for your fantastic tutorila! Barbara
ReplyDeleteOOOOMMMMGGG! This is unbelievably amazing! I can't stop watching this piece of art with all those crazy details! You even thought about a more realistic palm tree trunk! Really!? What a crazy girl :-) Thank you Sweetie for this inspiration! Hugs, Marzena
ReplyDeleteCathie what a stunning little shack creation. Thank you for the step by step and I love how you photographed it. This will also be perfect for one entry as an anything goes creation for our challenge below.
ReplyDeleteHugs
Desíre
{ATG with a CREATE WITH TLC Element}
{Doing Life – my personal blog}
Great minds think alike and I love how we both chose the Surf Shack but showed how to create such different projects using it! :) Your shack is just wonderful and I adore all the details and texture you've incorporated into this, it's just gorgeous! <3
ReplyDeleteThis is amazing Cathie! I love everything, from all the different surfaces and textures you used, to the fabulous coloured sand. How fun! It sounds like a wonderful place for a holiday.
ReplyDeleteWhat an adorable summer surf shack! I am so jealous of you renting a beach house. It looks like so much fun for you and your kids!! Thank you for showing us the step by step instructions!
ReplyDeleteWhat an amazing project! Love it! I think it's my favorite project of yours so far! Love how you've made lots more dimension on the palm trees and the little surf shack is amazing! Great pictures of you and your family having beach fun! Hugs, Sandra
ReplyDelete