

Hi Everyone! Welcome back to another week of fun with the Simon Says Stamp Monday Challenge. Our theme this week is, We're Going Around In Circles. That's it! Easy right? Just put a circle somewhere on your project. Now, if you have a different interpretation of the theme, that's fine too. Just have fun!
I chose to create a card with soft colors and a fun shabby bow. I haven't put one on a project in a long time and decided it would be pretty with this color combination. Below is a short tutorial on how I created the background, bird and circles. Enjoy!
Also, please don't forget to check out our May guest designer, Sonia. This is her last week with us and I can't tell you how much I've enjoyed seeing her creations each week. They have all been jaw dropping and if you don't check out her blog, you're really missing out on one of the papercraft world's amazing talents.


To begin, I create the background for my card. I stencil on some bubbles using the Tim Holtz Bubble stencil with Ranger Texture Paste in random areas on a piece of canvas paper.

When the texture paste is completely dry, I brush on some Dina Wakley White Gesso with a dry paint brush. I brush on the gesso but leave some areas exposed and allow that to completely dry.

I use a dry paintbrush and paint on some Spun Sugar Distress Paint in random areas using downward strokes and allow that to completely dry before moving on to the next color.

When the pink paint is completely dry, I use a dry paintbrush to add Tumbled Glass Distress Paint in random areas. I allow this to completely dry before moving on to the next step.

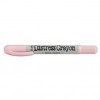
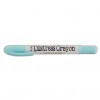
To deepen the color around the bubbles and to add even more texture, I color over the stenciled bubbles with Spun Sugar and Tumbled Glass Distress Crayons. I then rub the pigment in with my fingertips to blend each color over the bubbles.

When the Distress Crayon is completely dry, I add some Tim Holtz Sketchbook Tissue Tape adhering it to the background with Ranger Multi Matte Medium. This completes my background, however, I do add more tissue tape later after I place the circles on my background.

For the bird, I cover some Neenah Solar White 110 lb. card stock with four strips of Tim Holtz Symphony Tissue Paper with musical notes. I use this to cut out the bird for my project.

Here is the bird for my project after cutting it out from the Tim Holtz Caged Bird die set.

I color the bird with Spun Sugar, Tumbled Glass and Wild Honey Distress Crayons. I add an eye with a dot of Dina Wakley Night Acrylic Paint and I also cut away the branch from the legs. (They will be covered by the bow.)

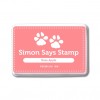
For the circles, I used My Favorite Things Zig Zag Stiched Circles and color them with Spun Sugar, Worn Lipstick and Tumbled Glass Distress Inks. I create three sizes of circles using two of the dies, one inside of the other. Above is the largest circle. I create two smaller circles using other sizes of circle dies in the set for the other two circles on my card.

Here again, is my finished card. You can find out how I created the flowers here and the shabby bow here. The sentiment is from the Tim Holtz Small Talk Stickers.
I hope you enjoyed seeing the process I used to create my card and that you join us for this fun challenge by adding your project to Simon Says Stamp's Monday Challenge Blog for your chance to win a $50 gift voucher to their amazing store.

For more inspiration, tips and tricks for all types of papercraft creations, follow Simon Says Stamp on:


You can find all the following supplies I used to create this project at Simon Says Stamp:


Stunning card Cathie! the little bird is adorable and the pinks and aqua colours are so pretty together! I love the luscious bow and circles, the whole design is gorgeous :-)
ReplyDeleteluv
Lols x x x
love the bird! what pretty colours!
ReplyDeletesuch a soft and pretty project. thanks for sharing the process too!
ReplyDeleteAnother stunner Cathie and so much inspiration!!! Hugs xxx
ReplyDeleteGorgeous shabby chic card, Cathie! Colors, textures, images work so well together. I am jealous of that gorgeous bow you created!! mine never look so good :) xx Maura
ReplyDeleteThis is beautiful and I love how you've made the rings overlapping. The colors, too, are so dreamy and this whole piece fills me with a sense of peace and lightness! Very lovely and inspiring.
ReplyDeleteThis is such a delightful creation, Cathie. The layered embellishments and the soft colors on this piece are so beautiful. :)
ReplyDeleteThis is so pretty Cathie! I absolutely love the color combination you used and the gorgeous bow and bird. The circles are fantastic in the background.
ReplyDeleteBeautiful!!!!!!
ReplyDeleteanother amazing creation Cathie...love the soft pastel colours and oh my...that bow...be still my beating heart...hugs kath xxx
ReplyDeleteThis is so pretty Cathie ~ such a beautiful design and that bow is the perfect finishing touch to a wonderful card! <3
ReplyDeleteSo soft, cute and sweet! Love the beautiful colors you combined. Amazing texture too! Hugs, Marzena
ReplyDeleteCathie, this is such a darling project! I love the pinks and blues shades! Very well mixed!
ReplyDeleteI never ever thought that pink and blue can be so wonderful together! You made an incredible work! Fab card, fab design, fab colors! barbara
ReplyDeleteI love this card! The colors, the bird, the bow, just everything!
ReplyDeleteBeautiful Cathie, love your colour palette and that wee bird is adorable! Deb xo
ReplyDelete