

Hi everyone, thanks for stopping by! Today I created a card using the Tammy Tutterow Designs Rejoice stamp set and some flowers created from the Shabby Posies and Pinwheel Posies die sets. Below are step by step instructions on how to create the flowers and how I created a soft image using white embossing powder and light colorization with Spun Sugar Distress Ink. I hope you enjoy the tutorial and that you can take away some inspiration for your next project.


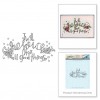
I created the base for the sentiment from the Spellbinders Enchanted Labels die set. I then stamped the image on the label using a Misti with Versamark embossing ink and sprinkled Hero Arts white embossing powder over top and set it with a heat gun. After the embossing powder was cool, I gently begin inking over the sentiment with Spun Sugar Distress Ink until I'm happy with the amount of ink to bring out the sentiment.

Here you can see the completed image and the soft pink color I was going for when applying the Distress Ink.

Next, I color the inside of the letters and flowers with markers. I first color the flowers with Red Geranium Zig Clean Color Real Brush Marker and then over that with a Spun Sugar Distress Marker. I colored the leaves with Copic marker YG63. The letters are colored with a Spun Sugar Distress Marker.

The first step in creating the small flowers is to place one petal in water for about 15 seconds.

Next, color the petals and center of petals with Red Geranium and Pale Green Zig Clean Color Real Brush Markers. To get soft colors, make sure you are using enough water to dilute the colors. These are very vibrant markers.

Next place the petal on a clean towel and dab off the excess water.

While the petals are still damp, pinch each petal with tweezers or your fingertips and set aside to completely dry.

Now that the petals are dry, punch a 1/8" hole in the center.

Create two of these petals to complete the flower and if the petals opened a little when punching the center whole, re-pinch the petals again with tweezers or your fingertips.

Place one set of petals on top of the other by offsetting the petals.

Take two sets of stamens and bend them in half to create four stamens next to each other.

Push the set of stamens through the top set of petals and then the second set of petals.

Put a small dot of hot glue between the petals and push them together by offsetting the petals. The offset petals are now secure.

Using a hot glue gun, place a ring of hot glue around the base of the petals and allow that to completely dry.

When the hot glue is completely dry, cut the wire of the stamens with a wire cutter at the base of the hot glue.

The flower is now flat enough on the bottom to apply to your project.

For the pinwheel flower, create three sets of the smallest petals from the Pinwheel Posies die set and color them the same way as the small flowers using the same colors of markers. Pinch the petals with your fingertips so the petals face downward and set aside to completely dry.

For the set of petals that will be placed on top, stamp on some tiny circles from the Simon Says Stamp Look For The Miracles stamp set in Twisted Citron Distress Ink. Assemble the flower using the same steps as was used in completing the small flower.

To finish the card, I attach the sentiment panel to a 5" x 7" embossed piece of Bazzill Apple Crush card stock that has the edges distressed and inked with Peeled Paint Distress Ink. I attached that panel onto a 5-1/4" x 7-1/4" card base created from My Favorite Things Pink Lemonade card stock. I attached the flowers on the top left and bottom right corners of the card and added a couple of pearl enamel dots in the opposite decorative corners.
I hope you enjoyed seeing how I created this beautiful card using some of Tammy's amazing products and that you got some inspiration for your next project. Thanks for sticking through to the end, I really appreciate it!!


I love this color combo! The emboss/resist technique is so beautiful here. And oh, those posies!!!! Great tutorial!
ReplyDeleteWow, your hand made flowers look gorgeous!
ReplyDelete