

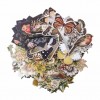
I'm so happy you stopped by to see this week's project for the Simon Says Stamp Monday Challenge Things With Wings theme. I created several layers of elements to create this small plaque. I love butterflies and birds so this was a fun challenge and perfect for using some new products I just received. I hope you join me below to see how I put together my "Beautiful Moment" project together. Enjoy!
Don't forget to check out, Linda, our guest designer this month from heARTfully inspired for amazing inspiration. This is Linda's last week with us here on the challenge and she's done an amazing job. Please stop by and leave her some much deserved love and check out her amazing talent.


I begin by cutting a 4-3/4" x 6-3/4" piece of Bristol watercolor paper. I lightly spray the piece with water and sprinkle on some Paper Artsy Infusions Royal Blood pigment powder.

I spray more water over the powder and allow the colors to mingle and run. I completely dry the panel before adding the next color.

When the top layer is completely dry, I sprinkle on some Paper Artsy Infusions Orange County pigment powder and mist over it with water and allow the colors to mix together. I allow the piece to completely dry.

Now that the panel is completely dry, I ink on some numbers from the Tim Holtz Perspective stamp set in Potting Soil Archival Ink. I then add some texture using the Tim Holtz Bubble layering stencil and apply that with Ranger Texture Paste. I set that aside to completely dry.

While my panel is drying, I cut a 3-3/4" x 4-1/2" piece of corrugated cardboard and add some Ranger Grit Paste in random areas and then more bubble texture with Ranger Texture Paste. I set that aside to completely dry.

I prepare a 4-3/4" x 5-3/4" piece of Bazzill Candy Corn card stock and heavily distress the piece with a Prima Distressing Tool. This is heavy duty card stock so you really need to get in there and rough the paper up with the distressing tool. I'm not afraid of rips, wrinkles or tears because that is exactly the look I want.

When I'm finished distressing the piece I splatter it with Black Soot Distress paint mixed with water and splatter it on with a Tim Holtz Splatter Brush. I set the piece aside to completely dry.

I want to create another piece that will frame one of the cut out pieces I'm adding so I cut a 2-1/4" x 3" piece of Bazzill Whirlypop card stock and distress the edges with the Prima Distressing Tool. Again, I'm not concerned about rips, wrinkles or tears. After distressing the piece, I splatter it with Picket Fence Distress Paint using the Tim Holtz Splatter Brush. I set this piece aside to completely dry.

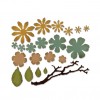
I create a branch for one of the cut out birds from the Tim Holtz Botanical Layers Paperie pieces using the Simon Says Stamp Songbird Branch wafer die set. I color the card stock before cutting out the pieces because they are so small and intricate and would easily tear so I color some card stock with Peeled Paint and Forest Moss distress ink for the leaves and Walnut Stain and Ground Espresso Distress Ink for the branches. I adhere the leaves to the branches with some Ranger Multi Matte Medium and let that completely dry.

I begin putting all the pieces together now that they are dry.

I add some butterflies and the bird on a branch along with a flower piece all from the Tim Holtz Botanical Layer Paperie set.

To finish my project, I create some small flowers from the Tim Holtz Small Tattered Florals thinlits dies and add them below the bird. I add the sentiment using some stickers from the Tim Holtz Big Chat sticker set and adhere the entire panel onto a 5-1/4" x 7-1/4" piece of Bazzill Whirlypop card stock. This completes my project.
I hope you enjoyed seeing the process I used to create my Things With Wings Beautiful Moments project and that you join us for this fun challenge by adding your project to Simon Says Stamp's Monday Challenge Blog for your chance to win a $50 gift voucher to their amazing store.

For more inspiration, tips and tricks for all types of papercraft creations, follow Simon Says Stamp on:


You can find all the following supplies I used to create this project at Simon Says Stamp:


Absolutely gorgeous panel Cathie! the background is fabulous and I love the blue and orange together, the bird and the butterflies are beautiful! LOVE it :-)
ReplyDeleteluv
Lols x x x
what a really brilliant project Cathie! I so love all the layers and spatters with the botanical imagery. And now you have me really wanting to try some of those Infusions too:)I wonder if they are like the Nuance powders that Magenta sells...
ReplyDeleteIt has been a super month creating with you and getting to know you better :)
Aw, thanks for the sweet comments. It's been fun getting to know you better and enjoy your creative talent. In answer to your question, I'm not familiar with the Nuance powders. The Infusions pigment powders are a combination of dye color pigment mixed with walnut stain pigment. The color particles dissolve faster than the walnut stain particles so you can control the color-to-brown ratio depending on how much water you add, when you add how soon you dry the wet paper. They now have some new colors that contain multiple colors plus the walnut stain for more amazing results. I love them!
DeleteLOVE the colors you chose to create this piece. The background is fabulous and I love the ephemera you used. Just SUPER!
ReplyDeleteLove all the layers! :) Have a great week!
ReplyDeleteLovely project. Great distressing and dimensional layers. I love the colors matched perfectly together. Hugs, Marzena
ReplyDeleteFabulous, love all the texture and wonderful colours.
ReplyDeleteFantastic!
ReplyDeleteFantastic!
ReplyDeleteCathie, this is such a beautiful card! I adore your layering and amazing color palette! Hugs, Autumn
ReplyDeleteSo pretty. Love the orange (rust) with the navy.
ReplyDeleteLOVELY! The distressed layers look fantastic, Cathie!
ReplyDelete*mwah*
Steph
Simon Says Stamp!
Wonderful use of color Cathie! The bright orange and blues are awesome, and I love that you incorporated the cardboard - such great texture for you piece! hugs, Maura
ReplyDeleteI read your whole description of this creative masterpiece!!! I love this work of art - just beautiful!!
ReplyDeleteThis is such a great piece! I adore all those layers and especially the section of corrugated cardboard. You always make old things look new and fresh and I like how you mixed the distressed edges with the other elegant elements.
ReplyDeleteGorgeous - and thank you for sharing the process.
ReplyDeleteGorgeous card Cathie with such a wonderful use of colour...the choice of infusions work so well together and I love all the layers you've incorporated! Beautiful work... <3
ReplyDeletewow this is a stunner Cathie...love the colour palette and all the beautiful layers of detail...enjoy your weekend...hugs kath xxx
ReplyDeleteWow.. this is such a stunning piece, Cathie. Love the gorgeous layered embellishments and the colors are so beautiful! :)
ReplyDeleteSttunning piece CAthie! Color palette you chose is fantastic! the blue and the dark orange is fabulous together! background with Infusions..... I'm in love! barbara
ReplyDeleteBeautiful card Cathie!! Love all the layers and textures. The orange and blue is really nice together and the vintage images are the perfect additions to the card.
ReplyDelete