

Hi Everyone! It's time for another week of Simon Says Stamp Monday Challenge fun. This week our theme is, Layer It Up. I created a layered background using strips of copy paper and book pages. I hope you enjoy the tutorial I put together and that you'll join us in all the fun. I can't wait to see what you layer up! Enjoy!
Don't forget to check out, Linda, our guest designer this month from heARTfully inspired for amazing inspiration.


I cut a 5" x 7" piece of watercolor paper and paint on Nos. 34, 33 and 43 from the Zig Kuretake Gansai Tambi watercolor set in random areas.

Placing the panel underneath some paper towels, spray water onto the colors to allow them to blend while tipping the panel downwards.
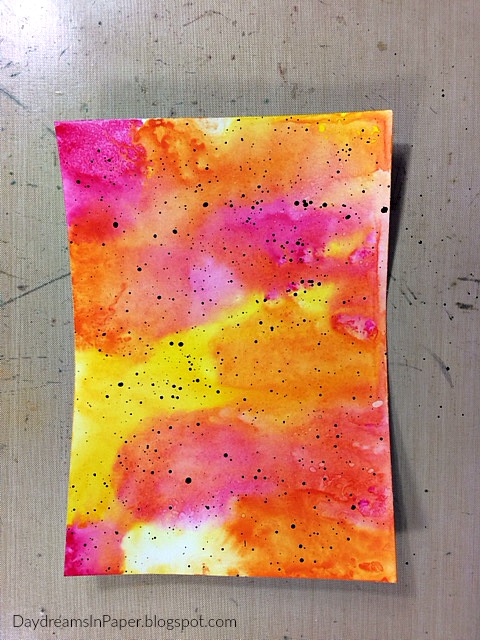
I completely dry the panel with a heat tool and spatter on No. 20 from the same watercolor set with a paintbrush and set that aside to completely dry while I work on the layering strips.

I took some plain copy paper and using a paper cutter, cut strips in different widths.

I then cut those strips into smaller pieces.

I run some glue along the top of the strips and adhere them to the panel allowing the bottom of the strips to remain free.

I do the same thing with book pages, adding them in random areas on top of the copy paper strips.

Here is the panel with all the strips adhered and I'm happy with the way it looks.

Next, I load a brayer with Dina Wakley Gesso by placing a small amount on my craft sheet and running the brayer over the gesso.

Now that the brayer is loaded, I roll it over the panel until I'm happy with the coverage and let that completely dry.

Now that the panel is dry, I stamp on some circles from the Simon Says Stamp Scribble Flowers stamp set in Black Soot Archival Ink. I set that aside to dry.

While the top panel is drying, I prepare another piece of water color paper cut to 5-3/4" x 7-3/4". I ink some Mustard Seed Distress Ink onto my craft sheet and spray water over the ink. I then run the piece of water color paper over the watered down ink and continue to do so until I'm happy with how it looks.

I do the same process with Fossilized Amber Distress Ink.

I adhere the top panel to the bottom panel by sewing them together on my sewing machine. I leave area along the edges of the inside panel.

With the area left around the edges of the top panel, I crinkle them and lift them to give the panel interest and dimension.

I add more circles from the same stamp set with Simon Says Stamp Lemon Zing dye ink. I splatter on Black Soot and Festive Berries Distress Paint that has been diluted with water using a Tim Holtz Splatter Brush. For the black splatters I flick the bristles over the panel to create small splatters. For the pink splatters, I whip the brush over the panel which results in large splatters. You can see the different types of splatters you can achieve using different motions with this brush.
When the splatters are dry, I add three words from the Tim Holtz Big Chat sticker set.

To complete the project, I use a black gel pen and create lines of interest around the words and attach the panel onto a piece of 6" x 8" Bazzill Black Licorice card stock. I add a peach burlap flower from my stash that I highlight with Picked Raspberry Distress Ink in random areas to give the flower some depth. I place that on top of a twisted heap of Parrot Green May Arts burlap twine and my project is complete.
I hope you enjoyed seeing the process I used to create my paper strip layered background and that you join us for this fun challenge by adding your project to Simon Says Stamp's Monday Challenge Blog for your chance to win a $50 gift voucher to their amazing store.

For more inspiration, tips and tricks for all types of papercraft creations, follow Simon Says Stamp on:


You can find all the following supplies I used to create this project at Simon Says Stamp:


GORGEOUS card!!
ReplyDeleteGorgeous!!!! Love everything about this!!!
ReplyDeleteOhhhhh! What a totally clever background technique with the strips of paper!! I love that effect! And I adore that Scribble Flowers stamp set, so I always enjoy seeing it in use. You've mastered the art of watercolors and the blending of the colors looks incredible. This is vibrant and wonderful!
ReplyDeleteThis is so cute! The first panel looks like you painted roses on them! Then I read you colored it randomly, oops... Love the stamped circles and the colors. Brave and beautiful. Hugs, Marzena
ReplyDeleteFabulous layered background - loved seeing it building up in the process photos - and what a gorgeous finished result.
ReplyDeleteAlison x
Gorgeous panel Cathie, I love how you layered the background, such a pretty base for the stunning flower! Absolutely fabulous ❤️
ReplyDeleteluv
Lols x x x
Very artsy and appealing, Cathie!! Love the free style you took with this with the circles and words and doodles! and then that fabulous flower - gorgeous, gorgeous!!! love it! hugs, Maura
ReplyDeleteHave mercy Cathie! This looks like so so much fun I want to go home and try it immediately! Sometimes just slapping layers down is the best way for sure! I'm so inspired by this and adore your colorful, yet muted composition. Big hugs, Autumn
ReplyDeleteThe background is awesome. Great Card
ReplyDeleteAND Thank you for always encouragement for me.
This is delightful, Cathie! I love the overall design looks architecturally inspired! Great bright colors, too!
ReplyDelete*mwah*
Steph
Simon Says Stamp
This is just amazing! I wouldn't even know where to begin to create this multi-media masterpiece. Fabulous!
ReplyDeleteThank you, Sybrina! I do hope you give it a try. There are many steps but the process is simple, just a little time consuming but oh so much fun.
DeleteHi Cathie. This card is amazing! I love all of the colors and layers. Swoon! - LyndaCreates
ReplyDeleteYour card is a feast for the eyes! Flower is outstanding! Really fabulous, your background is so gorgeous, as always! Great project! barbara
ReplyDeleteI love the colours you've chosen on this card and adore that flower, it's wonderful! As always, the background is the perfect backdrop for all the layering and it's another great project, Cathie! <3
ReplyDeleteGorgeous and love the colours.
ReplyDeleteXX
Such a cool card Cathie! I love those strips in the backgrounds, and the circles and splatters. The flower is so pretty!
ReplyDeleteanother stunning card Cathie...love how you made your background and that flower is gorgeous...hugs kath xxx
ReplyDeleteThis is so pretty, Cathie! Love all the layering, and the color combo is stunning! The scribble flowers are such an amazing touch. Hugs, Sandra
ReplyDelete