

Happy Monday, friends, thanks for stopping by! I hope you all had an awesome weekend and that you're ready to play along with us on the Simon Says Stamp Monday Challenge where our theme this week is, Explore The World. For my project, I created a mixed media panel in rich colors of blue and brown. I hope you enjoy seeing how I created some of the elements for my project and that you join us this week for a chance to win a $50 gift voucher to Simon's amazing store.
Here is my, Explore the World, completed 8" x 6" mixed media panel.


I started by inking the balloon image from the Tim Holtz Remnants stamp set on a 6 1/4" x 4" piece of Neenah Solar White 110lb card stock with Versamark embossing ink. I then sprinkled Ranger black embossing powder over my image and heat that with a heat tool to set the image on the paper.

To add some texture to my card stock, I distressed the surface around the image with a Tonic Craft Scratcher tool.

Here is a close-up of the texture after using the scratcher tool. When applying ink to the surface the deeper crevices will collect more ink leaving a nice distressed pattern behind.

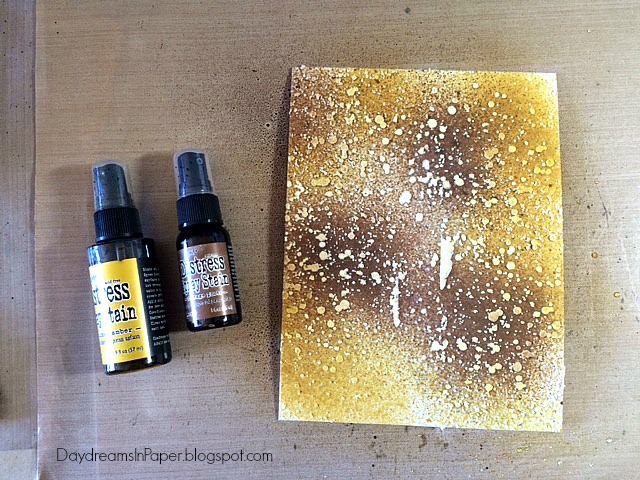
I add Tumbled Glass and Fossilized Amber Distress Ink using a mini ink blending tool along the top and middle of the image. Along the bottom, I wanted a different look other than blended, so I sprayed Mermaid Lagoon Distress Spray Stain to get a splattered look.

In random areas, I added the Tim Holtz Ledger Script stamp in Archival Jet Black Ink.

I distressed the edges with the Tonic Paper Distresser and inked the edges with Ground Espresso Distress Ink.

To further distress my piece, I add more scratches with the Tonic Craft Scratcher Tool.

Next, I cut a 5 1/4" x 3" piece of Neenah Solar White 110 lb. card stock and embossed one of the background images from the Tim Holtz Remnants stamp set using Versamark embossing ink and Ranger Clear Embossing Powder. After setting that with a heat tool, I went over the embossed image with Tumbled Glass Distress Ink. I set that aside and began working on my base panel.

I cut a 6" x 8" piece of white chipboard and stenciled on the Tim Holtz Speckles layering stencil using Studio 490 White Embossing Paste. I let that completely air dry.
After the embossing paste was completely dry, I sprayed Vintage Photo and Fossilized Amber in random areas on my panel and set that aside to completely dry.

After all my panels are completely dry, I assemble them together using 3D foam tape. I set that aside and begin working on the flower for my panel.

I created the flower on my piece using Spellbinder's Tammy Tutterow Pinwheel Posies and cut out the largest flower die from crinoline fabric. For the yellow petals, I diluted Fossilized Amber Distress Spray Stain with water on a craft mat and gently ran the petals through the ink picking up more ink in some areas than others. I did the same with the blue petals using a diluted mixture of Mermaid Lagoon Distress Spray Stain and water. I dried them with a heat tool as I crumpled them in my hand. Be careful not to burn your hand!

To assemble my flower, I alternated the yellow and blue petals adhering them with fabric glue. Be sure to offset the petals as you assemble the flower. Below is the process of adding one petal after the other and you can see the flower taking shape.


For the center of my flower, I drop a piece of hot glue in the center of a blue petal.

While the glue is still hot, (be careful), pinch the middle center of the petal with your fingers to form a small flower.

Using hot glue, adhere the small flower you just created to the center of your flower base. Viola! You have a beautiful pom pom like flower.

I finished my panel by adding the word, Explore using the Tim Holtz Alphanumeric 3/4" thinlits dies. I cut them out of manila card stock and inked the edges with Ground Espresso Distress Ink. I inked the edges of my base panel with Ground Espresso Distress Ink and began adding the other elements to my panel. I created a stick pin using Idea-ology Memo-Pins along with one of the Spellbinder's Tammy Tutterow Shortie Tabs and added a sentiment from Tim Holtz Small Talk stickers to the tab. I added a small piece of Tim Holtz Symphony tissue tape to the bottom of the balloon panel. I used burlap twine to add the globe from the Idea-ology Souvenir Adornments set and a Tim Holtz Word Band wrapping that around my entire panel. I adhered the flower to my panel, stuck the stick pin into the flower and called this piece done.
I hoped you enjoyed seeing the process I used to create my Explore The World mixed media panel. Please join us in all the fun and add your project to Simon Says Stamp's Monday Challenge Blog for your chance to win a $50 gift voucher to their amazing store.

For more inspiration, tips and tricks for all types of papercraft creations, follow Simon Says Stamp on:


You can find all the following supplies I used to create this project at Simon Says Stamp:


Gorgeous panel Cathie, the colours and whole design of this is fabulous! I love the flower, the colours are so pretty, LOVE it :-)
ReplyDeleteluv
Lols x x x
Such a beautiful piece! Always so inspiring Cathie...Hugs. Simona.
ReplyDeleteThank you! I appreciate your sweet comment.
DeleteCathie ♥
This is such a gorgeous artwork, Cathie. Love the beautiful texture on the background and the pretty flower. :)
ReplyDeleteOh yes! I absolutely enjoyed it! I am so impressed by this project I can't stop watching it. The way you made the main panel background is just amazing. The texture paste with the stencil and sprays gave so fabulous effect that I am speechless. This is a masterpiece! And the blues of the other panels are so perfect contrast. I am especially amazed by the embossed white/blue background text stamp. I was convinced the letters were embossed with blue on a white paper! What a surprise! I am really astonished! Thank you for this inspiration, Hugs, Marzena
ReplyDeleteHi Cathie - what a fabulous creation- in my favourite colour combination too! Love the scratched surface - now why had I never thought of that - great effect! Love the layers and the wonderful splattered background too. Thanks so much for the wonderful welcome to SSS this month - I very much appreciate it. Nikki xxx
ReplyDeleteThank you, Nikki! It's been fun having you on the team this month and seeing your amazing creations.
DeleteCathie ♥
Stunning card, Cathie! I love how you bring all your colors together so brilliantly with embellishments! :)
ReplyDelete*mwah*
Steph
Simon Says Stamp!
Love how you used the blues on this, so pretty.
ReplyDeleteThank you, Marci!
DeleteCathie ♥
Your work is just wonderful! I love everything you create.
ReplyDeleteAw, thank you, Betty! I really appreciate your sweet comment.
DeleteCathie ♥
This comment has been removed by the author.
ReplyDeleteThis comment has been removed by the author.
ReplyDeleteCame over from Simon to see the details. They're all wonderful, but I was really drawn to that flower!
ReplyDeleteCame over from Simon to see the details. They're all wonderful, but I was really drawn to that flower!
ReplyDeleteThank you, Marcie!
DeleteCathie ♥
This is such a brilliant project! And as usual, you've given me several ideas that I want to incorporate immediately! That flower puff-ball is amazing! It was also really neat to see Tim's font stamp in pastel tones. I'm so used to seeing that one in black and white and I loved seeing it in blue!
ReplyDeleteWowzers, Cathie! This is awesome! I love the speckled background you made, and the distressed edges. Your flowers are gorgeous!! Colors are beautiful too! hugs, Maura
ReplyDeletesuch a gorgeous panel Cathie and oh my giddy aunt that flower is just so beautiful...have a great weekend...hugs kath xxx
ReplyDeleteAnother wonderful tutorial for a great project ~ this is just gorgeous Cathie and I love those flowers! I've always wanted to make flowers using crinoline fabric but it's very hard to find in the UK and I can't source it but I love the fullness of your blooms, you've really made these come to life! <3
ReplyDeleteOh this is fantastic!! I love the colours you chose and your take on the theme!!
ReplyDeleteLove this color palette! Your flowers........FABULOUS! I adore them! Fantastic project and tutorial! Barbara
ReplyDeleteLove this color palette! Your flowers........FABULOUS! I adore them! Fantastic project and tutorial! Barbara
ReplyDeleteAmazing piece, Cathie! Love the hot air balloon, it's one of my favorite stamps of Tim! What a great technique with distressing the cardstock! The flower is gorgeous! Hugs, Sandra
ReplyDelete