

Hi Friends! Happy Monday to you all. I hope you had an awesome weekend. This week our challenge on the Simon Says Stamp Monday Challenge is to create a treat bag or box. As things begin to cool down here with temperatures in the 80s and 90s, (cool for us), it's exciting to see all the fall decorations making an appearance. With Halloween fast approaching, I decided to make a treat bag with a zombie that has personality. She's sort of a zombified rendition of Cruelle Deville from the movie, 101 Dalmatians. I dressed her up in jewels, a pretty hat with flowers and even gave her lips some pucker with lipstick. I hope you enjoy her and enjoy seeing how I created some of the elements for my treat bag.
Here she is:

Ms. Zombie sits on a treat bag created with the Tim Holtz In The Bag die held up with gear wheels. It's a sturdy bag that can hold several treats. The completed project is 7" x 4-1/4". Follow along below to see how I created the treat bag.

I cut my first bag out of Neenah Solar White 110 lb. cardstock. This is sturdy cardstock that provides enough stability to not only stuff the bag with treats, but sturdy enough to support all the elements I used to decorate the front of the bag.

I cut another bag out of one of the card stock sheets from the Tim Holtz Materialize 8x8 card stock collection. The 8x8 piece of cardstock was just big enough to create the bag. It's a very tight fit so you need to be aware of where the left and right side of the cardstock sits on the die. I actually had to put the two ends right on the cut line.

I creased both bags on their crease lines with a bone folder and then placed the patterned paper bag on top of the white cardstock bag and adhered that with a strong glue from a glue runner. You need to work with it a little to make sure all the edges fit together. It creates a wonderfully sturdy bag where the candy will not tip the bag over or fall out the bottom. I used very strong double sided tape 1/4" Scor-Tape to adhere all the edges together. I set this aside and began working on Ms. Zombie.
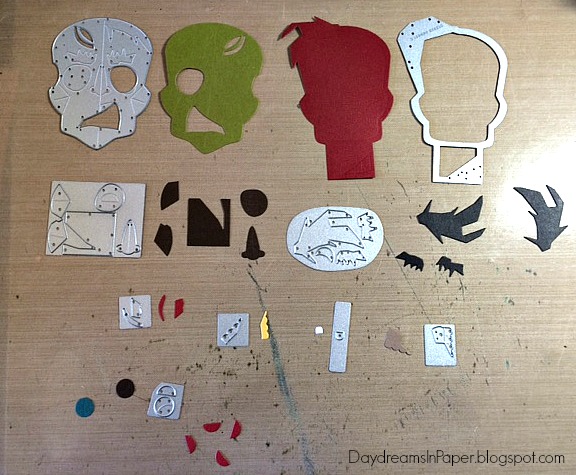
The first thing I did was plan out my Zombie. I selected all the colors I wanted to use to create her and began cutting them out of the Tim Holtz Zombie Thinlits die set using the Kraft-Core Nostalgic Cardstock Collection.

After cutting the base for the face, I removed the hair where I will place the hat and adhered the neck with its scar.

I adhered all the pieces of the face using Ranger Multi Matte Medium. I like this glue because it won't leave behind a shiny residue. To create the lips, I cut out three pieces from the center of the left eye die and placed them along the open mouth area as shown above. I also trimmed a little off the bottom of the eyebrows to give them a more feminine look before attaching them. For the silver tooth, I used Brushed Pewter Distress Paint. To create her hair, I used the hair die, that is included in the set, and cut out three of them from black Kraft-Core cardstock. To get a better idea of how each piece is cut out and fits on the zombie's face, there are excellent videos on YouTube showing the process.

Here you can see the completed zombie.

I wanted to add earrings to Ms. Zombie so I poked a whole with the Tim Holtz Craft Pick Tool. Remember to use a self healing craft mat when piercing the ear.

I created the earring with a Tim Holtz Jump Ring and attached a spider from the Idea-ology Wicked collection.

For her necklace, I used extra thin metal wire and added one of the Tim Holtz Halloween Typed Tokens in between some black beads. I attached that around the neck and twisted the wire to tighten it.

To create the hat, I cut out two coffee lids from the Tim Holtz Fresh Brewed Bigz die set. I used the coffee lid pictured on the left. It's hard to see because it shows it cut out of clear plastic. I cut the orange and black pieces out of Tim Holtz Halloween Deco Sheets. On the black hat, I cut the strip along the bottom and used that as trim for the orange hat.

Here, you can see the completed hat.

To create the wheels, I used two gears from the Tim Holtz Gearhead Thinlits die set. I cut the black gear out of Neenah Solar White 110 lb. cardstock and colored it with Black Soot Distress Ink. I used this cardstock again for stability. The wheels will not collapse under the weight of the candy in the bag by using this thick, sturdy cardstock.

I adhered the two gears by offsetting them to create a wagon wheel type wheel. The kind you see on old covered wagons. I adhered them with Ranger Multi Matte Medium.

I adhered the wheels to the base of the treat bag using hot glue and used Idea-ology Nailheads to adorn the center of the wheels. I adhered the nailheads with Ranger Multi Matte Medium.

I attached the zombie head to my bag using hot glue.

To finish off my treat bag, I added the Tim Holtz Dripping thinlits die along the base of the zombie, some Tim Holtz Materialize Design Tape and one of the pieces of ephemera from the Tim Holtz Curiosities Ephemera collection. I also added a pretty black flower to her hat using the Tim Holtz Tiny Tattered Florals die set.
I hoped you enjoyed seeing the process I used to create my Ms. Zombie treat bag. Please join us in all the fun and add your project to Simon Says Stamp's Monday Challenge Blog for your chance to win a $50 gift voucher to their amazing store.

For more inspiration, tips and tricks for all types of papercraft creations, follow Simon Says Stamp on:


You can find all the following supplies I used to create this project at Simon Says Stamp:


Fabulous creation Cathie! I love how you put all of the elements together to create this super spooky bag! the spider earrings made me smile, I might just copy that idea for myself for Halloween! ;-)
ReplyDeleteluv
Lols x x x
What a super cute zombie lady! Love the spider earrings you added to her, Cathie, and the necklace is oh, so perfect! Then you put her on wheels! Awesome!! maura xx
ReplyDeleteThe jewelry was such a great detail, just love her!
ReplyDeleteThis made me smile! So cleverly put together, Cathie! :)
ReplyDelete*mwah*
Steph
Simon Says Stamp!
Oh my! This is simply amazing! I love your Ms. Zombie she's such an elegant lady :-) Perfect design and geat composition. Love all the colors. Hugs, Marzena
ReplyDeleteLove your beautiful creation, Cathie. The zombie is fantastic! Love it! :)
ReplyDeleteYour interpretation is just what this die needed! I love her cloche hat and stylish hairdo and the jewelry is to die-for! Super creative genius.
ReplyDeleteYour interpretation is just what this die needed! I love her cloche hat and stylish hairdo and the jewelry is to die-for! Super creative genius.
ReplyDeleteOh wow, Cathie! This is amazing! Love Ms Zombie! She looks fabulous with her glitter hat! And love her ride! Her fine jewelery looks stunning! It's gorgeous! Hugs, Sandra
ReplyDeleteCathie this is a masterpiece! Every detail in this project is brilliant! Jewelry you've created is AMAZING! .... wonderful!!!! BArbara
ReplyDeleteCathie this is a masterpiece! Every detail in this project is brilliant! Jewelry you've created is AMAZING! .... wonderful!!!! BArbara
ReplyDeletewow this is amazing...you sure created on sassy zombie lady...hugs kath xxx
ReplyDeleteSuch a great treat box, Cathie and I love how you've accessorised the Zombie to become a very sophisticated lady with her glitter hat...fabulous work, as always! <3
ReplyDeleteHoly cow! What a wizard (wizard-ess?) of shapes you are! I can't believe you made a zombie look stylish! I'm so impressed with the versatility of ideas you give us week after week.
ReplyDelete