

What a fun challenge this was for me as I created a background with layer upon layer of inky goodness. Putting together a background for a mixed media project is easier than you think. Join me, and I'll show you just how easy it is.

Before we get started, don't forget to play along and show us what you created. Link your project to the Simon Says Stamp Monday Challenge Blog for the "April Showers Bring May Flowers" theme and you could win a $50 gift voucher to Simon Says Stamp. How cool is that?!?

Now, let's get started with some layered background mixed media fun!
The first step is to choose your paints. I started with a piece of white chipboard and decided to go with Dylusions Paints.


Don't let this process scare you if you are new to mixed media backgrounds. There are no mistakes. Just paint with your fingers and let them go where they want. Do you remember what it was like to finger paint when you were a child? Do you remember thinking about where to put the paint while you were painting with your fingers? I didn't think so, and that's what I'm talking about. Put on some music, revert back to your childhood and let your fingers loose and have fun with the process. Make sure to choose paints that will not turn muddy or brown when mixed together. Here, I stuck to a cool palette in greens and blues.

I added some white highlights with Dylusions White Linen.

Now it's time to start layering with stamps, stencils, pens and ink. Here I added some of my own hand drawn doodles with a White Signo Uniball Gel Pen and stamped some scribbles from a stamp from Dyan Reaveley's Graphic Backgrounds stamp set.

I'm continuing to add more stamps with coordinating ink. These stamps are from Tim Holtz Mixed Media and Mixed Media 2 stamp sets.

I want to add more white to my background so I added some white circles using Lawn Fawn Yeti Pigment Ink through a Wendy Vecchi Ornate Dots stencil. By adding white, this will allow the focal elements on my canvas to pop, otherwise, they would get lost in the blue and green background.

I decided to add some splatters to my background. To get the paint to splatter smoothly, I've found that if I dilute the paint, I can control the splatters a little better. I diluted Black Soot Distress Paint with water and loaded my Tim Holtz Splatter Brush with the diluted paint. I gently flicked the bristles over the background with my fingers making sure to move the brush closer and then farther away to get different sizes of splatters. I wanted some large splotches, so I loaded the brush with paint again and while holding the handle, flicked my wrist over the canvas. This is how I got those beautiful large splotches on the background.

After everything was dry, I decided to continue layering with more stamps. I wanted to add some contrasting colors, so I chose Orange Blossom and Buttercup Archival Ink with some of the stamps from Paper Artsy's Eclectica 3 stamp set.

Now it's time to create my flower for the canvas. I used a stamp set from Wendy Vecchi called large collage. This was a background stamp that I fell in love with because I loved all the mixed media images in the stamp. I wanted to use them all separately though so I cut the stamp set apart. I used these images to create the petals of my flower. You can use any mixed media stamps you may have on hand.

Here are all my stamped images for the petals. I drew a flower petal on a piece of card stock, in the size I wanted, and cut that out to use as a pattern piece.

Here you can see where I laid the flower pattern piece on the stamped images and traced around it using a Ranger Fude Ball 1.5 pen. For the darker images, I traced with a White Signo Uniball Gel Pen.

After cutting out each petal with my Tim Holtz Scissors, I inked each petal with Rusty Hinge Distress Ink on the outer edge of the petal and Carved Pumpkin Distress Ink on the inner edge of the petal with a Tsukineko Sponge Dauber. These are nice and small and perfect for inking the petals.

I attached each petal on the back side of a 3/4 round circle with adhesive making sure to put the pointed end of the petal in the center of the circle. I turned the flower over and attached another 3/4 round circle to the center of the flower for stability and added some texture paste, thick as frosting.
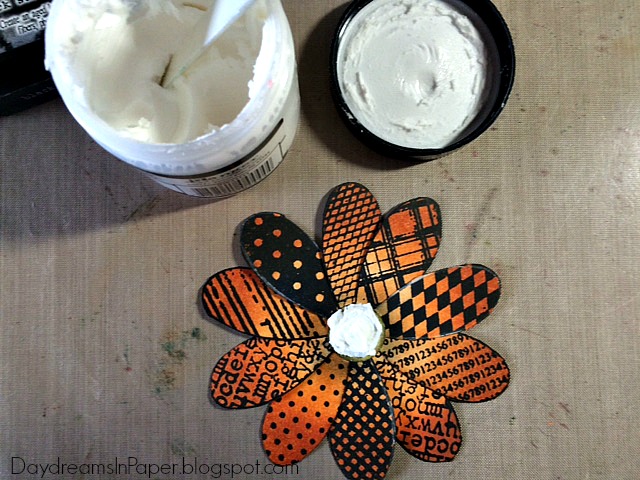
To create an ornate flower center, I gently pushed some black beads into the thick texture paste and sprinkled some Prima Copper Micro Beads into the texture paste also and allowed that to dry. The texture paste dries white, so I dripped some Sunshine Yellow Alcohol Ink over the center of the flower to color the white paste a very dark yellow.

I created my sentiment on a piece of black card stock by handwriting it with a White Signo Uniball Gel Pen. I spaced the words far apart because I wanted to cut each word out individually.

Here, I attached them to my canvas by brushing the back of the words with Ranger Multi Matte Medium and placing them on my canvas.

I stenciled some raindrops on my canvas with Wendy Vecchi White Embossing Paste and a Prima Rain Drop stencil. You can find an alternate raindrop stencil here. I drew a cloud onto white card stock, cut it out and stamped it with the sentiment stamp from Paper Artsy's Thoughts stamp set. I inked the edges of the cloud with Jet Black Archival Ink. I used Paper Artsy's Eclectica 3 ELB15 for the flower stem and inked the petals and stem with Fern Green Archival Ink. I added a few more doodles by hand on one side of the stem and shaded around the sentiment with a Black Licorice Gelato, smudging the pigment with my finger tips around the words. And that's it! My project was done.
Here again is my completed canvas:

Thanks for sticking around to the end and I hope you enjoyed seeing the process I went through to make this mixed media canvas. If you have any questions, please don't hesitate to contact me, I'd be happy to answer any questions you may have about the process, product or anything else you have on your mind.
For more inspiration, tips and tricks for all types of papercraft creations, follow Simon Says Stamp on:


You can find all the following supplies I used to create this project at Simon Says Stamp:


Gorgeous canvas Cathie, the colours and whole design of this is beautiful. I love the bright colours and all the details, you have lovely handwriting too! altogether perfect! :-)
ReplyDeleteluv
Lols x x x
WOW! Great project, Cathie! I'm loving the vibrant colors and great texture :)
ReplyDelete*mwah*
Steph
Simon Says Stamp!
This is such a gorgeous creation, Cathie. I love the beautiful bright colors and the fabulous patterns you created on this piece. :)
ReplyDeleteWhat a great painted background. The flower was an amazing idea! I love the colors and all the patterns on the background, there are so many details to admire. Hugs, Marzena
ReplyDeleteCathie, I love how bright the colors are on your tag, and the oranges and blues are wonderful. Love how yow you did your flower petals,
ReplyDeleteWow wow wow! Love this work Cathie! Your flower is incredible, love so much! Colors are stunning, Dylusions paints are amazing and you've used them in a wonderful way!BArbara
ReplyDeleteWhat a fantastic piece of art, Cathie! The details are just stunning and your flower looks fabulous ~ thank you so much for sharing the creative process behind this beautiful piece! <3
ReplyDeleteThis is so pretty, Cathie! The background is amazing, and so it the gorgeous flower. Hugs, Sandra
ReplyDeleteI absolute love the way you made the flower! Whata wonderful project cathie xxxx
ReplyDeleteWOW! So many incredible steps went into making this project! You are truly a Queen of Layers and I always enjoy seeing how you got from Point A to Point B. Such a cool combo of stamps and colors here! LOVE IT!
ReplyDeletethis is gorgeous! the flower is perfect!
ReplyDeleteThis is so stunning Cathie! I love the vibrant background and the stamped flower petals are amazing.
ReplyDeleteThis mixed media rocks! And I do love dylusions paints, their color just pops to me.
ReplyDelete